YARD/HOME PROJECTS AND REPAIRS 2021This is
a catch all page for yard projects and the maintenance of yard equipment
such as the lawn tractor, Troy-bilt tiller, home generator, weed trimmer, leaf blower and all home maintenance whether corrective or preventative!
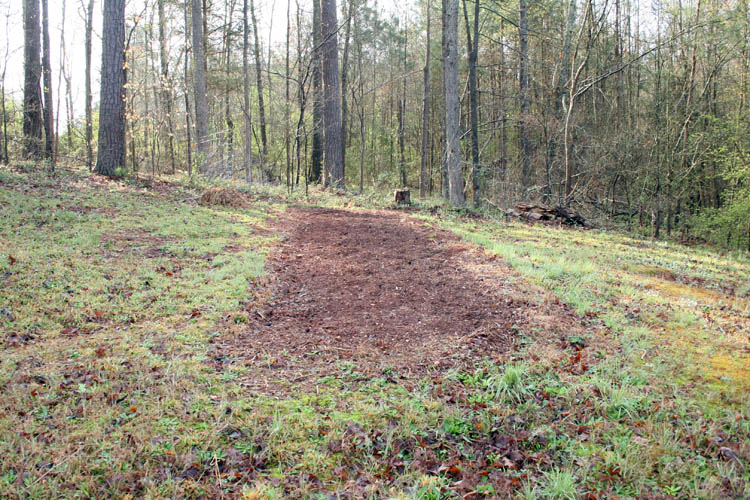
TOMATO PATCH
A couple weeks ago around March 19th; guessing at the date, I fired up the
antiquated Troy-Bilt tiller and tilled the soil for the tomato patch.
It tilled up pretty good and the moisture content in the ground was perfect,
whereas the red clay mixture wasn't sticking to the tiller tines. I do no plan
to place any tomato plants in the soil until April 15th and that depends on
the temperature.
I need to put some 10-10-10 fertilizer on the tomato patch along with a
couple bags of sand and some ground up egg shells I have been saving for the
past year and till it one more time before getting the tomato plants into
the ground.
We have certainly had some variable weather conditions and seems like
Spring didn't want to arrive due to the late frost and freeze we recently
experienced and we have had our fair share of rain too!
I have plenty of annual routine maintenance to get done including the
lawn tractor and other small engines such as the leaf blower which didn't
start the last time I tried to start it and due to my hernia surgery, I didn't want to
mess with it. I need to service my weed trimmer, chainsaw and
generators.
Seems like there is something that needs attention most of the
time........grin if you must.
Web page created by Bill aka Mickey Porter on 03-26-2021.
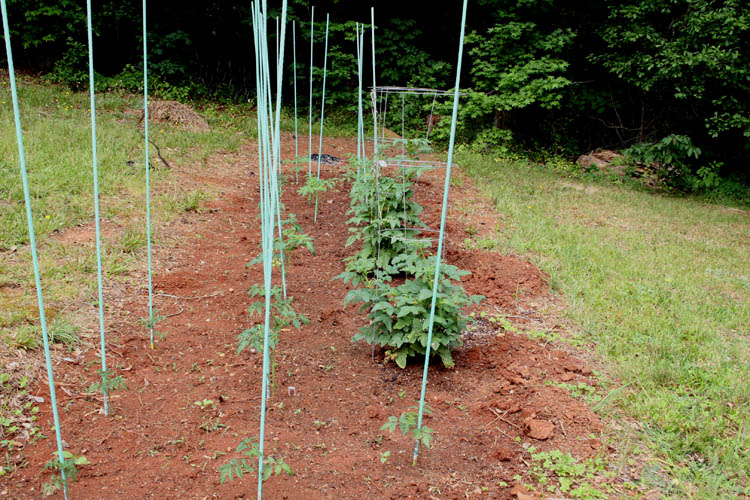
XANDER
HELPING PLANT TOMATO PLANTS
Xander McKnight Gonzales our youngest Grandson helped me get twenty (20)
tomato plants in the tomato patch on 04-17-2021.
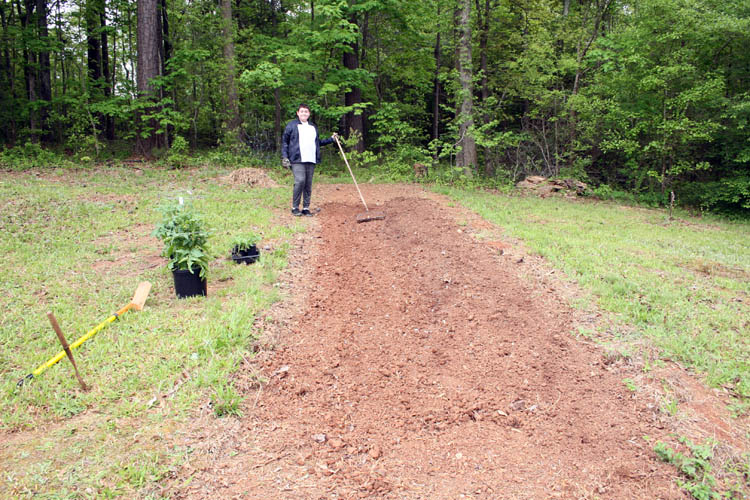
Xander raked the planting area flat/level.
Check out Xander's Bucket tomato page hyperlinked
here:
We both were ready for some R & R after getting
those tomato plants in the ground.
Web page updated by Bill aka Mickey Porter on
04-18-2021.
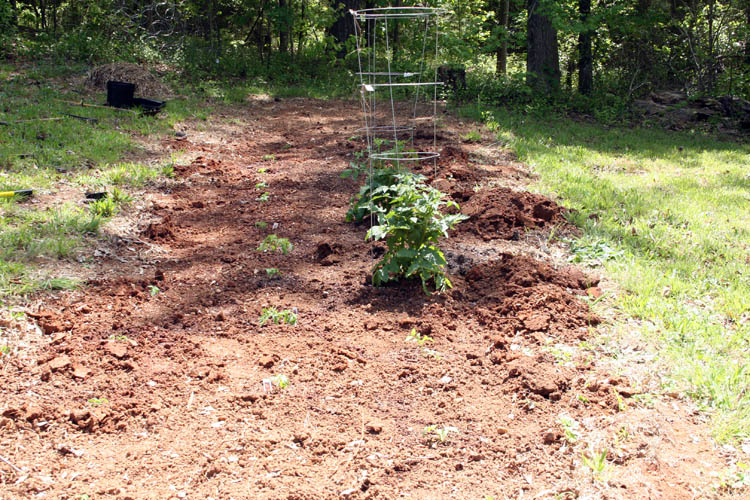
TWO FROSTS SINCE PLANTING THE TOMATO
PLANTS
It is hard to believe we have had two (2) frosts
since planting the above tomato plants, whereas I lost at least three (3)
plants and one of the larger plants was killed back about half way due to
the frost.


Web page updated by Bill aka Mickey Porter on 05-29-2021.
TOMATO PLANTS
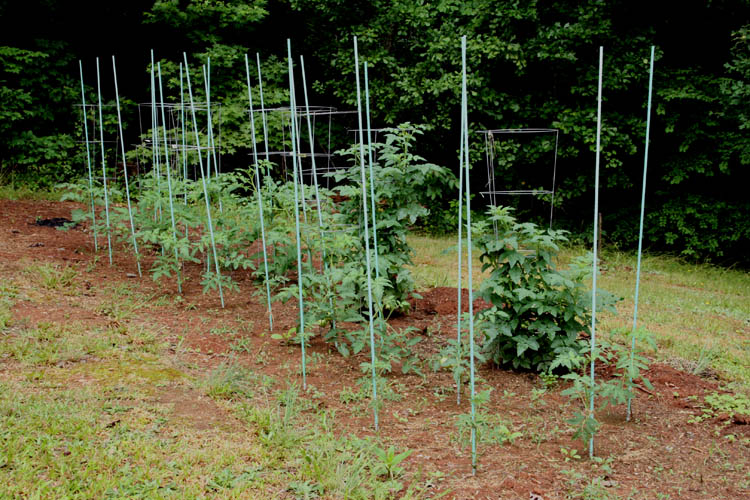
Above pix taken on 06-07-2021 and my bride has enjoyed 9.5
cherry tomato sandwiches and 1 Club sandwich on 07-06-2021 and I have
enjoyed 6.5 tomato sandwiches to date, however the slicing tomatoes has several more
weeks before they start turning that
"beautimous" cherry red color destined for a
club sandwich,
blt and regular
tomato sandwich.
Web page updated by Bill aka Mickey Porter on 07-06-2021.
NOTE: Due to my right arm distal radius fracture on
04-19-2021, I haven't taken many pixs with the ole Canon DSLR camera.
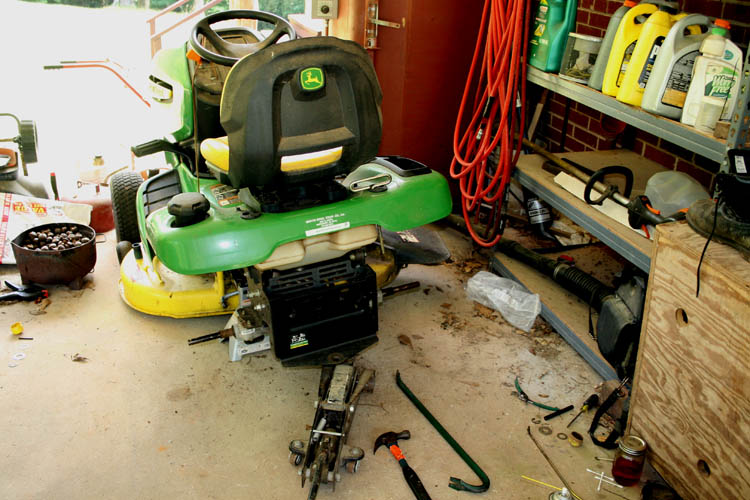
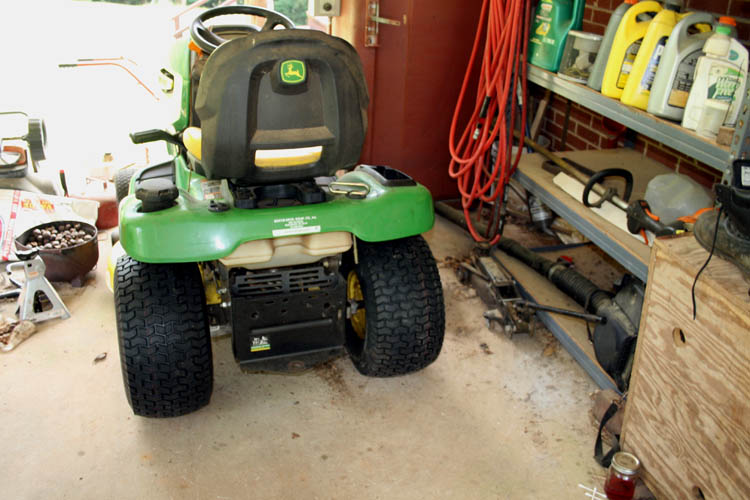
LAWN TRACTOR ANNUAL MAINTENANCE
The weather has been gorgeous the past few days with the temperature in
the low to mid 70s and a perfect time to get the lawn tractor serviced by
yours truly.
The lawn tractor battery back in colder weather was weak would not turn
the engine over and hooked the truck battery to it without running the truck
and got it started and let it run for a good while and the battery
maintained a charge.
On April 2, 2021, the lawn tractor cranked ok and drove it to my deer
hanging tree I nicknamed Tom Dooley aka Dula after the Kingston Trio song
Tom Dooley, of which I use to hoist the front of the lawn tractor up in
order to remove the blades for their annual sharpening.
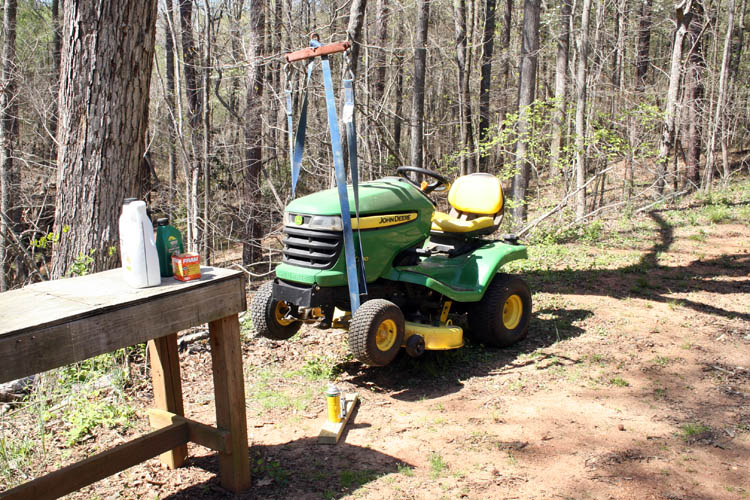
After removing and sharpening the blades and getting them back onto the
spindle bearings, I lowered the lawn tractor down and proceeded to change
the oil filter, oil, spark plugs, air filter and the in line gas filter.
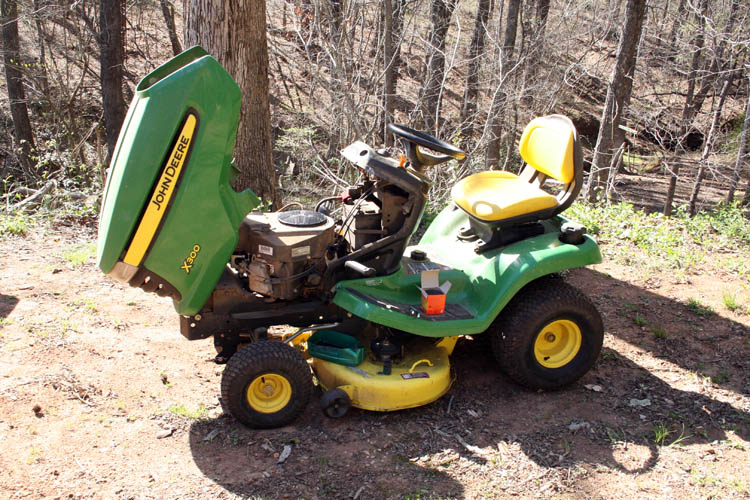
Everything was going along real well until it got time to change the in
line gas filter of which I will later take a pix of its current location.
The left side of the filter is way down in the frame and it is difficult to
get pliers onto the spring clamp to remove the gas filter.
Well, I finally got it removed and instead of using a regular John Deere
gas filter, I went frugal, OK cheap and purchased a bag of generic gas
filters that was supposed to work for the John Deere X300 lawn tractor.
The gas filter looked nearly identical, however there was some difference in
the protruding stem on each end of the gas filter. I noticed when I
placed the generic gas filter back in the gas fuel line, it went on much
easier than the original one that came off. That should have been a
tip off that it was a little smaller size wise.
The engine cranked up with ease and I immediately noticed that air
bubbles was inside the clear plastic gas filter and in short order the
engine came to a halt. The engine would not fire and disconnected the
pulse fuel pump and with the engine turning over, but not cranking, there
was no fuel coming from the fuel pump. I tried to pressurize the fuel
tank with the air hose and a plastic bag, but that didn't help out,
therefore it was my thinking the fuel pump was the problem.
It was getting late and decided to stop until the next day, getting a
battery and fuel pump from John Deere in Polkton, NC and also a can of
starter fluid from one of our local auto parts stores.
I got the John Deere X300 owners manual out and it was hard to believe
that the lawn tractor was seven (7) years old and the original battery was
still in the lawn tractor. Prior to this lawn tractor, my bride and
myself used a Troy Bilt lawn tractor for around 20 years before giving it to
our oldest daughter and the only problem with it then was a clogged fuel
line to the carburetor. I had Pinkston here in Wadesboro, NC to
service it and one of their technicians broke the deck lift bracket
mechanism which didn't keep it from working.
The following morning, I went to the John Deere dealership in Polkton, NC
and purchased a battery and a fuel pump, stopped by C & M Auto and purchased
a can of starter fluid. I put the original John Deere in line gas
filter back on, installed the new battery and sprayed the starter fluid into
the carburetor intake and turned the engine over. The engine
immediately fired and let it run a good while, therefore the pulse fuel pump
was not the culprit, only air in the gas line and now I have a spare pulse
fuel pump for the X300.
I later went back to the John Deere dealership and purchased a six (6)
inch length of 1/4 inch inside diameter gas line hose and will extend the
gas line filter out away from the frame to make it easier to change the gas
filter; e.g., "work smarter not harder."
IN LINE FUEL FILTER ORIGINAL LOCATION
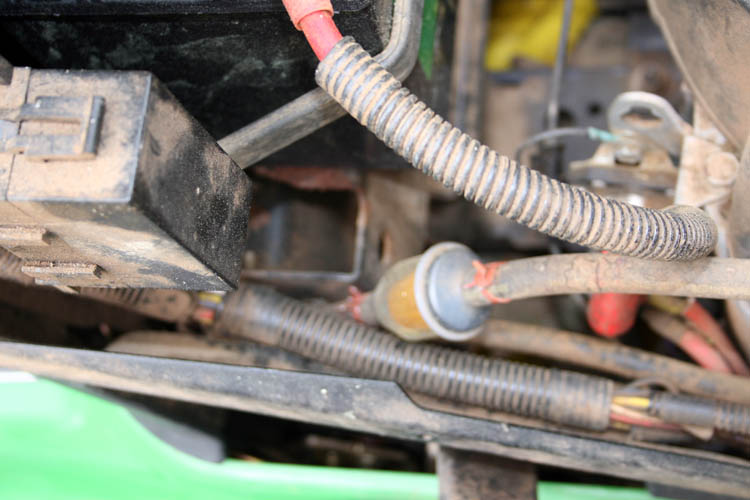
The above pix is a little out of focus, but you can see how close the
left clamp and fuel line clamp is wedged into the frame and a pain in the
rear to get pliers onto the clamp to relieve pressure in order to remove the
in line fuel filter.
FUEL FILTER RELOCATED
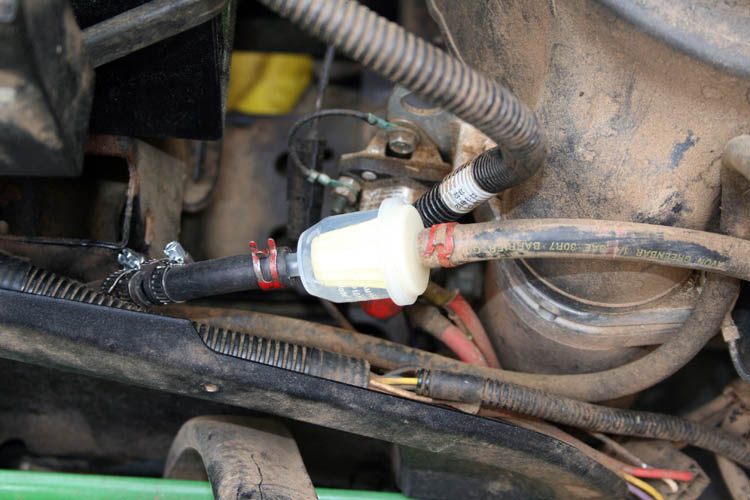
The new 1/4 inch inside diameter fuel line was
"tighter than two coats of
paint" and unable to push the fuel filter all the way into the fuel line
extension. The larger portion of the stepped stem on the fuel filter
is close to 5/16 inch outside diameter.
Web page updated by Bill aka Mickey Porter on 04-09-2021.
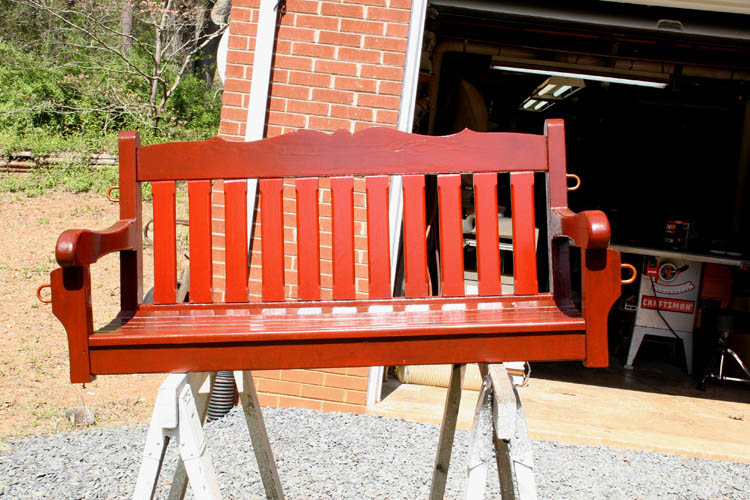
STAINED THE YARD SWING
As stated earlier, the weather has been gorgeous and our
hanging yard swing
has been in the basement woodworking shop, of which I had already cleaned it
with Mineral Spirits.
I used a redwood oil type based
stain TWP 102-5 from
SealandProtect.com and used my
spray gun to apply
the sealant. The finish is curing out as I type and will probably take
several days to properly cure before I hang it back up in the front yard.
HUSQVARNA FARM MODEL 55 CHAINSAW
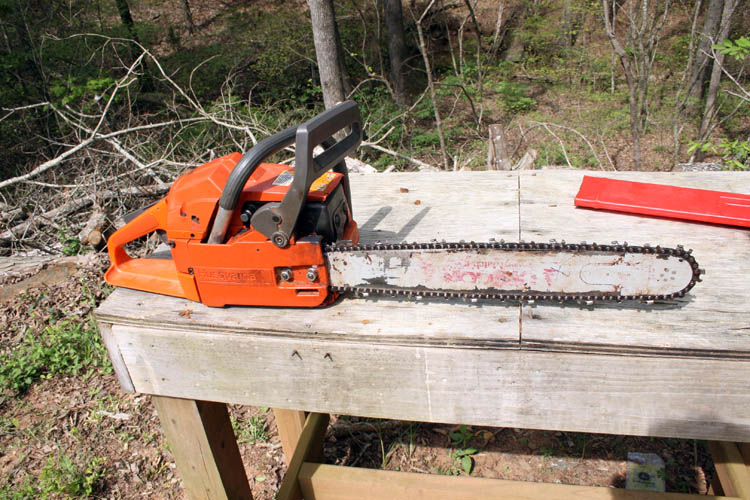
With plenty of daylight left, I replaced the worn Oregon chain on the
Husqvarna Farm Model 55 chainsaw. I don't know how many times I have
sharpened the chain, but the teeth were worn way down and cutting badly and
time to stop being so frugal.
Later model Husqvarna chain saws has the side chain tension adjustment
which is a big help!
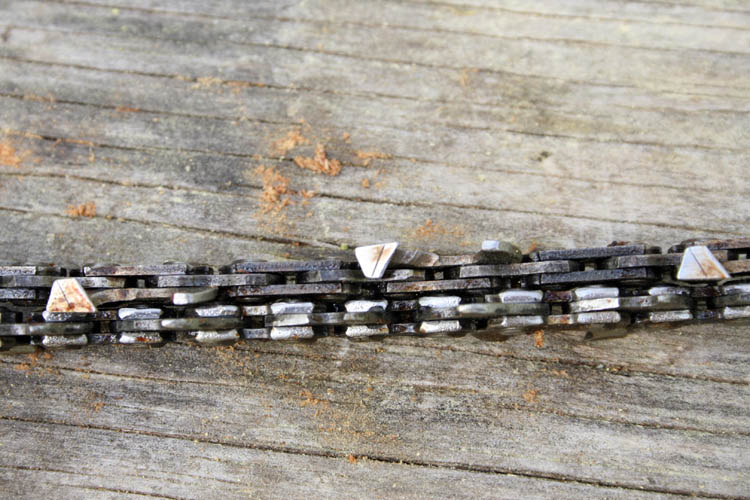
I don't know how many years the above chainsaw chain has been in service
and for many years I sharpened the teeth by hand and many times the chainsaw
would cut at an angle or bias which meant I sharpened the teeth unevenly as
evidenced by the individual teeth length above in reference to the angle
line stamped into each tooth.
I later purchased a cheap Harbor Freight chainsaw motorized chain
sharpener which works ok, but definitely not for production
work.............grin if you must!
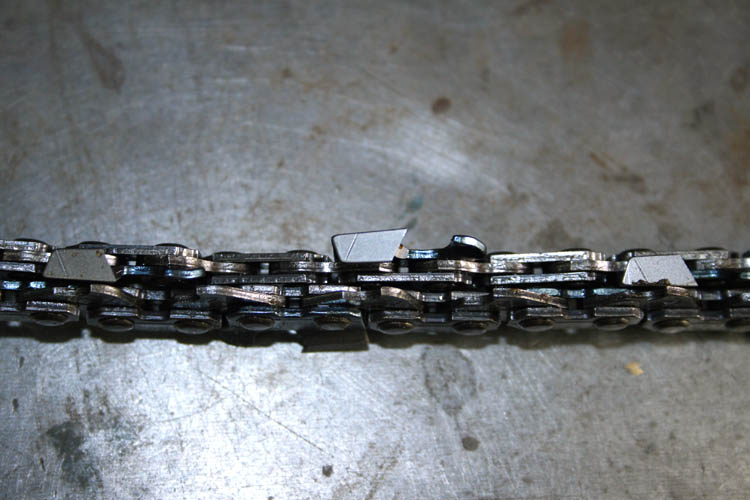
Above is pix of a new chain and you can see how much the worn chainsaw
chain was sharpened.
If my memory is correct, I purchased the Husqvarna chainsaw in the fall
of 1999 before we had a major
blizzard in the year 2000.
I doubt I will change the spark plug since the chainsaw got very little
usage last year, but I might get energetic and do a complete annual
maintenance on it.
Next on the agenda will be to service the weed trimmer, leaf blower,
tiller and portable generators. Yesterday, I got the oil and filter
changed in the truck and gave it a good scrubbing with Dawn to get rid of
all the gunk accumulated over the winter months from parking under the trees
in our lower driveway.
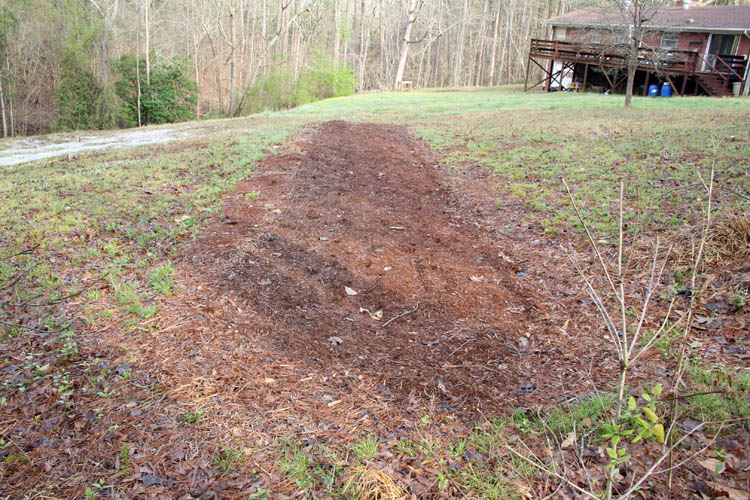
Today, 04-09-2021, I tilled the tomato patch again and plan to purchase
tomato plants around the 15th and get them in the ground.
I also cut the lawn, which is mostly weeds, onions and clover and sprayed
three (3) gallons of Ortho weed killer solution on the clover to help the
grass get jump started.
Web page updated by Bill aka Mickey Porter on 04-06-2021 and 04-09-2021.
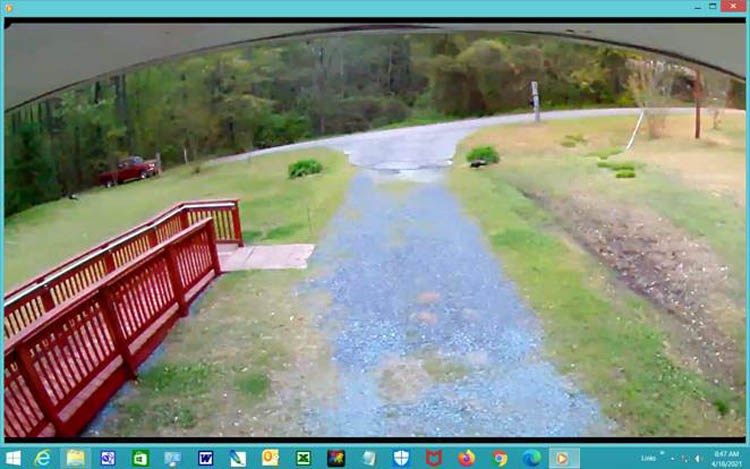
DRAINAGE PROBLEMS
Back around the first of April or earlier, I noticed there was a good
amount of water collected on the right side of our driveway and thought it
might be from all the recent rains that we had.
However, during a couple weeks of practically no amount of rain,
the area would dry up during the heat of the day and then the following
morning the water would be back.
Below is a screen capture from one of our security cameras on April 9,
2021 showing the drainage problem:
While doing some weed trimming on some of the high spots, of which it was
too wet to use the lawn tractor, I noticed the area was very damp going up
the hillside adjacent to the road on our property. Upon further
investigating, I noticed water running slowing in the drainage ditch across
the road and it was originating from under the lower driveway at our
neighbor's home Pat Hildreth.
I called the Wadesboro City Hall and got up with the water utilities
department and talked with Hugh James and he later came out and ascertained
there was a break in the water main line causing the water problem.
The next day or two, a crew came out and dug the line up and found the
damaged 2 inch in diameter water line and repaired it with a couple sleeves.
It took a few days before the area above started drying out and will be
able to mow the area with the lawn tractor.
Web page updated by Bill aka Mickey Porter on 04-18-2021.
LAWN TRACTOR REAR TIRES REPLACED
Several days ago while cutting grass, the left rear lawn tractor went
flat. It appeared the tire was dry rotted, whereas the rear tires were
the original tires that came on the John Deere X300.
I had Danny Bowers at Moore's Garage order me a couple 20x10x8 tires and
he said they would be delivered on 06-07-2021.
The rear tires and rims had never been off the axle and I did not think I was
going to get the right rear tire to come off the axle. I applied a
couple lubricants; e.g., RemOil and Kroll Oil which is a super product for
loosening stubborn bolts/nuts. I used a hammer and beat and banged on
the tire and rotated the tire and beat some more and it finally started releasing the
hub from the axle.
It was hot and humid and I was about soaked to the bone with
perspiration! I am glad no one was down wind from me.............grin
if you must.
After getting the tire/rims off the axle, I sanded the rusty spots and
lubricated the axles before installing the hub/tires after getting the new
tires installed.
I am still using mainly my left arm and hand since my right arm was
broken on 04-19-2021 which required surgery, two plates and eight (8) screws
to secure the broken distal radius bone which is hyperlinked here:
https://www.portercalls.com/broken_arm.htm
of which a second surgery is required to
remove the top plate and screws in order for my wrist to be able to bend.
After that challenging ordeal with the stubborn
tire removable, I finally got them back on the axle. In the mean time
while beating and banging on the right rear tire, I knocked the transaxle
lever rod loose from the lever to disengage the transmission and will try
and figure out where the rod is attached. I will probably go to our
John Deere dealership in Polkton, NC and hopefully get some pro bono
advice/help.
On 06-10-2021, I called the John Deere Dealership in Polkton, NC and was
put on hold for a good amount of time and was finally transferred to their
parts department, of which no one answered.
I decided to go ahead and "wing"
it so to speak. I scotched the front end of the lawn tractor wheels
and jacked the rear end up and placed jack stands under the rear axles and
it was easy to ascertain where the transaxle lever rod fitted into a
pivoting horizontal bracket on the top of the transmission.
I tested it out and this was an easy fix.
Web page updated by Bill aka Mickey Porter on 06-07-2021 and 06-11-2021.
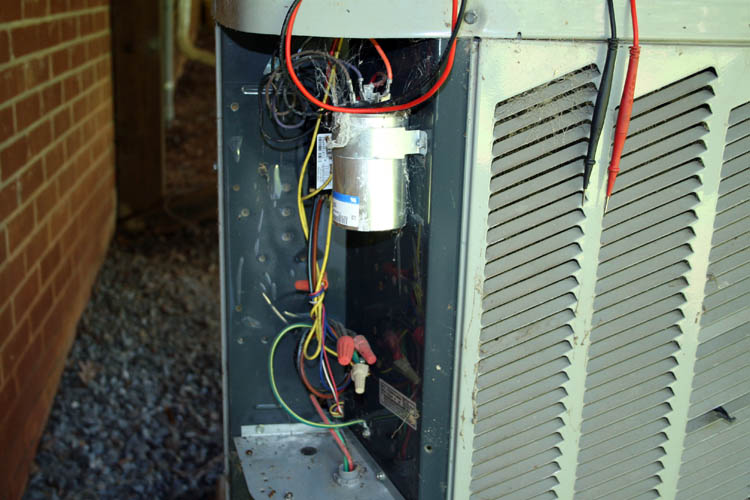
TRANE AC UNIT
Our Trane cooling unit stopped working on 06-20-2021 in the afternoon.
The inside heat/cooling exchanger blower was running, but the outside unit
was not running.
I checked the 30 amp breaker at the main service panel and ascertained
with a voltage meter that 240 volts AC was getting to
the unit disconnect box and could hear the contactor relay making a
buzzing type sound. With no spare parts and no experience working on
AC units. I called Marvin Goodwin who is in the rental property business
now, but does service units that he installed while he was in the heating and air
conditioning business.
Marvin stated that he would come by the following morning and take a look
at the unit.
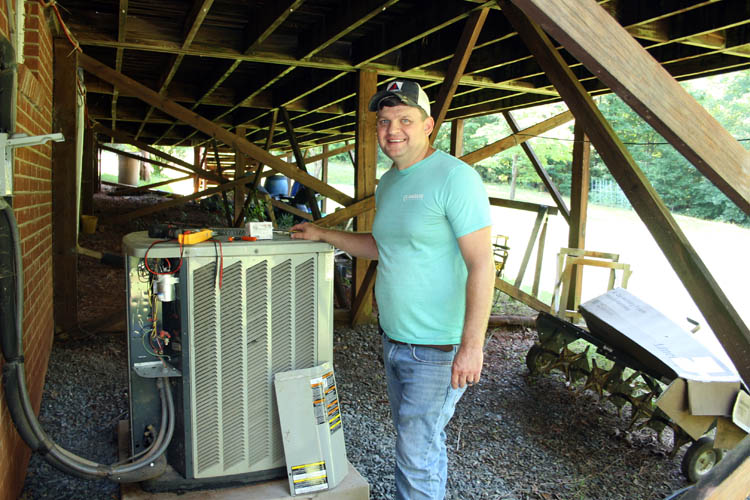
It didn't take Marvin but a minute or two to determine the contactor aka
relay was bad and replaced the contactor.
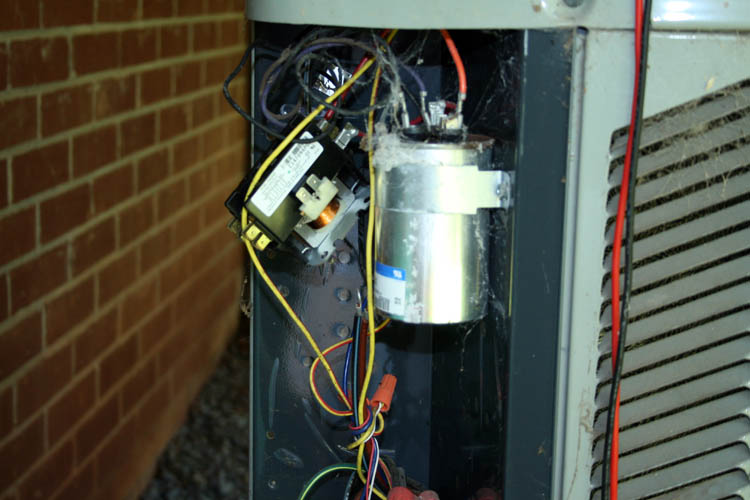
The replacement contactor Marvin used did not have the spade/lug type
terminals and cut the matching connectors from the wiring harness and
stripped the wires for wrapping underneath the contactor screws.
I believe Marvin's total service time was around thirty (30) minutes and
glad he repaired the unit. There was some ants inside the unit and I
got Marvin some Raid Ant and Roach spray to send those suckers packing.
Web page updated by Bill aka Mickey Porter on 06-21-2021.
SLICING TOMATOES
I harvested a few slicing tomatoes on 07-16-2021 and below is a pix of
the largest one:

That mojo tomato is four (4) inches across.
Web page updated by Bill aka Mickey Porter on 07-16-2021.
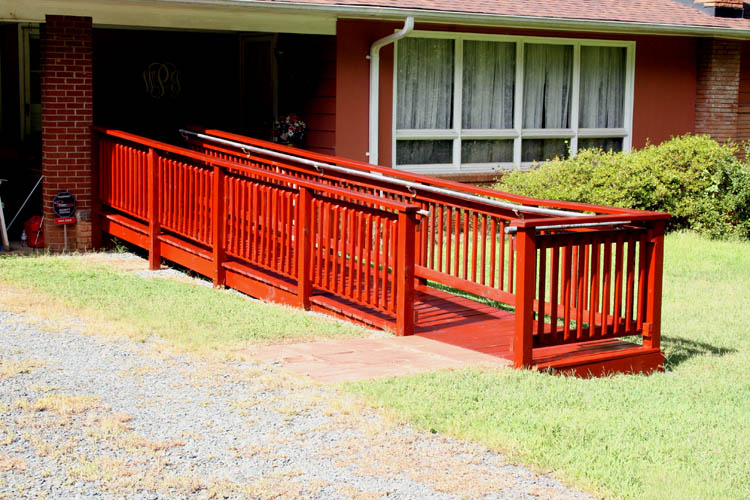
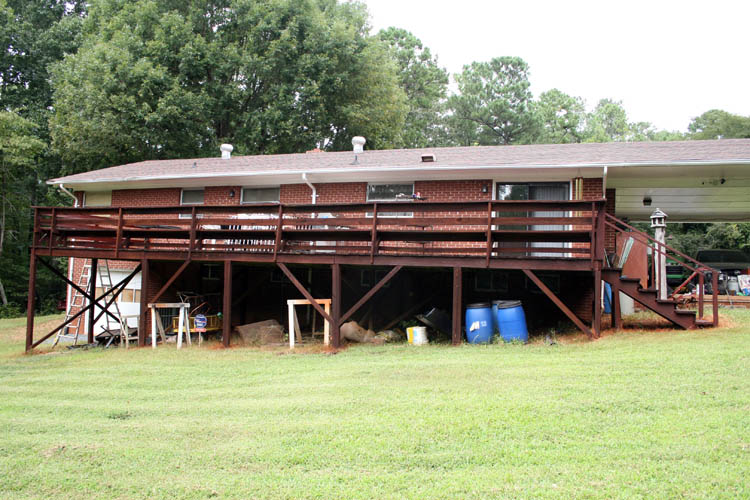
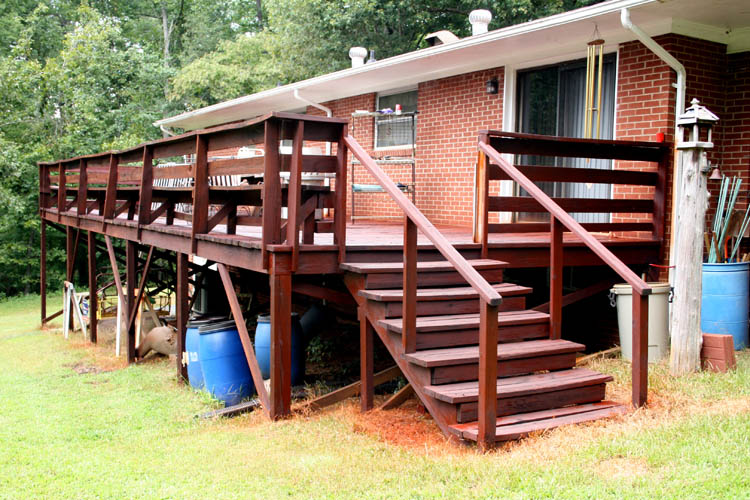
STAINING WHEELCHAIR RAMP
With the upper plate and screws removed from my
broken arm on July 28,
2021, I am able to bend my wrist and gaining some strength back into the
wrist/arm, therefore completing much needed yard work such as weed
trimming, etc.
Our wheelchair ramp and deck were long over due for staining and started
staining the wheelchair ramp on or before the week of August 23rd using an
oil type based stain TWP 100 from
SealandProtect.com.
It has been extremely hot and good for the redwood color stain to
penetrate the treated wood, but the temperature and humidity is rough on the
human body. It took me
about seven or eight installments of working about an hour each morning to stain the
wheelchair ramp. I started by staining the outside upright pickets
with a small roller and would do a couple sections at a time and take the
rest of the day off.......grin if you must.
Below is a pix of the wheelchair ramp after staining taken on 08-30-2021:
THE STAIN IS WORKING
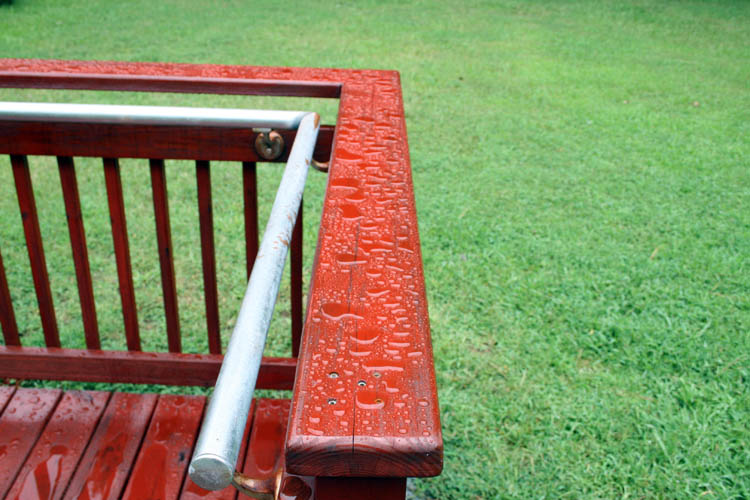
We have had a couple good rains since the wheelchair ramp was stained and
the water is beading up very well. The ultraviolet light from the sun
takes a toll on outside wood products which readily cracks and checks, even
protected treated wood such as above.
Web page updated by Bill aka Mickey Porter on 09-01-2021.
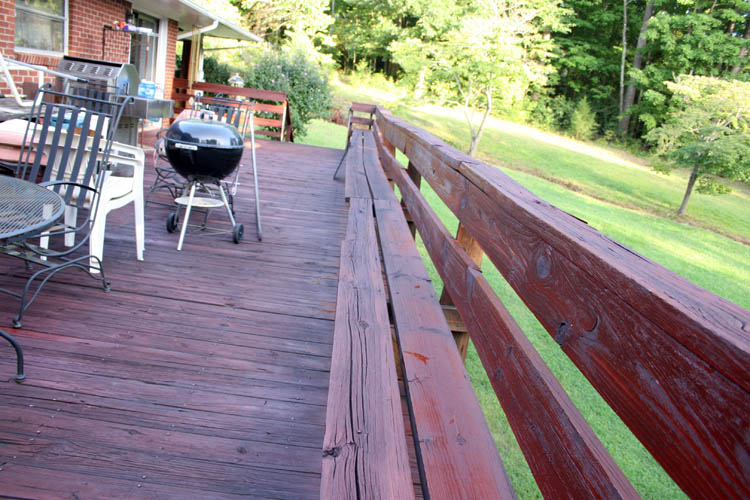
STAINING THE DECK
I started staining the deck on August 27, 2021 and used a 9 inch x 2 inch
diameter roller and getting the stain on the deck rails and supports was a
"dawg" for sure. I applied about one gallon and decided to set up my
2.5 gallon pressure pot made by CATechnologies and sprayed the deck using my
Lynx 300 HVLP spray gun.

NOTE: I later plastic tied the pressure pot red and black
hoses together!
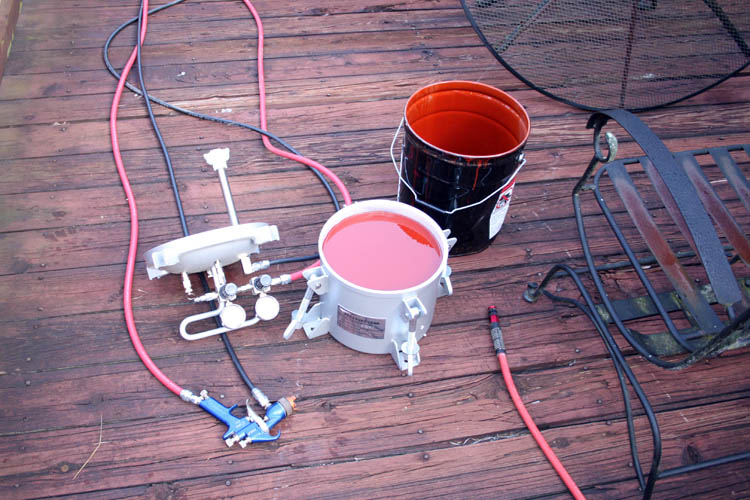
It didn't take but an hour or so to spray about 2.5 gallons and went much
faster and easier than using the roller, however the roller can apply a much
thicker coat of stain if the roller is saturated!
I had to move the deck tables, chairs, Weber charcoal grill and
Jenn-Air gas grill
over to the area that I had earlier stained on the 27th.
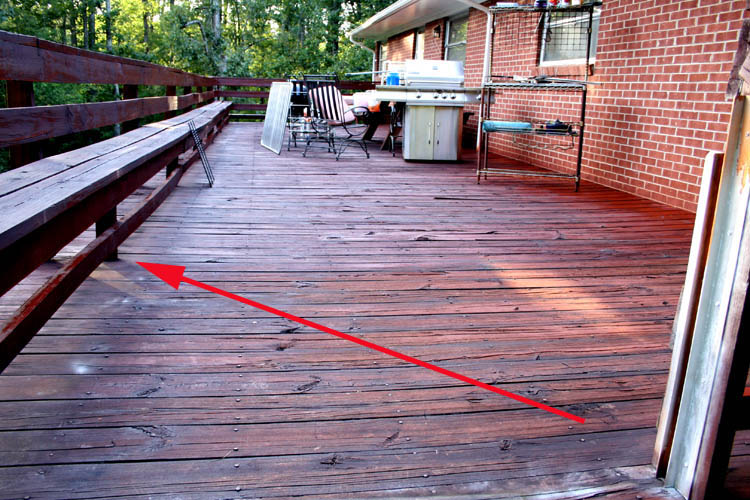
I ran out of stain about where the seat upright lower member is in the
pix.
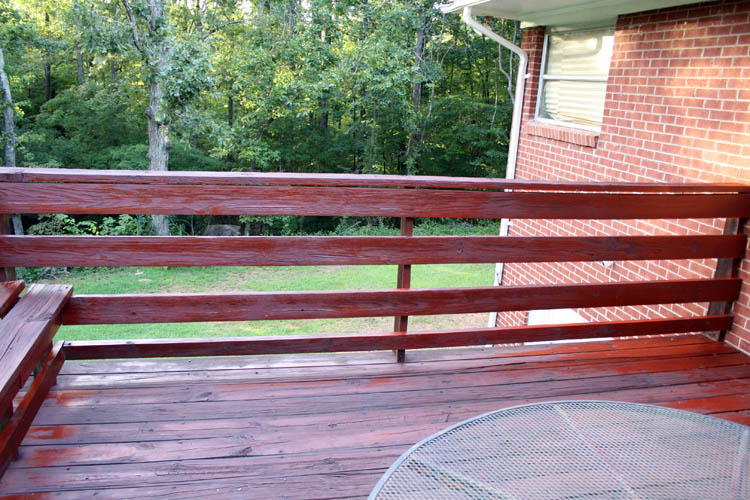
It was hard to get a decent pix with the sun angle on the deck.
This deck has seen much usage over the decades, especially since we
purchased the home in 1989. I am guessing the deck is over 40 years
old and the current treated timber will not last half that long due to
changing the treating process for environmental reasons. The deck could use
a maker over, but hopefully will last as long as my bride and myself.
As with any type of staining, painting, etc., the equipment clean-up is
the most troublesome part, but is necessary to keep your equipment operating
at maximum efficiency and today was no exception.
The pressure pot uses disposable liners (not cheap) which helps the clean-up
tremendously, however you have to replace the liner, adding lacquer thinner
and flush out the black fluid line. You can use the same liner for the
next spray application; just remove any lacquer thinner.
I will need at least 3 more gallons of the stain and ordered another 5
gallon pail today. If Hurricane Ida doesn't dump any rain in our area,
I will finish up staining the deck when the stain arrives, our Lord willing
of course.
Web page updated by Bill aka Mickey Porter on 08-30-2021.
FINISHED STAINING THE DECK
I finished staining our deck on 09-06-2021 which took approximately four
(4) hours and that includes two or three good water breaks to cool off.
Here is a hyperlink to a short video clip captured via one of our
security cameras:
video here. The overspray was
horrible with the wind blowing and later put my 3M dual canister mask on.
I am sure the overspray was my bad since I was having trouble adjusting the
spray gun due to the length of air hose required and I believe 3/8 inch
inside diameter air hose line as far too small which had too much drop age
in gun air pressure. I probably need at least an air hose with 5/8
inch inside diameter
The ole Little Giant
ladder was used in the A frame configuration and you still need some Gorilla
DNA to easily handle that monster of a ladder. I used a couple
levelers on the outside to keep the ladder level, otherwise it could tip
over. One of the levelers was "store
bought" and the other a simple board and C clamp.
Below a few pixs taken:

To reiterate, the clean-up of the spray gun, pressure tank and
fluid line is a pain, but is necessary. The reddish/brown color under
the steps to the deck is where I adjusted the pressure tank fluid pressure
to the spray gun.
Next on my project aka to do list; replace the seat boards on the deck
picnic table of which the weather and sunlight has two of the seat boards up
turned like the bow of a boat!
I will definitely need a couple days of not using
the right hand/arm, of which the hand is swollen a good amount.
Web page updated by Bill aka Mickey Porter on 09-06-2021.
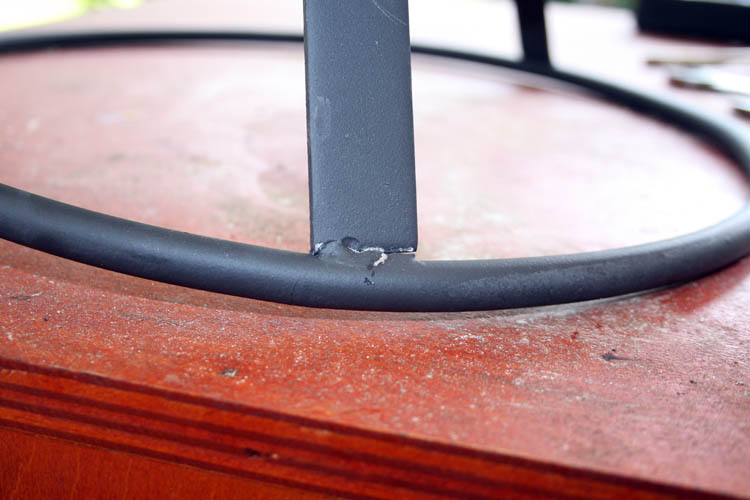
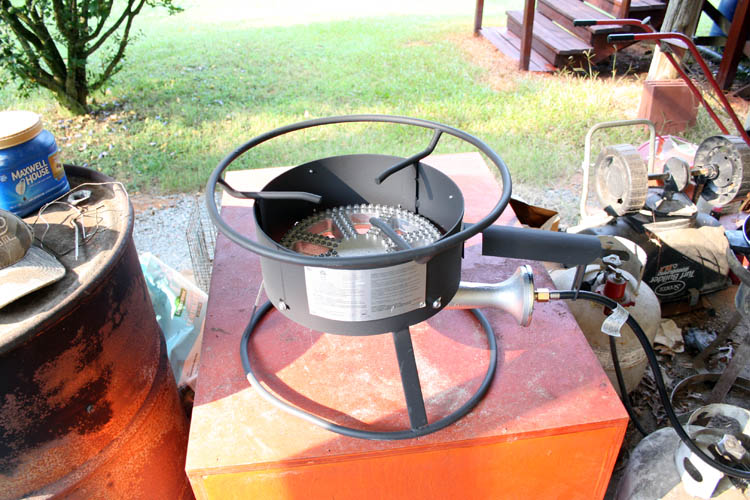
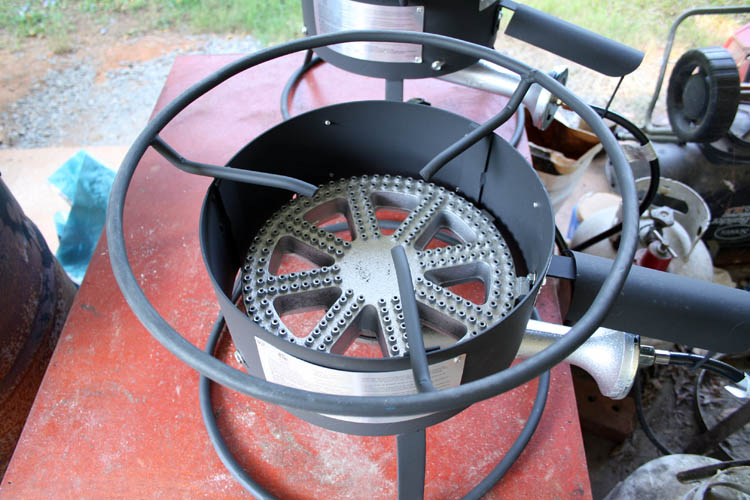
CAROLINA COOKER REPAIRS
I ordered a Banjo Burner Stand aka cooker from Agri Supply on 09-08-2021
and received the cooker on 09-10-2021, being delivered via FedEx.
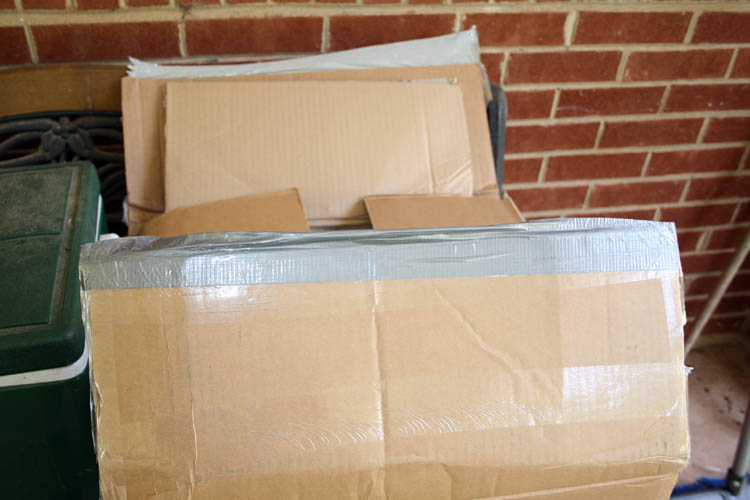
I noticed the package/shipping cardboard box was bent in at the bottom
and the top of the box had been resealed with Duct Tape. Upon removing
the cooker from the shipping box, the base of the cooker was badly bent
upward and one of the frame connecting welds was broken about 1/3.

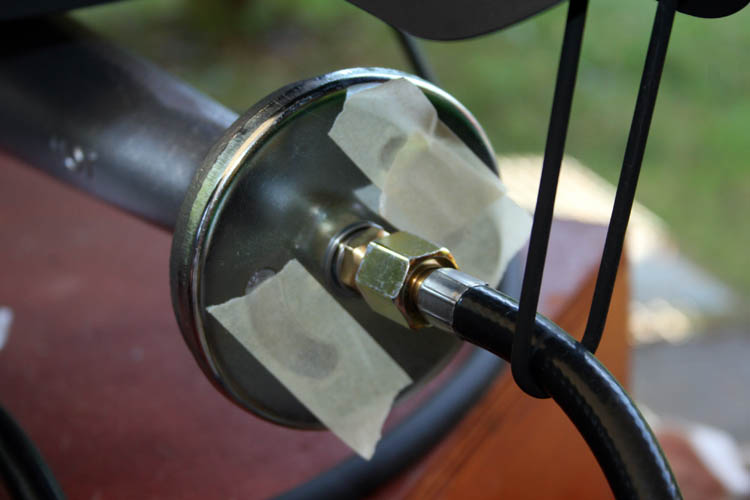
The unit was pre-assembled which only required to hook up the air
shutter, wind shield and the high pressure regulator hose.
After attaching the regulator to one of my gas cylinders, the burner
would immediately light, however it would go out within a few seconds at the
most.
Carolina Cooker was contacted via telephone and they directed my problems
to Agri Supply who later in the day emailed me an invoice for another banjo
burner cooker at no charge.
I changed the high pressure regulator out with a spare one that I have
and the same results. I swapped tanks and the same results; burner
would lite, but not burn but a few seconds.
I started checking the burner and found about half dozen of the holes aka
orifices in the casting were plugged up and had to drill them out and
eventually got the burner to stay lite with a good blue flame.
I am sure Agri Supply will file a damaged claim for this shipment with
FedEx since I sent the above pixs to Agri Supply to validate my problems
with the Carolina Cooker. If Agri Supply wants the damaged unit
returned to them, it will have to be at their own expense and not mine.
If they don't want the unit returned, I will have a spare cooker even though
damaged, of which I might try and flatten out the base.
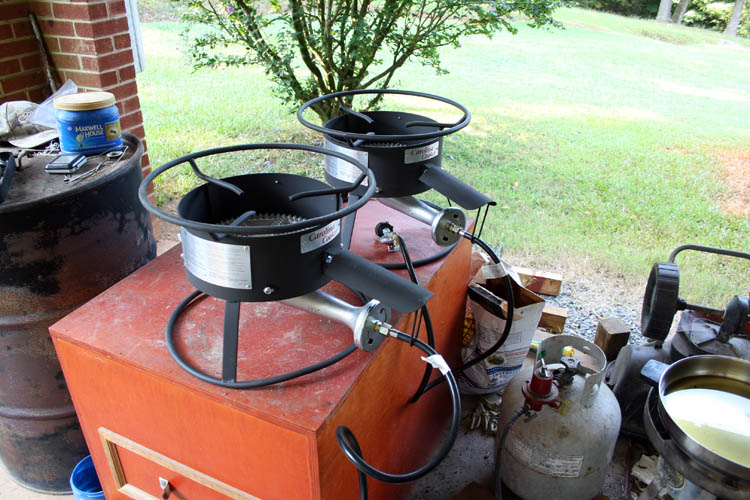
NOTE: I received another Carolina Cooker Banjo Burner via
FedEx on 09-11-2021 at 9:45 AM and hooked it up and it worked fine.
The base ring was warped some upward, but will be ok.
A close up pix of the burner which has plenty of orifices for a rated 97K
BTUs.
The reason I purchased another propane gas burner/cooker, my old unit has
been giving trouble and needed a back-up one since I use the gas
burner/cooker for deep frying turkeys,
fish, etc., and
Murphy's law
never sleeps!
Our son Bill, Jr.
and his bride Nichol
will be visiting with us next month and plan to do an early Thanksgiving
with a deep fried
turkey with all the
trimmings and definitely need a cooker that
will work flawless!
Web page updated by Bill aka Mickey Porter on 09-11-2021.
CAROLINA COOKER UPDATE
I received an email from Agri Supply in reference to the original
purchase of the Carolina Cooker and they were going to send me another Banjo
Burner and wanted me to box up the original cooker and have UPS to pick it
up.
I contacted Agri Supply and advised them they had already sent a
replacement Banjo Burner and I would pay them 50 bucks for the damaged
cooker, of which they agreed, therefore I now have a spare Carolina Cooker, Banjo Burner.
Web page updated by Bill aka Mickey Porter on 09-13-2021.
FREE TIDBITS OF INFORMATION
Around our home, spiders and dirt aka
mud daubers will clog the air intake holes
to outside gas burners such as the ones depicted above. An easy
solution; use masking tape to cover the air intake holes to the burner at
the air control shutter when the unit is not in usage. Even in very
cold weather, spiders have clogged up said air intakes.
Also, I plan to cut a couple round wood circles of wood and position
directly on the top of each burner to prevent said insects from clogging the flame
output orifices up.
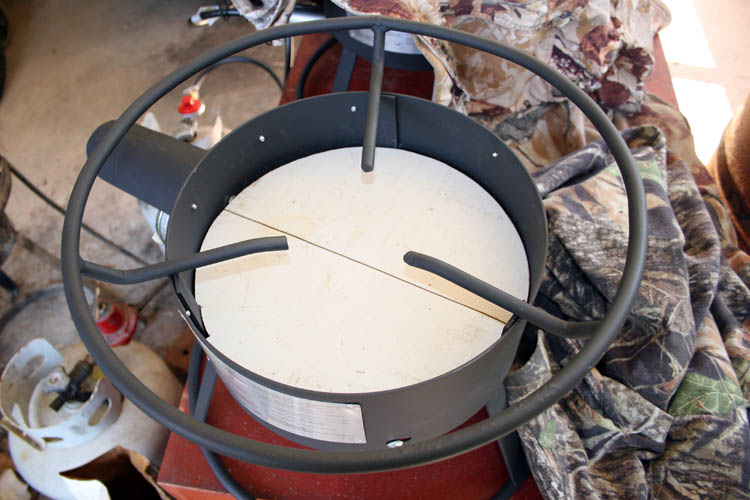
I could have simply used aluminum foil to accomplish the same thing
above, but sometimes I do things the hard way.............grin if you must!
Dirt aka Mud Daubers have clogged up the ignition keyway on our John Deere lawn
tractor which was a pain to get the keyway cleaned out. Since then, I
use masking tape over the keyway when the tractor is not in usage.
Web page updated by Bill aka Mickey Porter on 09-14-2021.
LEAVING ON A
SPIRITUAL NOTE
If you do not know Jesus Christ as your Lord and Savior, please take
this moment to accept him by Faith into your Life, whereby Salvation
will be attained.
Ephesians 2:8 - 2:9 8 For by grace are ye saved through
faith; and that not of yourselves: [it is] the gift of God: 9 Not of
works, lest any man should boast.
Hebrews 11:1 “Now faith is the substance of things hoped for,
the evidence of things not seen.”
Romans 10:17 “So then faith cometh by hearing, and hearing by
the word of God.”
Open this
link about faith in the King James
Bible.
Romans 10:9 “That if thou shalt confess with thy mouth the
Lord Jesus, and shalt believe in thine heart that God hath raised him
from the dead, thou shalt be saved.”
Open this
link of Bible Verses About Salvation,
King James Version Bible (KJV).
Hebrews 4:12 “For the word of God is quick, and powerful, and
sharper than any two edged sword, piercing even to the dividing asunder
of soul and spirit, and of the joints and marrow, and is a discerner of
the thoughts and intents of the heart.”
Romans 6:23 “For the wages of sin is death; but the gift of
God is eternal life through Jesus Christ our Lord.”
Romans 3:23 “For all have sinned, and come short of the glory
of God;”
Micah 6:8 “He hath shewed thee, O man, what is good; and what
doth the LORD require of thee, but to do justly, and to love mercy, and
to walk humbly with thy God?”
Philippians 4:13 "I can do all things through Christ which
strengtheneth me."