YARD/HOME PROJECTS AND REPAIRS 2022This is
a catch all page for yard projects and the maintenance of yard equipment
such as the lawn tractor, Troy-bilt tiller, home generator, weed trimmer, leaf blower and all home maintenance whether corrective or preventative!
TOMATO PATCH
A couple days ago, the afternoon weather was very pleasant, therefore
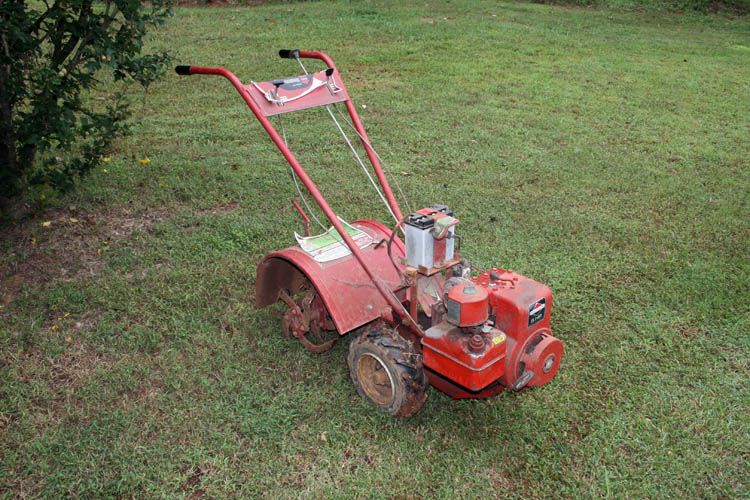
I decided to till our little tomato patch area with the antiquated
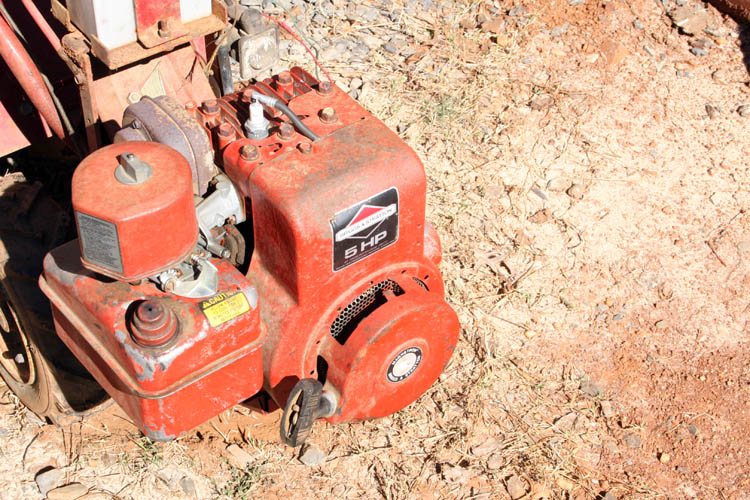
Troy-Bilt tiller which has a 5 HP Craftsman engine on it. I
checked the oil and gas level and had to add some engine oil to the
engine block and gave the pull starter cord a good pull, however the
started cord was snatched out of my hand and had my right arm sore after
a couple of the same failed attempts to get the engine started.
Last year, the tiller worked ok, but it did have some erratic, not
normal sounds to it and also it would cut out every now and then under
load.
I thought about taking it to our local Lawn tractor service center
being Pinkston's Mower, Inc., but decided to see if I could find out
what the problem was. I typed the problem on the YouTube channel search
engine and there were plenty of videos with the same problem that I was
having and the trouble was a broken flywheel key which I call a shear
pin in the flywheel.
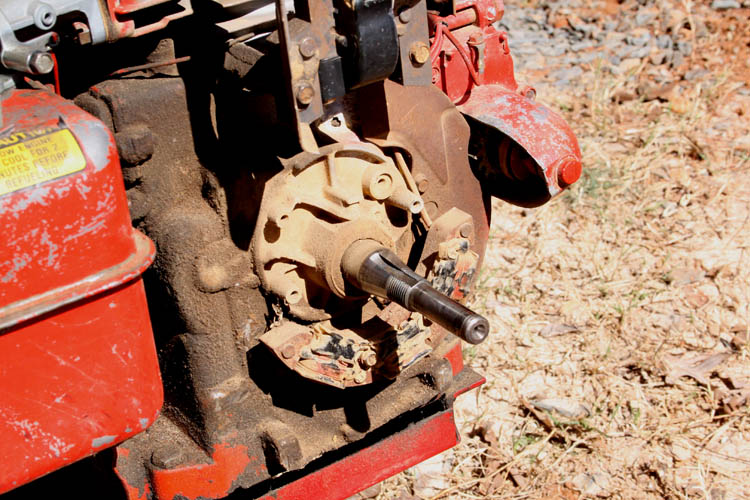
I took the housing (shroud) off the engine which contained the rope pull cord
assembly, removed the screen cover from the clutch assembly, removed the
clutch assembly to access the flywheel and it was obvious that the shear
pin aka flywheel key was broken which causes the engine to be
out-of-time and in this case, when the engine tried to start, yanked
back on the rope starter pull cord with great force.
I went to Pinkston's Mover and purchased three flywheel keys and will
have a couple spare ones. Back in 2018, I replaced a sheared
flywheel key and other parts and have it documented
here. The soil where the
tomato patch is located has some roots and if the tiller tines get in a
serious torque bind, the flywheel key is the built in safety mechanism
to keep from damaging the internal parts of the engine, which is a good
thing.
NOTE: The above Troy-Bilt tiller had at least two prior
owners and was repainted with fresh decals, however the decals have
deteriorated over the years. I plan to remove them and use a magic
marker and/or label maker to refresh my memory on the functions of the levers.....grin if
you must!
I will post a few pixs when I start tilling up the tomato patch
adding some fertilizer, broken up egg shells, sawdust from my
woodworking shop and maybe purchase a few bags of sand to add to the
soil.
TILLED THE TOMATO PATCH
I added sawdust from my woodworking shop
dust collection system and
crushed eggs shells for some natural calcium to the tomato patch soil on
03-02-2022. The tiller fired up without any trouble and right at
the end of finishing the tilling of the soil, I put the tiller in
neutral and put it in reverse, whereas it jerked in reverse pretty hard
and I believe the engine back fired. I wasn't able to start the
engine again after letting it set a while. The flywheel key might
have sheared again since the starter pull cord did snatch back one time
pretty hard. I probably didn't torque
the clutch assembly enough to hold the flywheel solid against the
tapered crankshaft with the flywheel key in place. My right
arm/hand strength is not 100 percent yet from the
broken arm
last year on April 19, 2021.....got to have an excuse right?
It looks like there will be another repair in the future to get in
running again.
REPLACED SHEARED FLYWHEEL KEY
To make a long story short, I replaced the flywheel key which was
sheared in two pieces and the keyway was about 1/2 inch from being
aligned with the flywheel and crankshaft keyway. I torqued the
clutch assembly as tight as I could get it using a large pair of channel
lock pliers. I ordered a clutch wrench where I can use a socket
and torque wrench to get enough torque applied.
Below a few pixs taken during the repair:
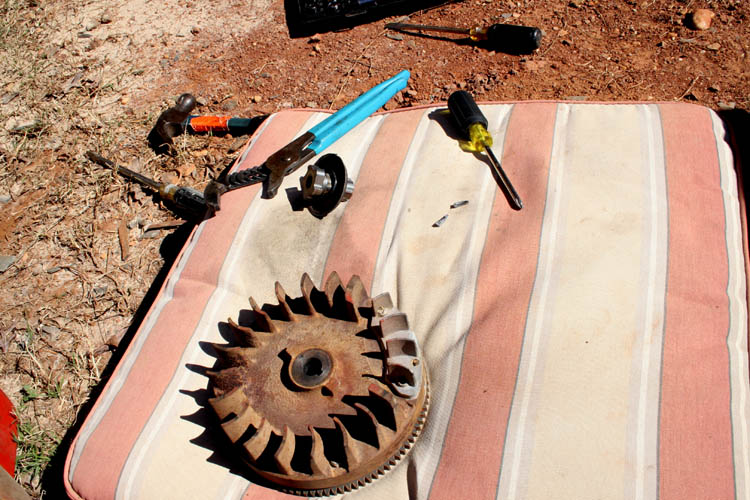
I installed the flywheel and flywheel key and then the clutch
assembly. Before I did all that, I used some 600 and 1000 grit
sanding paper to polish the crankshaft straight portion where the inner
clutch assembly shaft spins.

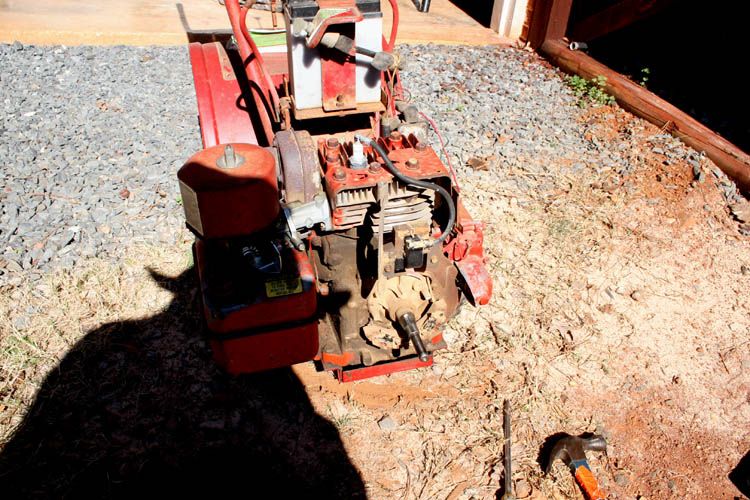
The clutch reverse spins freely without binding and the screen was attached to the clutch assembly.
After the shroud was in place, I choked the carburetor and after two
or three pulls of the starter rope, it fired and moved the choke lever to
the normal run (vertical) position.
When I finish tilling the tomato patch right before planting tomato
plants sometime near the end of April, I plan to take a look at the
starter and see why it is not engaging the toothed flywheel, although
the starter solenoid is activating, the starter is not engaging the
flywheel. I haven't used the starter in several years due to a
dead battery. I jumpered voltage from the John Deere to the
starter solenoid to ascertain if the starter would activate. If I can get the starter and/or solenoid working
properly, I will replace the dead battery.
I have plenty of routine yearly maintenance projects to get started on once
the weather turns and stays much warmer. We have had an unusually
colder winter this year and looking forward to Spring of the year!
Web page published by Bill aka Mickey Porter on 03-01-2022 and
updated on 03-02-2022.
REPLACED TILLER BATTERY
I replaced the tiller battery on 03-30-2022 and the starter turned
over and got the tiller started. I let it run for a while and
checked to the voltage of the battery to see if it was charging, of
which it was. I had to replace the existing battery bracket hold
down bolts with longer ones since the battery was taller than the original
battery. The wiring for the switch and starter solenoid needs a
little TLC and will use a few tie down straps.
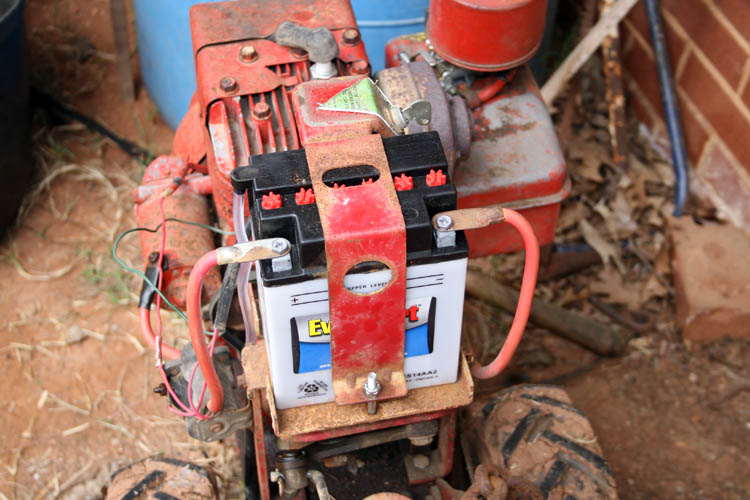
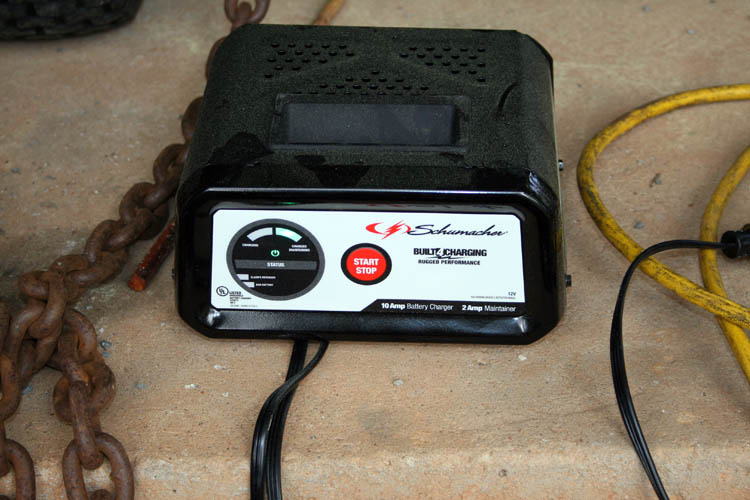
NOTE: The above battery came with the electrolytic solution
in a plastic sealed container. The instructions was to fill each
battery cell and then charge the battery. I had to purchase a
battery charger to get this project completed.
Web page updated by Bill aka Mickey Porter on 03-30-2022 and
04-07-2022.
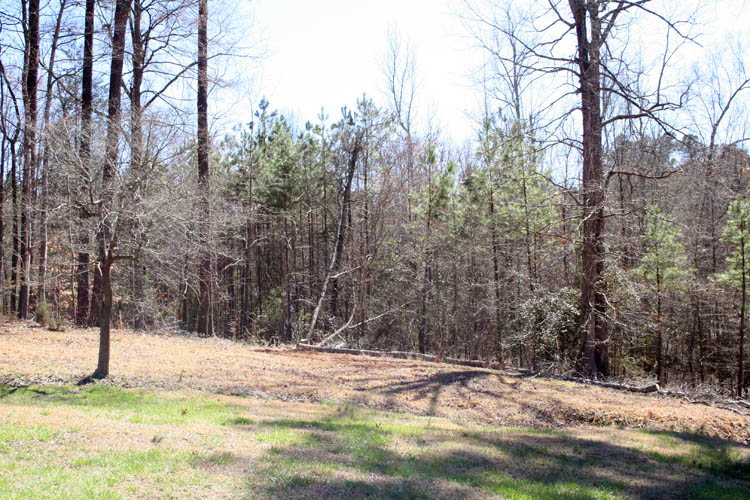
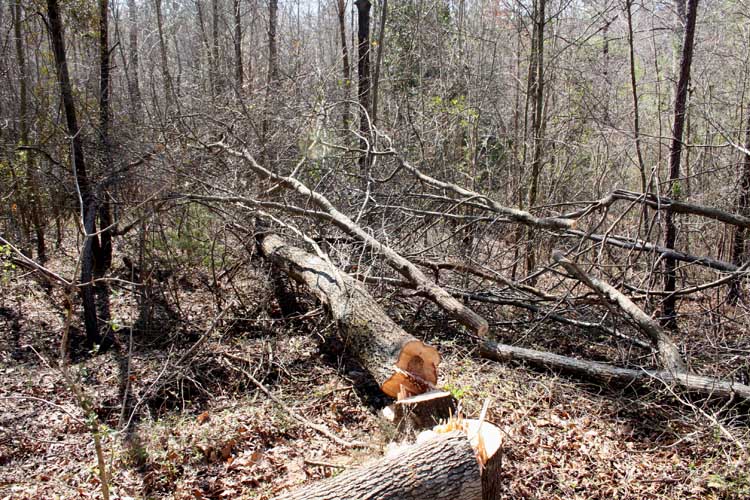
CUT DOWN SHADE TREES NEAR THE TOMATO PATCH
The weather forecast was to be in the high 70s in the afternoon and
got an early start today (03-03-2022) cutting down several trees that
were shading our tomato patch on the West side. I had a fresh
gallon of gas using Stihl oil and non-ethanol gas and added some
chainsaw bar oil to the reservoir. I either had a new chainsaw
chain and/or a freshly sharpened one and it went through the sweet gum
tree like butter leaving some good sized chips denoting the chainsaw was
cutting properly.
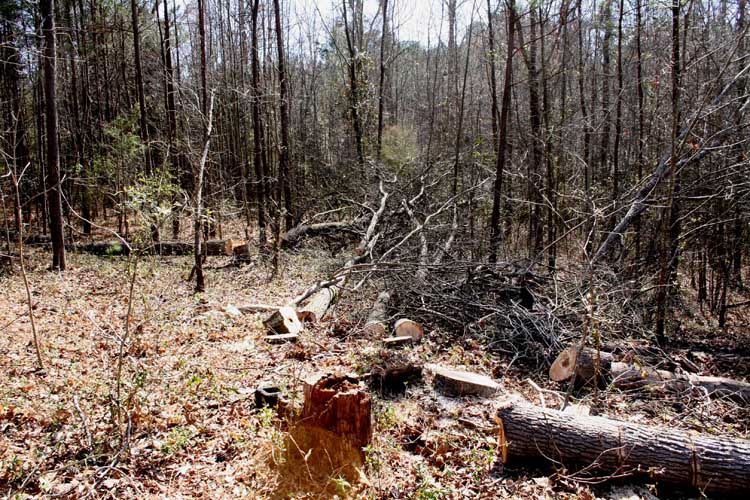
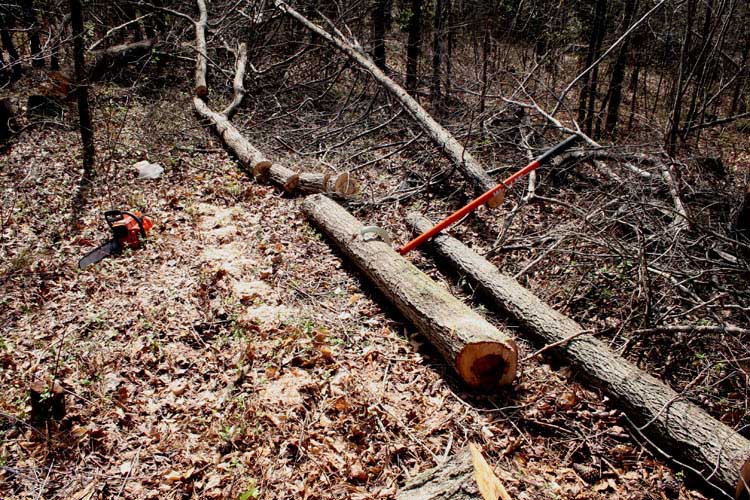
A zoomed out image of the fallen sweet gum tree adjacent the tomato
patch. A couple of the smaller trees called
Widow Makers because they are hung up in another
tree and a hazard to try and get them on the ground.
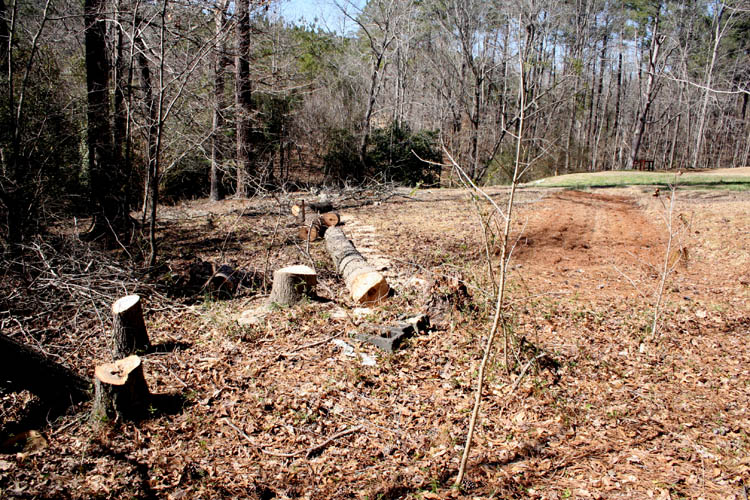
The tomato patch will get plenty of sun light now from the West and
mid day too. I will let the sections of sweet gum tree dry out
some before I start getting them out of the way and let Nature do its
thing!
I definitely have to purchase a cant hook
to roll the log portions over to finish the cut, otherwise the chainsaw
chain will dig into the dirt. How I managed all these years
without one is amazing and has accounted for many chainsaw chain
sharpening(s).
I will come back later and cut the tree stumps down closer to the
ground for eye appeal.
This sweet gum tree I plan to leave as is for now since it is out of
the way. A bonus is future seed balls will now vanish!
We should have a much better tomato crop this season, our Lord
willing of course with the extra sun light reaching the tomato patch.
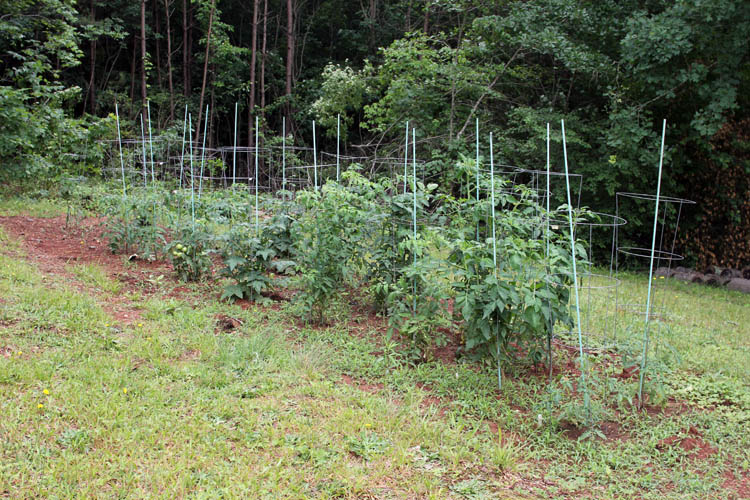
TOMATO PLANTS IN THE GROUND
I waited until around the 25th of April before I started putting some
tomato plants into the ground and put the last four (4) plants in the
ground today being May 2, 2022. At the moment, I have eighteen
(18) tomato plants in the ground.
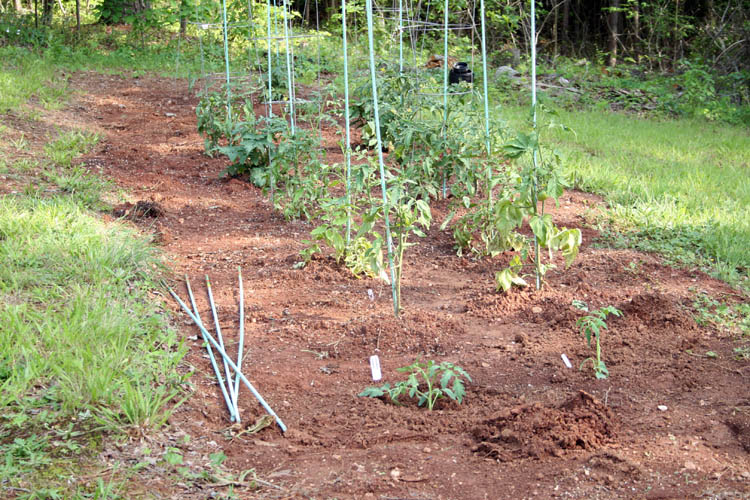
This should be enough tomatoes for my bride and myself and everything
goes well, our Lord willing of course!
We had a "frog strangler"
rain last evening and should jump start the plants for sure with what I
call, "Nutrients From The Sky."
I have already given the plants a little Miracle Grow water solution
to help them along.
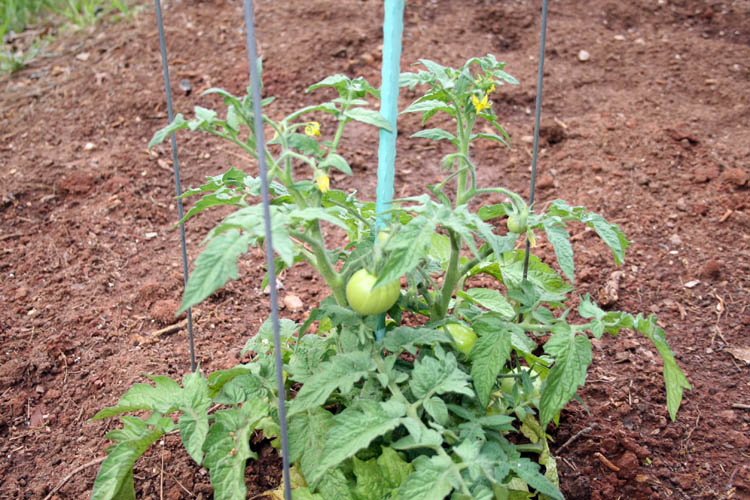
Above close-ups of the tomato plants. I have three (3) three
gallons size plants, and about eight (8) one gallon size plants if my
memory is correct and the balance is smaller plants. Some of the three and
one gallon plants already had small tomatoes as evidenced by the pixs
above on them with a good amount of blooms as well.
There is a variety of Homestead, Celebrity, German Johnson, Cherokee Purple, Pink
Brandywine and one other variety.
Web page updated by Bill aka Mickey Porter on 05-02-2022.
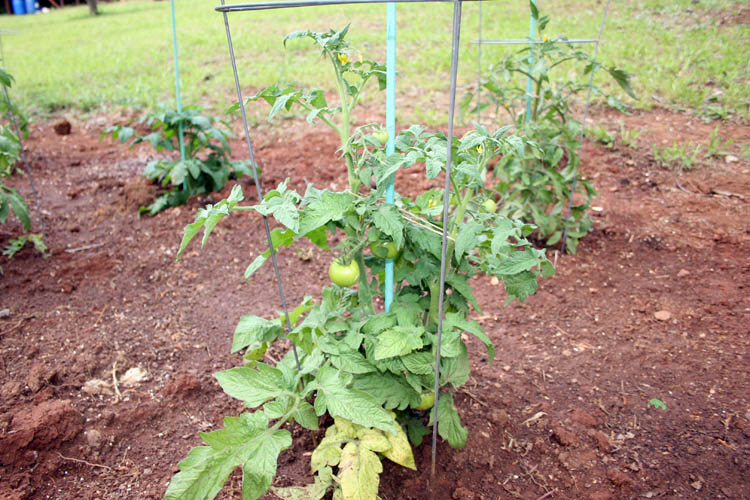
TOMATO PLANTS UPDATE
We have had several good rains aka "nutrients from the sky" and the
tomato plants are jumping. About all the plants have blooms on
them now.
I will have to start weeding out some grass when the ground dries out.
Web page updated by Bill aka Mickey Porter on 05-24-2022.
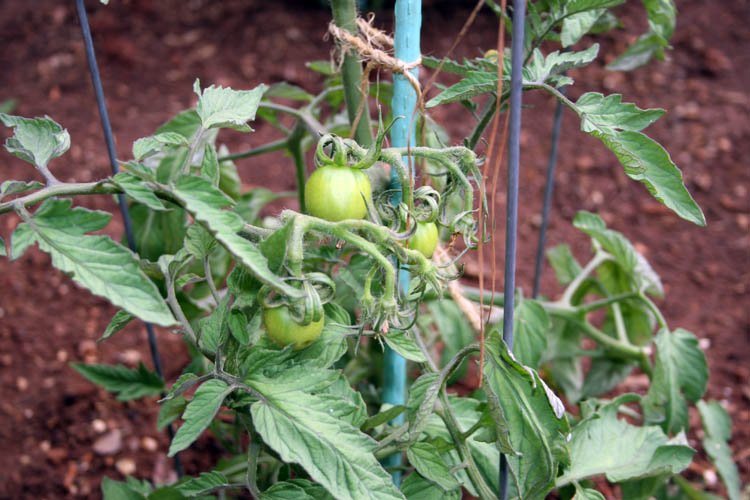
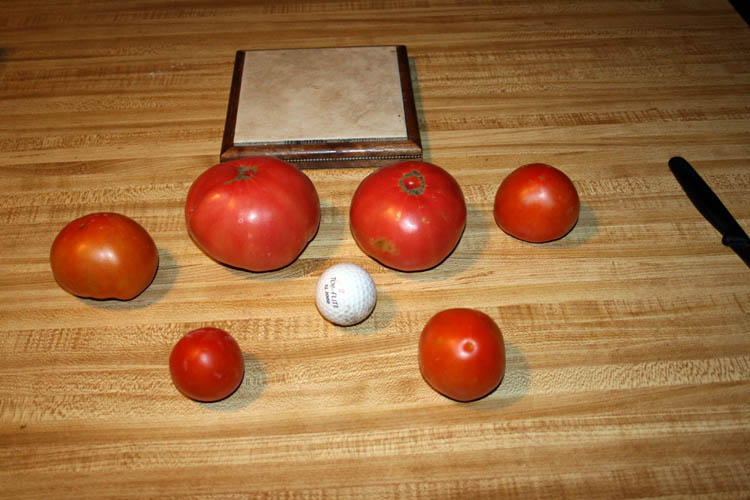
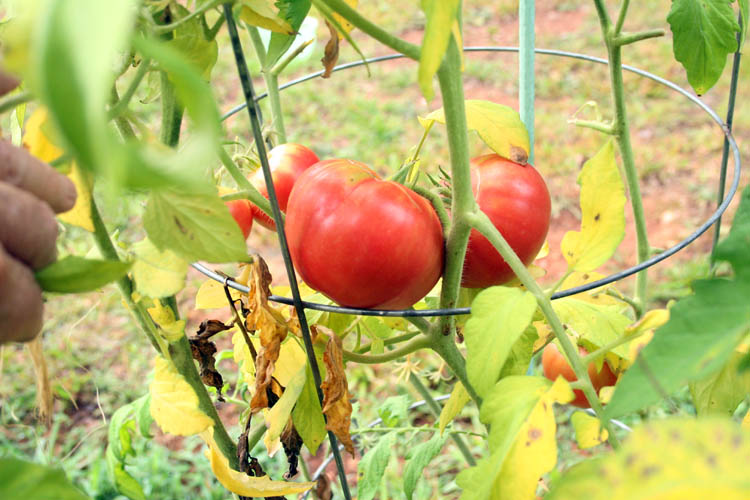
FIRST RIPE TOMATOES
We received our first two ripe tomatoes on 05-30-2022 and my bride
and myself eat them sliced with salt and black pepper. On
05-31-2022, I picked three (3) more tomatoes, two about ripe and one was
ripe. I made my bride a sandwich on 06-01-2022 and it was
definitely wonderful indeed! This is the earliest we have
harvested tomatoes.
Here is pix of the tomatoes harvested on 06-03-2022.

We plan to have a couple BLT sandwiches from the above tomatoes very
soon!
Web page updated by Bill aka Mickey Porter on 06-01-2022 and
06-03-2022.
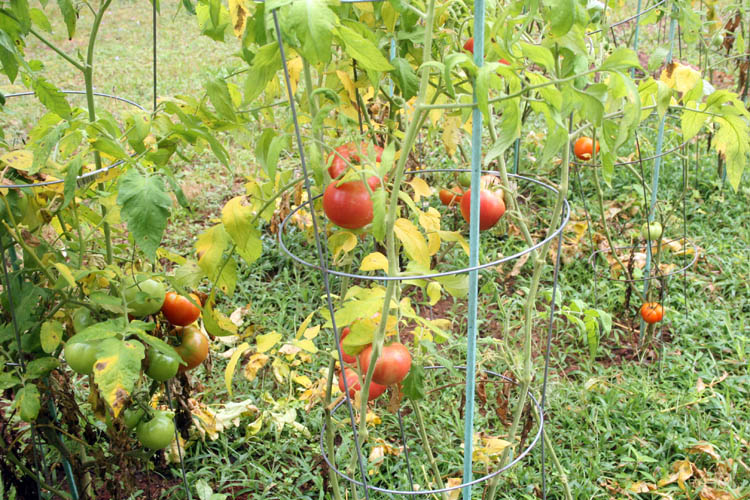
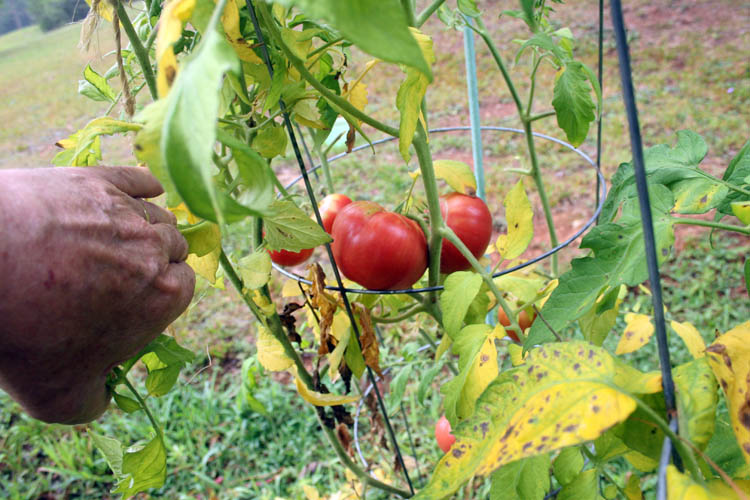
GERMAN JOHNSON TOMATOES
As of 06-15-2022, I have been getting some tomatoes from our tomato
patch and the German Johnson tomatoes are beginning to ripen.
Below is a pix of a couple of them and I made three (3) thick sliced
tomato sandwiches from the larger one.

The German Johnson tomato had a wonderful taste and texture!
Can you say "beautimous" out
loud?
Web page updated by Bill aka Mickey Porter on 06-16-2022.
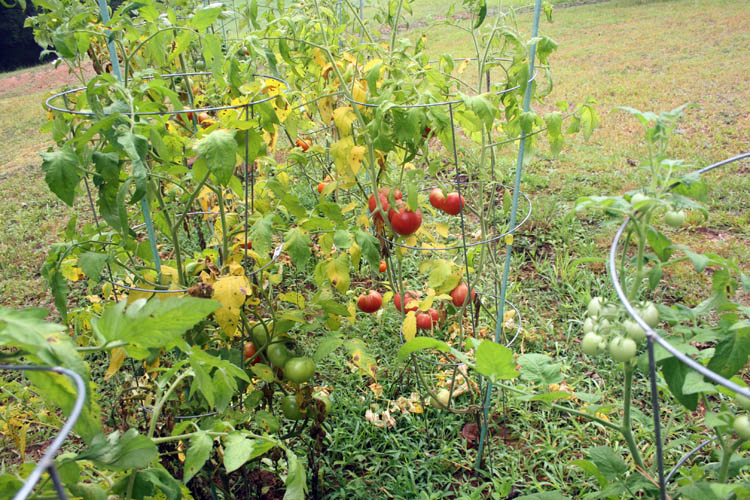
HARVESTING SOME TOMATOES
It has been super hot this late Spring and Summer, however we have
continued to get some good tomatoes and enjoyed many sandwiches; e.g.,
BLT, Tomato and Club and enjoyed eating the Cherry tomatoes like
candy...........grin if you must!
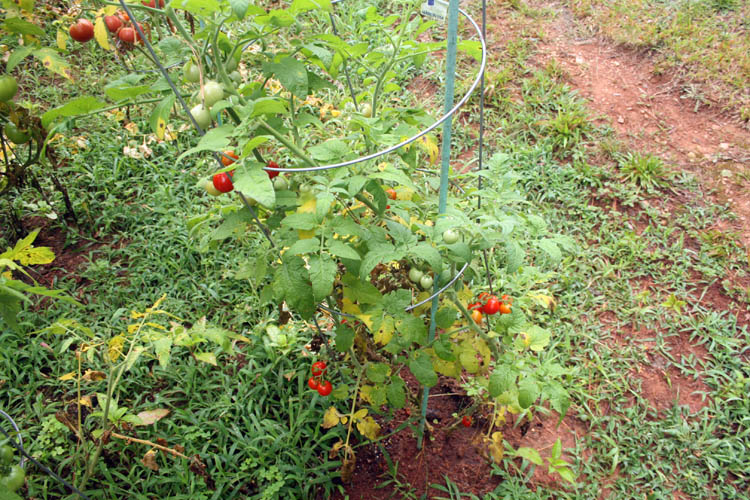

I can visualize a good
Club sandwich from the largest German
Johnson tomato. Plants I purchased here in Wadesboro, NC from HW
Little, Co., Inc. did not do well at all, especially the Cherokee Purple
tomato plants.
Web page updated by Bill aka Mickey Porter on 07-05-2022.
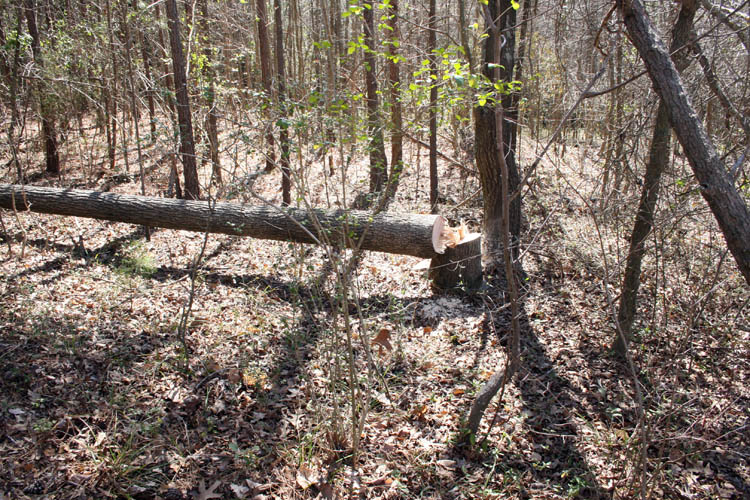
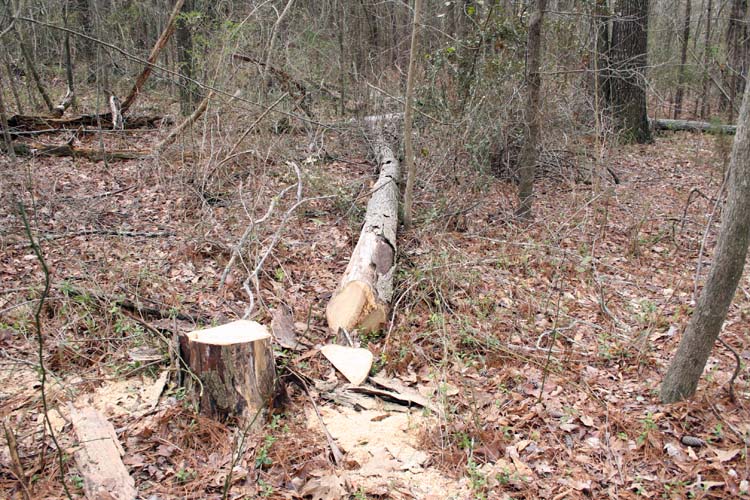
CHAINSAW WORK CONTINUES
The temperature the afternoon of 03-04-2022 was 60 degrees and
decided to fire the chainsaw up again. Earlier around mid-morning,
I started dragging some of the laps from the downed sweet gum tree that
stepped off to be approximately 82 feet in length.
I cut the stumps from three (3) of the trees cut yesterday and it
looks much better. I surveyed the two trees that were cut and
lodged into another good size red oak tree, of which I call those type of trees
"Widow Makers" because if you
are not careful in getting them down, you can certainly make your bride
a widow, therefore the name Widow Maker is very applicable!
The tree that was holding the two widow maker trees was leaning in
the right direction and I knew once I started the back cut and the tree
started to fall, I had to get in high gear out of there away from the
two widow maker trees that would come crashing down as well.
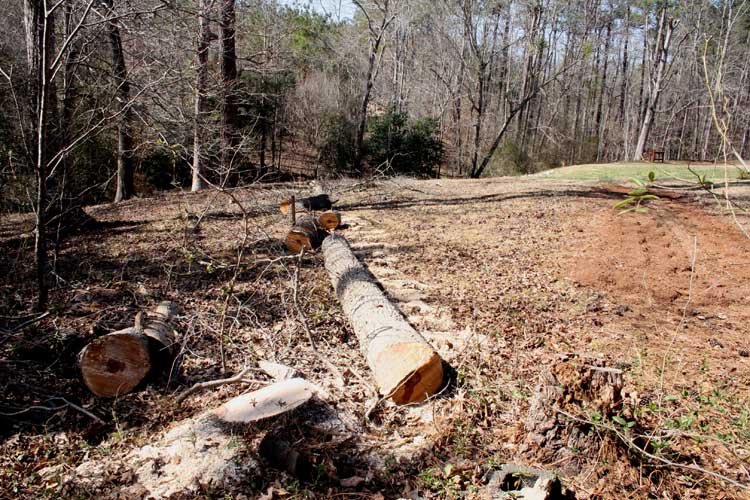
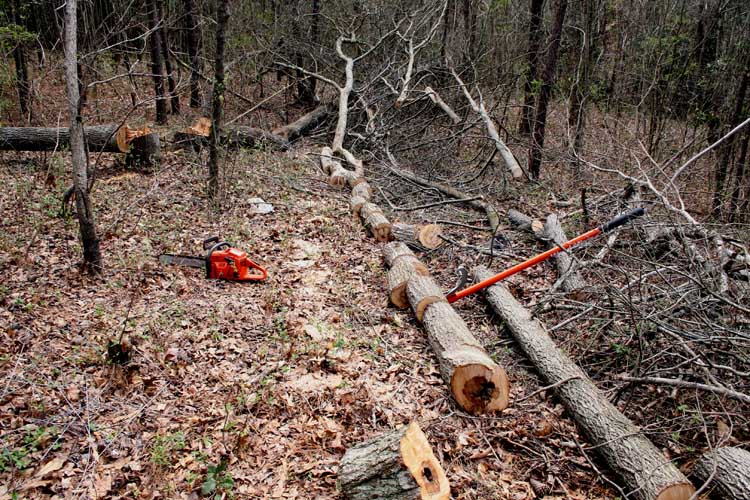
Below is a pix of the Widow Maker trees on the ground along with the
large 15 inch diameter Red Oak tree that had them hung up:
Another pix of the widow maker trees and the trees stumped out:
Pix of the stumped out trees and also the large sweet gum tree,
whereas I dragged out the laps cut from the tree.
The
brown/reddish stump in the front center of the pix is a maple tree
that was the corner of a dog lot the prior home owners Paul (deceased) and Opal
Walters owned. I removed the heavy hog wire fence and posts not
too long after we purchased said property in July 1989. The decayed stump had
the fence wire grown into it.
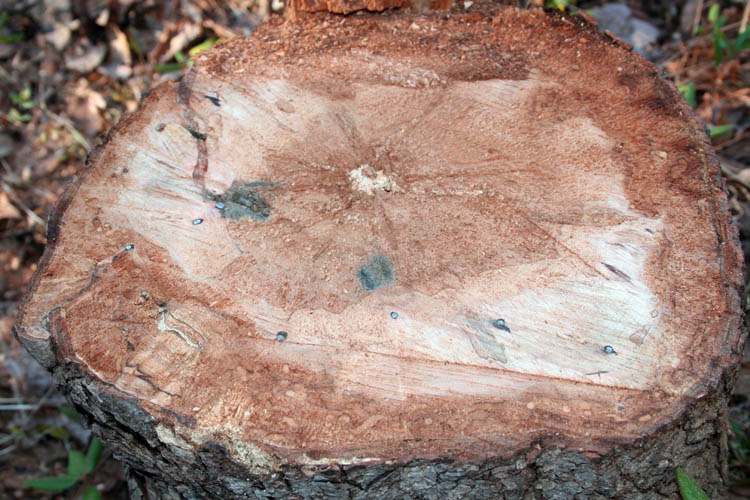
Here is a pix of the stump right after I cut it in February 2019 and
you can see the ends of the fence wire the chainsaw chain cut through.
Yes, I did see sparks flying from the chainsaw.............grin if you
must!
The chainsaw chain definitely got another sharpening before the next
usage!
View of the area below opened up even more now:
I ordered a 60 inch length cant hook from Wood-Mizer, internet pix and when it
arrives, will finish up this project; pix below:

With the extra sunlight able to shine onto the tomato patch, we
should have much better tomatoes this season, our Lord willing of
course.
I asked my friend Robert Webster of Hamlet, NC to contact his
son-in-law and see if he wanted any of the wood for firewood.
Web page updated by Bill aka Mickey Porter on 03-04-2022.
FERTILIZED YARD AND TOMATO PATCH
The weather prognosticators are forecasting rain next week, therefore
I purchased another bag of 10-10-10 fertilizer and spread about 80 lbs
on the front and side yard along with the small tomato patch. The
rain should help dissolve the fertilizer and next month I plan to till
the tomato patch again.
One of our security cameras captured yours truly spreading the
fertilizer on the front side yard hyperlinked
here.
Web page updated by Bill aka Mickey Porter on 03-05-2022.
RECEIVED THE CANT HOOK
I received the cant hook today 03-08-2022 and put it quickly to use.
It is amazing how much leverage you can get with the 5 ft. bar.

I finished all the cuts needed on the bottom side of the logs and the
cant hook rolled over the long section of the sweet gum tree with no
trouble at all. I didn't have to exert much energy and that
is a good thing.....working smarter, not harder!
The cant hook got another workout on a red oak tree. The
circa. 1999 Husqvarna Farm Model 55 chainsaw is cutting real well.
There is a hickory tree to the right of the red oak tree and I cut it
up into manageable lengths too. I plan to get the ole manual log
splitting maul out and split some of the wood for our fire pit and
"weenie" roasts for the Gonzales Grand Kids!
As stated, it will be log splitting time very soon and will get the
balance of the large sweet gum tree out of the way.
Web page updated by Bill aka Mickey Porter on 03-08-2022.
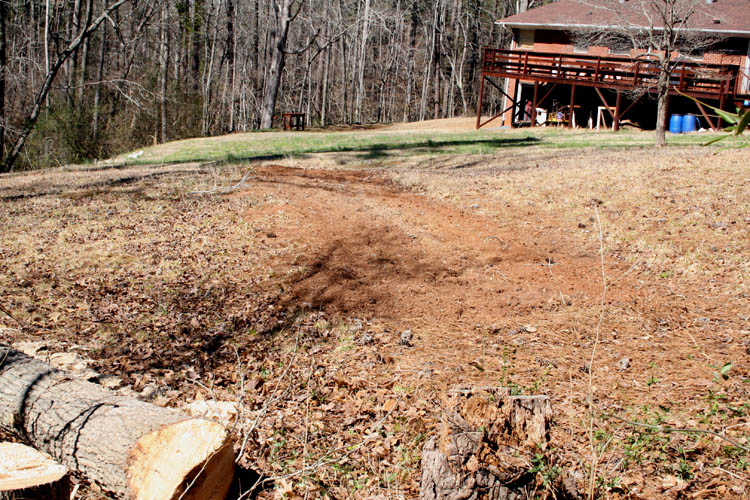
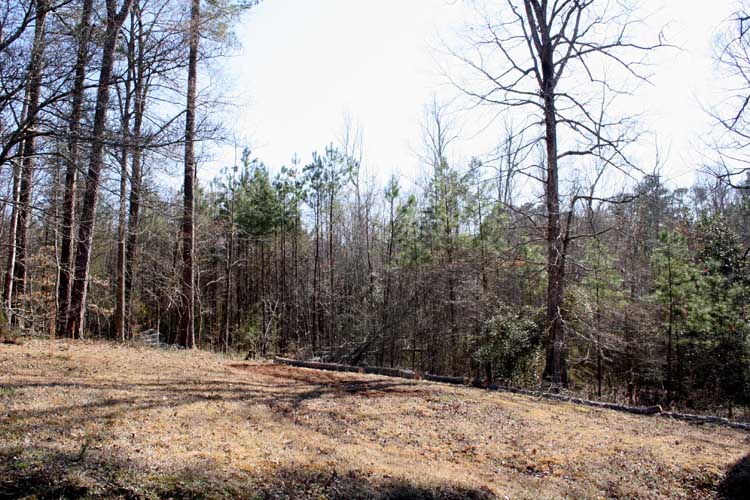
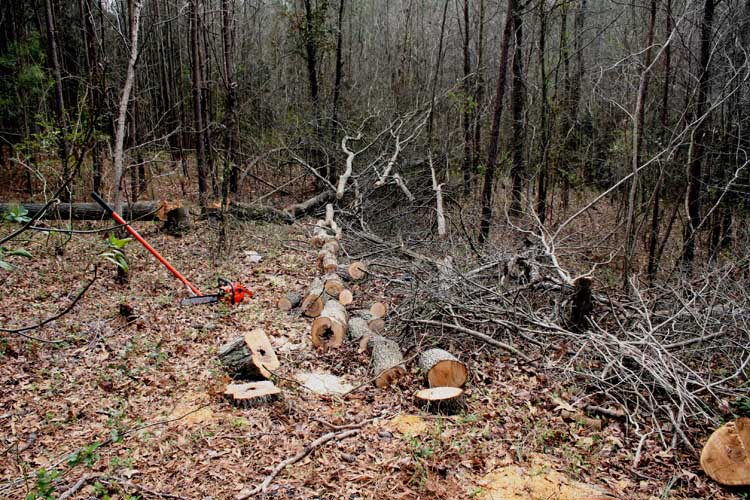
SWEET GUM TREE OUT OF THE WAY
Late yesterday afternoon, I got the balance of the large sweet gum
tree moved out of the way and the rain today has stopped my outside yard
projects, etc. Pix of the tomato patch area below:
The grass and of course the weeds have started growing fast the past
few days with the warmer weather and need to get the lawn tractor
serviced ASAP. As soon as the rainy weather stops, of which
is good for the broadcast fertilizer, I need to split up some of the
hardwood for our fire pit.
Web page updated by Bill aka Mickey Porter on 03-09-2022.
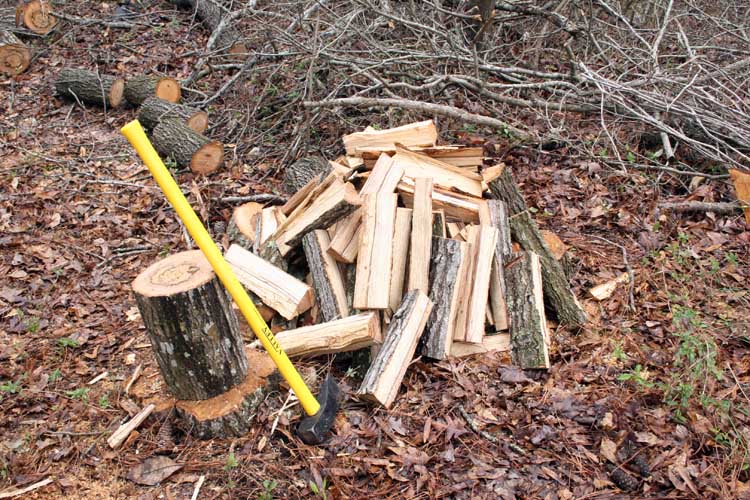
WORKING HARDER NOT SMARTER
Today was overcast and intermittent light misting rain falling with
the temperature in the mid 40s. After getting back from shopping
in Rockingham, NC and putting up dry goods, refrigerated items, etc., I
decided to get the ole log splitting maul out and split up some of the
hardwood for our make shift fire pit for
"weenie roasts" for the Gonzales
Grand Kids.
We have never burned wood for heating our home, therefore I do not own a hydraulic log
splitter, but have managed to split wood the hard way as needed.
Below is pix of the pile of split firewood and I have to take my
time and split a few pieces at a time and then take a rest....grin if
you must:
The log splitting maul seems to be getting heavier with each
additional year of usage, but I am thankful for each and every day that
our Lord allows!
Log splitting - to be continued.
Web page updated by Bill aka Mickey Porter on 03-10-2022.
WORK CONTINUES
With the temperature in the mid to high 40s, I split more firewood
and decided to cut down a dead sweet gum tree on our upper property.
My endurance seems to be getting better having been hindered by
non-physical activities during the Winter. Below are a few pixs taken:
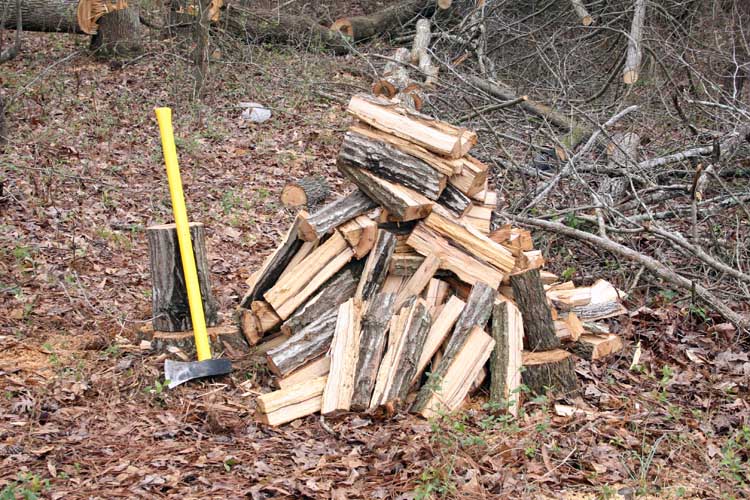
The firewood pile is getting larger and will haul this pile to our
fire pit using a wheel barrow. I am unable to get my truck closer
to the pile due to the rain and wet/soggy back yard and a drainage ditch.
The little Ford Ranger will spin on wet grass....grin if you must!
I believe I can get the lawn tractor very close to the split wood and
use a wagon garden cart attached to the lawn tractor to work a little smarter
not harder getting the wood to the fire pit area.
I will use some exterior plywood to make a temporary bride across the
drainage ditch instead of navigating the sloping incline area below the
tomato patch.

The above sweet gum tree has been dead for some time by the bark
releasing from the tree.
The ole "husky" made quick
work of getting the tree on the ground. I will let nature continue
to process the dead tree.
I will call it a day for the chainsaw and log splitting work,
whereas I have a quart bag of frozen white perch fillets thawing out and
my bride and myself will have a
fish fry late this afternoon.
Web page updated by Bill aka Mickey Porter on 03-11-2022.
BURNED LEAVES - FIRE PIT AREA
It will not be too much longer before we can have
"weenie" roasts for the Gonzales Grand Kids, therefore I raked
up the leaves adjacent the fire pit and set them on fire. We
experienced a light drizzling rain toward the end of the fire burn which
helped freduce the risk of spreading the fire!
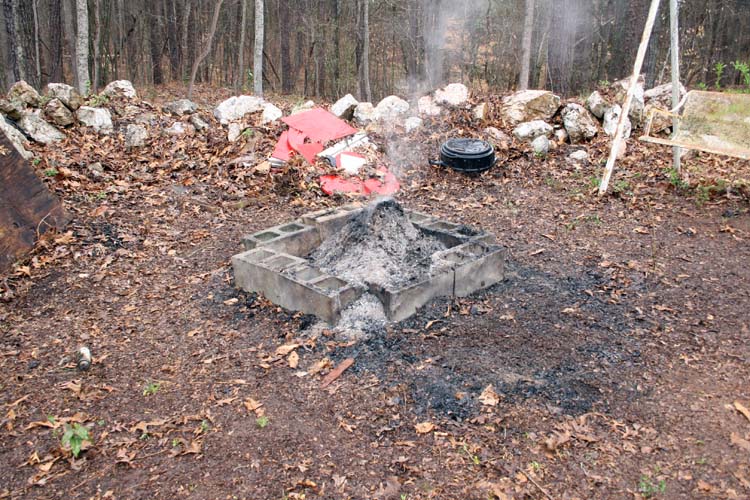
Before our next "winy" roast, I will police up the area and rake
additional leaves from the rear white milky quartz rock wall and
probably do another controlled burn. The painted red color wood
adjacent the rock wall is the remnants of a
Santa's sleigh.
Web page updated by Bill aka Mickey Porter on 03-16-2022.
READY FOR A WEENIE ROAST
We planned on having a "weenie" roast for the Gonzales Grand Kids today
(03-26-2022) and I spent most of yesterday getting the area
"policed" up and raked and
hauled many wheel barrow loads of leaves off, etc.

It certainly does look much better now and spend a couple hours this
morning rounding up some dead cedar trees on our property. I put
the ole Husky chainsaw to use along with my regular axe splitting up the
wood for the fire pit.
Web page updated by Bill aka Mickey Porter on 03-26-2022.
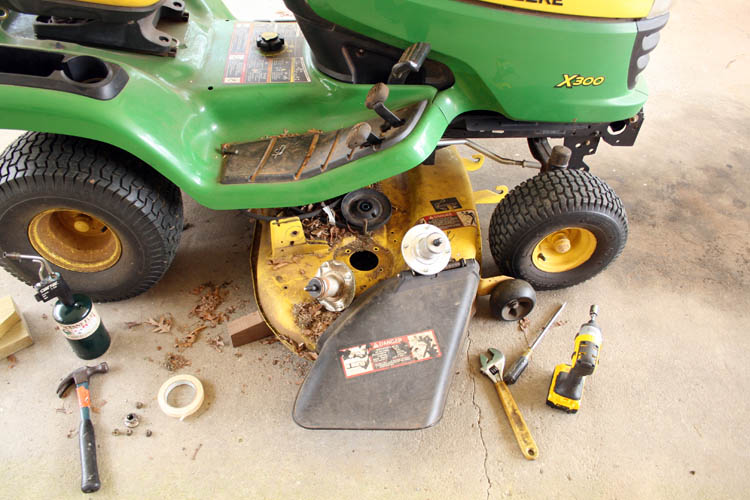
LAWN TRACTOR MAINTENANCE
Today 03-22-2022, the mid-day weather was gorgeous with highs in the
lower 70s and a great day to do the annual maintenance on the John Deere
X300 lawn tractor.
What started out to be routine maintenance, ended up being a
corrective maintenance issue. Yesterday after cutting the front,
side and back yard and having the deck in gear while running water into
the port to clean the deck underneath, I noticed an abnormal sound and
the deck was doing more vibrating that usual with the deck blades in
gear.
While removing the right cutting blade, I noticed a good amount of
movement in the spindle and knew that the bearings were gone. I
went to John Deere aka Quality Equipment in Polkton, NC and purchased a
spindle assembly. When you purchase something with John Deere
green on it, your wallet or plastic will definitely know you have been to
John Deere!
I had never taken the cutting deck off the X300 and viewed a couple
videos on YouTube before starting this project which was a valuable help
and resource.
After disengaging the deck from the lawn tractor, I used a DeWalt 20V
cordless impact Drill Driver model number DCF885B which is
variable speed; 0-2,800 RPM to try and loosen the pulley nut which was
7/8 inches, however the nut would not budge. I then took a propane
torch and heated the nut up and after several seconds with the impact
driver/drill chugging along, the nut finally broke loose. It was
then no problem removing the spindle assembly which was held to the deck by
four (4) bolts.
The old spindle assembly is off and the new one ready to be
installed. I definitely didn't blow or wash the leaves from the
upper cutting deck...........my bad!
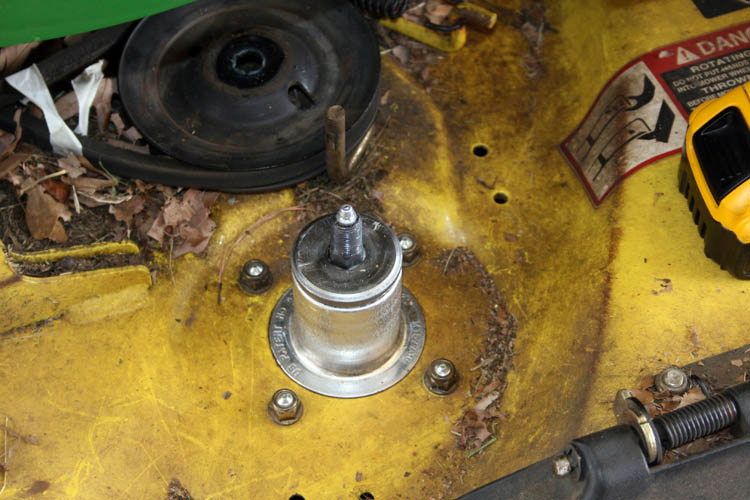
New spindle installed and ready for the pulley and pulley nut.
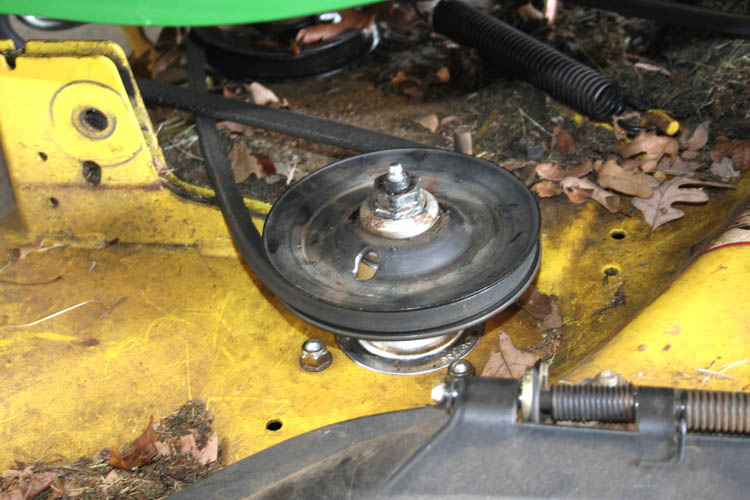
With that out of the way, getting the deck back onto the lawn tractor
took some serious effort, but managed to get it done and tested the unit
out and it ran fine without all the noise and excessive vibration.
I should have replaced the other spindle which will go out soon for
sure, but I am going to "milk"
it as long as I can!
After reading a few internet threads, the deck bearings do not last
that long on some of the John Deere models and I am not talking about
the cheaper ones they sell to Lowe's, etc. for resale.
Most of the time you get what you pay for, but I don't think it fits
current John Deere, whereas I believe their quality has diminished over the
decades trying to
stay competitive with other brands which are getting a Lion's share of
the market.
After the spindle replacement, I changed the oil, oil filter, spark
plugs, cleaned the air filter and greased the fittings.
BECAUSE ITS GREEN, DOESN'T MEAN QUALITY AND SERVICE
Just for the record to validate my above heading, I used a Troy-Bilt
lawn tractor which was around 18 HP with a Kohler engine and 36 inch wide cutting deck for
approximately twenty-five (25) years and did not have any major repairs
or issues, other than cross threading the spark plug which had to be
re-tapped/threaded. The deck spindle bearings were still good when I gave it
to our oldest daughter, of which she used it for a few years and I believe
that was about eight (8) years ago.
The only problem with the machine was the carburetor needed cleaning
and the fuel line needed to be blown out!
PLANNED OBSOLESCENCE
After viewing a couple
videos on why many lawn tractor deck spindle
bearings fail within a few years, it was apparent that they were
manufactured to fail. The reason being, there are grease fittings
on most of the spindle assemblies, however the bearings are sealed and
the applied grease never reaches the inside of the bearing raceway.
The only grease in the bearings is the grease applied during the bearing
manufacturing process.
Here is the definition of planned
obsolescence: Planned obsolescence means
manufacturers deliberately designing products to fail prematurely or
become out-of-date, often to sell another product or an upgrade – a
practice that is barred in some countries.
Web page updated by Bill aka Mickey Porter on 03-22-2022.
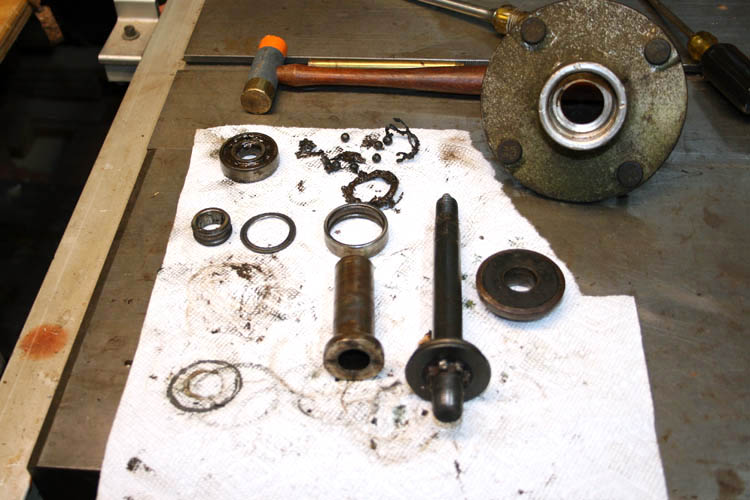
DECK SPINDLE TEAR DOWN
We had rain last night early morning (03-24-2022) and too wet to do
anything outside and to keep from getting
"antsy", I decided to tear down the X300 deck spindle, whereas at least one bearing was
completely shot.
Yesterday, I attempted to take the spindle apart to access the
bearings, but wasn't able to do it. There are no YouTube videos
showing the tear down of the John Deere spindle, part number
AM137483; finally figured out the top idler spacer needed to come off. It was
apparently fixed solid to the main shaft; i.e., press fit on the shaft.
I soaked the shaft/heavy washer with Kroll oil overnight and this no
doubt helped!
There was about 1/8 inch clearance between the washer and the spindle
housing and took a flat head screwdriver and worked around the diameter
of the housing and it started to move upward and finally got it removed.
I definitely did the above the hard way, whereas all I had to do was
put a nut on the top threaded spindle and tap it with a hammer and the
spindle will start moving out of the spindle housing. You have to
readjust (back out the nut) to give the shaft clearance space, whereas
the spindle will come out the bottom of the spindle housing.
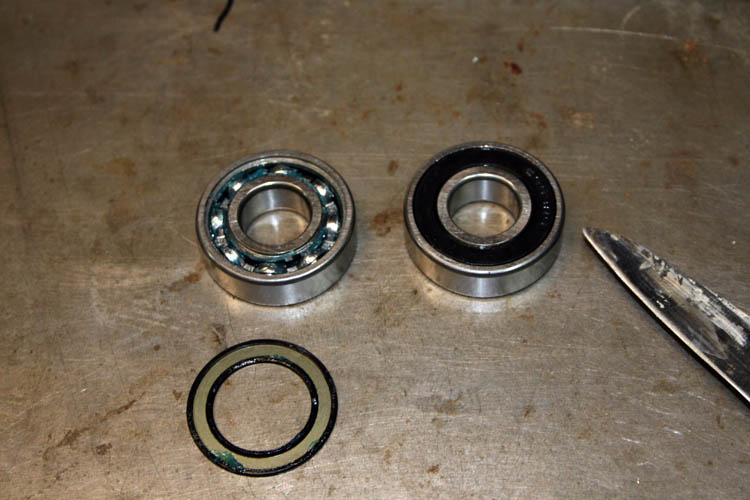
As depicted by the pixs below, the top bearing was totally destroyed
and somewhat dry indicating there was no grease getting to it.
There was some grease inside the spindle housing and the lower bearing
was still in fairly good shape. I did notice that there was no
seal on the bottom bearing facing the spindle cavity and probably why it
did not fail, of which there was adequate grease in the bearing raceway.
NOTE: John Deere sells the above bearings, whereas the
bottom bearing has the top seal removed and the upper bearing has both
seals in place. No amount of grease you pump will get into the top
bearing and as evidenced will prematurely fail!

A closer look at the bearings, of which the top bearing was totally
destroyed aka shot.
I ordered a couple after market bearings for this spindle and will
drill and tap a weep hole in the upper spindle housing and also remove
the seal on the bearings that is facing inside the spindle housing to
allow grease to get to the bearings. I tested the zerk grease
fitting on the top of the shaft and there was grease getting through two small holes on either
side of the main shaft.
As soon as the bearings arrive, will get the deck spindle put back
together and have a spare unit!
REPLACED SPINDLE BEARINGS
I received the spindle bearings today (03-28-2022) and already
drilled and tapped a weep hole in the spindle housing to ascertain that
the cavity will be full of grease.
I installed the spindle bearings without the usage of a press,
whereas I have a small press to install frets into musical instruments,
but it was not large enough, therefore I tapped the bearings into place
with a small hammer with a brass and a hard plastic head. After
the bearings were installed, I filled up the spindle cavity with high
temperature bearing grease. Pixs below:
I removed one of the bearings seals on each bearing and the
bearings without the grease seal will face inward toward the spindle
cavity to allow grease to get to the bearings.
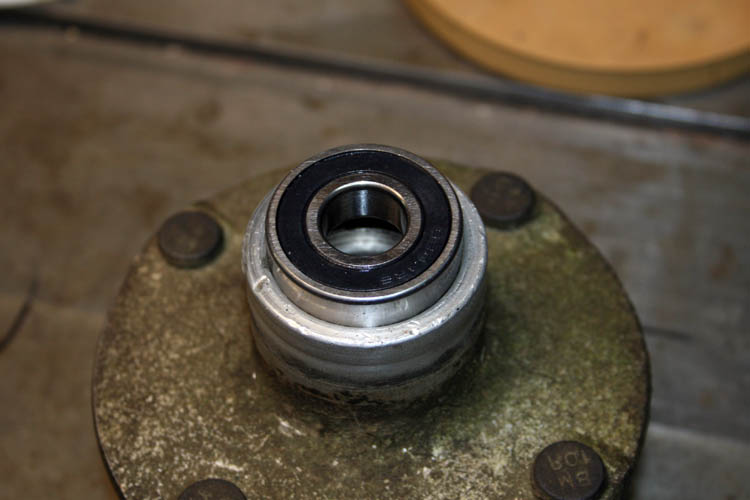
The bearing is slowly tapped into position.
Spindle housing with the bearings and caps in place along with the
weep hole sealed with a 10-24 bolt.
I will give the spindle a test run using my large drill press to
drive the spindle and see if the grease stays in place. There was
some slop between the main shaft and the inner bearing no doubt due to
wear. If it doesn't work, I have enjoyed taking the spindle
housing apart and installing the bearings even though the bearings cost
$ 15.50 for a set of two.
Web page updated by Bill aka Mickey Porter on 03-28-2022.
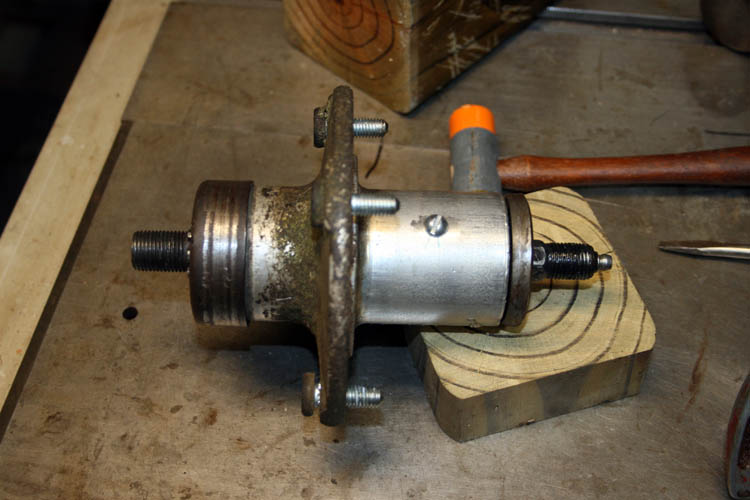
REPLACED LEFT SPINDLE
The lawn tractor was making a terrible racket when the mowing deck
was engaged and ordered a John Deere deck spindle assembly from one of
John Deere's vendors via EBay which was a few bucks cheaper than the
closest John Deere Dealer in Polkton, NC. The hours on the JD was
approximately 178 hours.
I replaced the worn out spindle assembly and the top bearing was
totally shot and the ball bearing raceway had given way and the ball
bearings had worn grooves into the spindle spacer rendering the spindle
housing unfit for replacing the bearings.
It didn't take but about 30 minutes, guessing at the time since I now
know the short cuts and easy way of removing the deck, etc. and added a
1/2 inch drive pneumatic impact wrench which was a breeze removing the
spindle housing, blade and pulley nut.
I did notice a couple belt flat groove idler pulleys had excessive play in them
and will order replacements and order a new belt since it is showing
some wear, but still working ok.
After replacing the spindle assembly, I cut the grass in the front
and side yard and the lawn tractor was not too loud when the deck was
engaged and no excessive vibration as before.
Web page updated by Bill aka Mickey Porter on 04-16-2022.
REPLACED TWO DECK FLAT IDLER PULLEYS
On May 11, 2022, I replaced the two flat idler pulleys on the
deck. I have on back order the V-Drive deck pulley. When the
V-Drive pulley arrives at the John Deere outlet in Polkton, NC I
will purchase two of the hard plastic deck wheels which are worn badly.
The deck drive belt is in fairly good shape and will
"milk" it a little
longer............grin if you must!
After installing the two flat deck idler pulleys, it was amazing how
quiet the machine sounded with the blades engaged. The total
operating hours for the X300 was 182 hours.
The only thing that didn't need replacing on the 42 inch Edge deck
was the two spindle drive pulleys.
Basically, I will have rebuilt the deck when the V-Drive deck pulley
arrives and the replacement of the worn deck wheels.
To say the least, "I am not impressed
with the reliability of this John Deere X300 42 inch deck."
Web page updated by Bill aka Mickey Porter on 05-11-2022
REPLACED WORN DECK WHEELS
On May 16, 2022, I replaced the two worn deck wheels and noticed that
the shoulder bolts aka axles were worn badly as well and order some
generic shoulder bolts from EBay.
The shoulder bolts I received, the shoulder portion of the bolt was
about 3/32 inch too long and added a washer between the shoulder bolt
and wheel to the deck frame bracket. I had to drill the washer
hole out to 5/8 inch diameter and the wheels were snug without much
wobble and turned freely.
NOTE: While at the John Deere place in Polkton, NC, I
purchased a belt and picked up the v-drive pulley that was on back
order. I will not change the v-drive pulley unless
the v-drive pulley gets real noisy, wobbly, etc. and/or the drive belt
breaks.
Web page updated by Bill aka Mickey Porter on 05-20-2022.
MOVED SPLIT WOOD TO THE FIRE PIT AREA
I pumped up the tires on an old wagon garden cart that has about seen
better days. I used that wagon/cart for many years hauling our yard
Christmas decor
lights, etc. from the basement to the front yard which served
us well.
After finishing the deck spindle tear down, I was still a little
antsy and decided to move the
split firewood to the weenie roast fire pit:
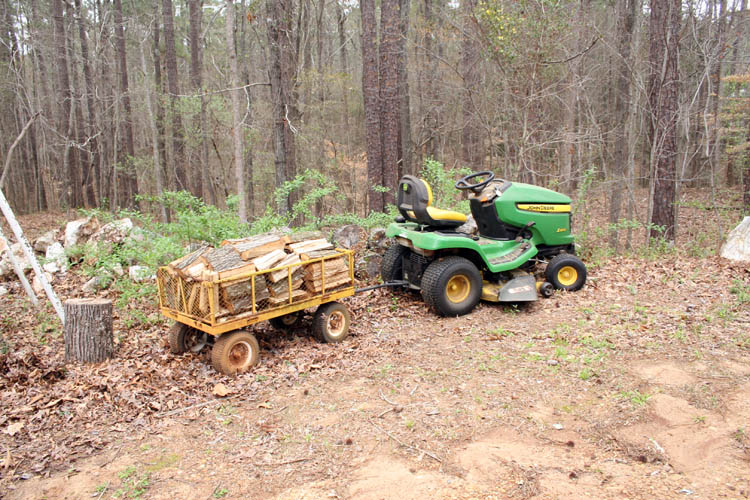
I will leave the firewood in the wagon garden cart for now and put a plastic tarp
over it and let it continue to dry out..
Web page updated by Bill aka Mickey Porter on 03-24-2022.
CHAINSAW MAINTENANCE
The Husqvarna 55 chainsaw has gotten a good workout so far this
season and wasn't running "perfect", therefore changed the spark plug
(Champion RCJ7Y) which was fouled some. I checked the air
filter and it was ok and basically that was all the maintenance needed.
The chainsaw fired up and sounded pretty good and still cutting
excellent. No pixs this time.
Web page updated by Bill aka Mickey Porter on 03-29-2022.
STAINED YARD SWING
The humidity today is 36% and the temperature 65 degrees F. and a
good day to spray a coat of stain on the yard swing. I first wiped
the swing down with with mineral spirits removing any dirt/grime and let
it dry for an hour to two. The yard swing has been resting in the
basement woodworking shop since cold weather last year and had a chance
to dry out and acclimate to the basement humidity, whereas the furnace
keeps the moisture level down.
I had about 2.5 gallons of oil type based stain TWP 100 from
SealandProtect.com
and stirred it up real well and it was still good. I used
the CA Technologies spray gun Lynx LH300 and sprayed a good coat of
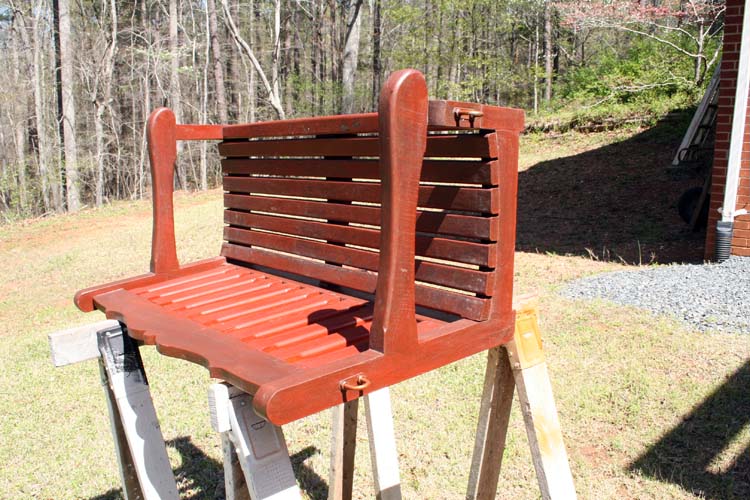
stain on the entire swing. Pixs below:
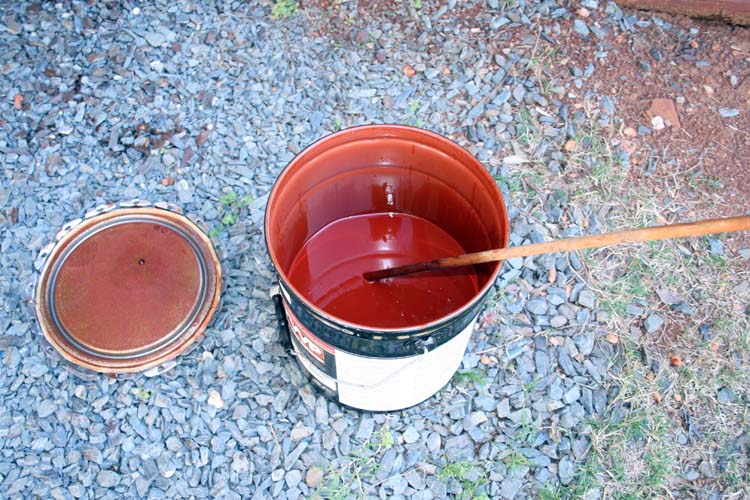
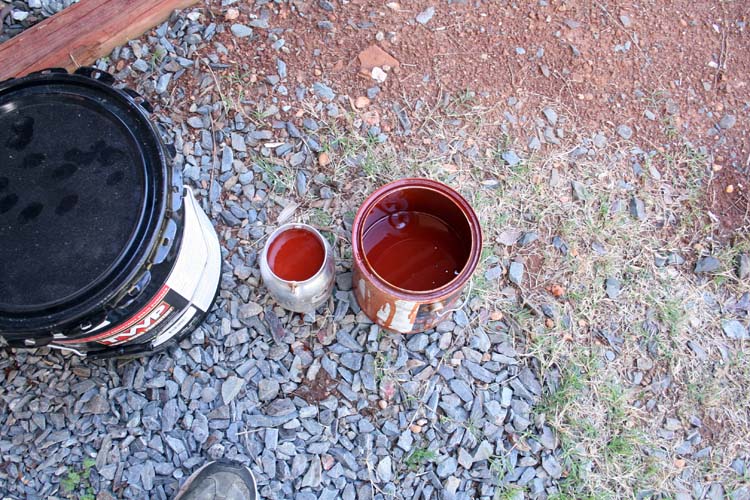
I transferred stain from the 5 gallon container to the 1 gallon
container to make less of a mess filling the quart spray gun cup.
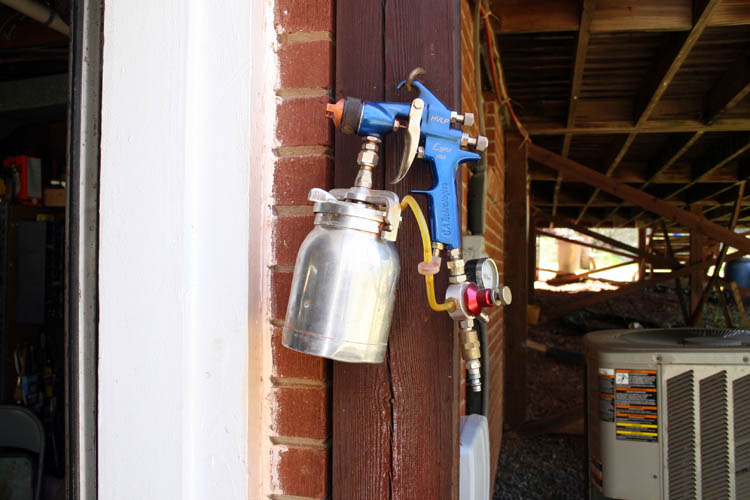
The above CA Technologies spray gun has given me excellent service
over the years.
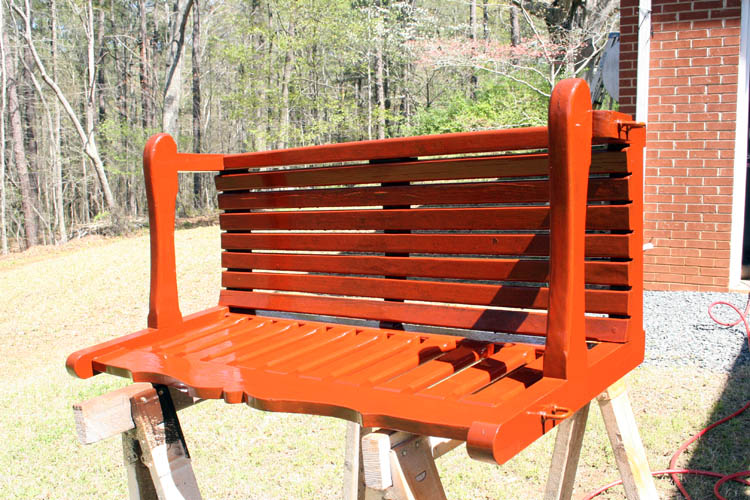
I will let the swing dry for a couple days before hanging it under
the white oak tree in the front yard.

Hopefully, when the weather gets warmer of the early morning hours, I
will get a chance to use the swing and get some
meditation
in.
Web page updated by Bill aka Mickey Porter on 04-07-2022.
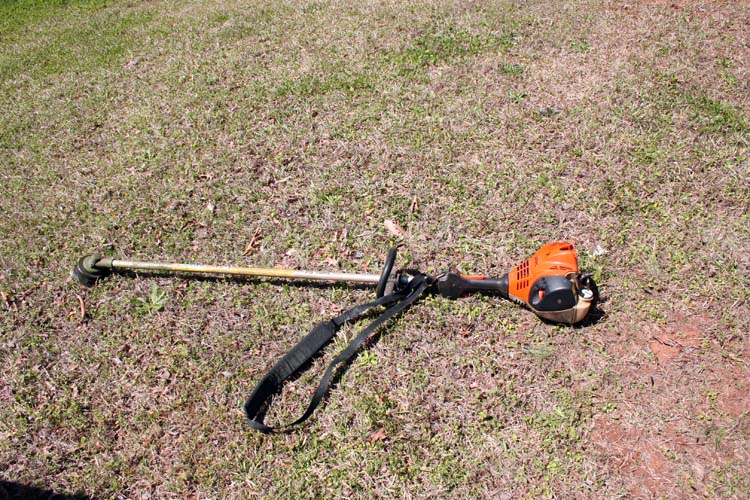
CHECKED OUT THE WEED TRIMMER
I rinsed out the gas tank on Stihl FS 70RC weed trimmer and added
fresh gas to the tank. It fired up ok and after idling a while ran
very good and caught up on some weed trimming. I don't think i
need to replace the spark plug at this time. I used the air hose
to clean any debris from the trimmer housing and it should be good to go
for this grass cutting season.
Web page updated by Bill aka Mickey Porter on 04-01-2022.
APPLIED ORTHO WEEDCLEAR TO THE WILD CLOVER
It seems like the wild clover is trying to take over the front yard
this year in places, therefore I am mixing up a solution of Ortho
Weedclear to kill it and give the grass a chance to grow. Our
weather prognosticators are predicting a high today of eighty-two (82)
degrees and will be an ideal day to spray the Weedclear solution.
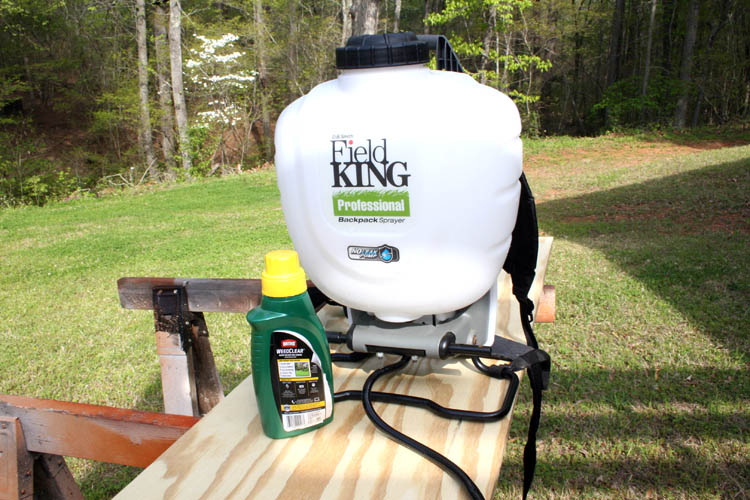
I applied approximately 3 gallons of the solution to the yard and
hopefully it will kill the wild clover.
Web page updated by Bill aka Mickey Porter on 04-12-2022.
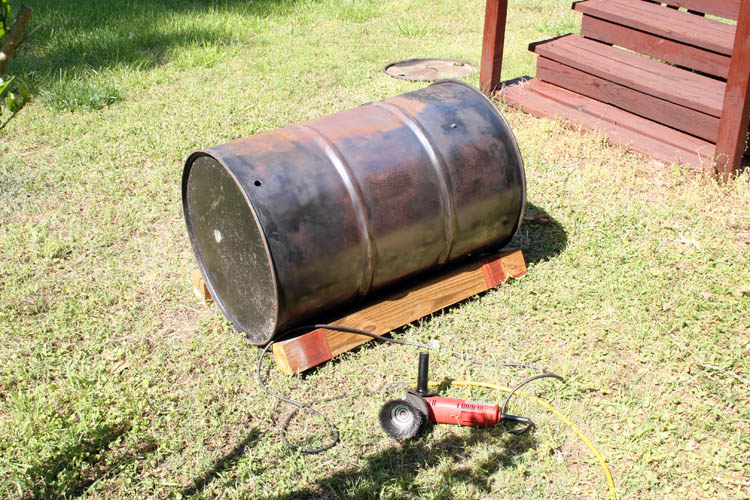
SPRAY PAINTED THE UGLY DRUM SMOKER
Our ugly drum
smoker needed a fresh coat of spray paint and got the ole 4
inch Milwaukee angle head grinder out and outfitted it with a wire brush
and went to work wire brushing the rust from the ugly drum smoker.
A few days earlier, I burned the inside of the drum out using plenty of
junk mail, newspapers and some small cedar wood robbed from our fire pit
area.
I had a partial can of gloss black spray paint, but the nozzle and/or
tube was clogged up and didn't get much usage out of that can and went
to H. W. Little and purchased a couple cans of Rust-oleum gloss black spray paint.
Below is the finished drum, sans the lid:
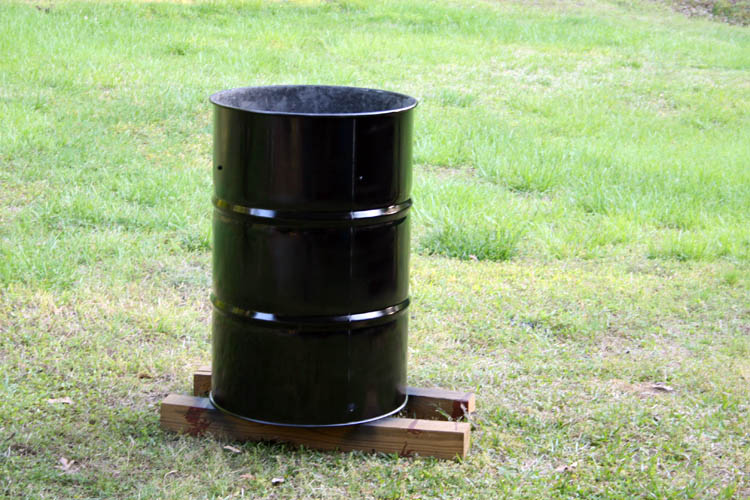
Below, the ugly drum smoker getting wire brushed:
Come July 12th, the ugly drum smoker will be ten (10) years old and
don't think I have spray painted it before.
I need to burn the accumulated grease off the underside of the UDS lid and apply of coat of
spray paint to outside. I will probably do that when we have
another weenie roast for the Gonzales Grand Kids!
I have done numerous Boston butts in the ugly drum smoker along with
turkey and chicken leg quarters. The hickory smoke flavor in the meat is
hard to beat and you cannot duplicate the same with a gas
grill...........end of story!
Web page updated by Bill aka Mickey Porter on 04-22-2022.
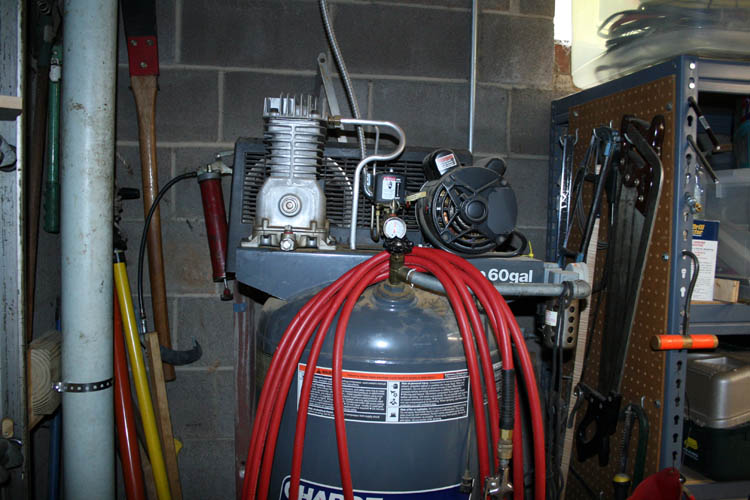
CHANGED OIL IN AIR COMPRESSOR
With the wet damp weather limiting my outside activities, I changed
the oil in the 6HP 60 gallon single stage air compressor.
The oil level was low and dirty for sure. I can't remember the
last time I changed it and glad I got around to it today.
I also washed the felt air filter out and letting it dry before
putting it back in place.
Web page updated by Bill aka Mickey Porter on 05-26-2022.
LEAVING ON A
SPIRITUAL NOTE
If you do not know Jesus Christ as your Lord and Savior, please take
this moment to accept him by Faith into your Life, whereby Salvation
will be attained.
Ephesians 2:8 - 2:9 8 For by grace are ye saved through
faith; and that not of yourselves: [it is] the gift of God: 9 Not of
works, lest any man should boast.
Hebrews 11:1 “Now faith is the substance of things hoped for,
the evidence of things not seen.”
Romans 10:17 “So then faith cometh by hearing, and hearing by
the word of God.”
Open this
link about faith in the King James
Bible.
Romans 10:9 “That if thou shalt confess with thy mouth the
Lord Jesus, and shalt believe in thine heart that God hath raised him
from the dead, thou shalt be saved.”
Open this
link of Bible Verses About Salvation,
King James Version Bible (KJV).
Hebrews 4:12 “For the word of God is quick, and powerful, and
sharper than any two edged sword, piercing even to the dividing asunder
of soul and spirit, and of the joints and marrow, and is a discerner of
the thoughts and intents of the heart.”
Romans 6:23 “For the wages of sin is death; but the gift of
God is eternal life through Jesus Christ our Lord.”
Romans 3:23 “For all have sinned, and come short of the glory
of God;”
Micah 6:8 “He hath shewed thee, O man, what is good; and what
doth the LORD require of thee, but to do justly, and to love mercy, and
to walk humbly with thy God?”
Philippians 4:13 "I can do all things through Christ which
strengtheneth me."