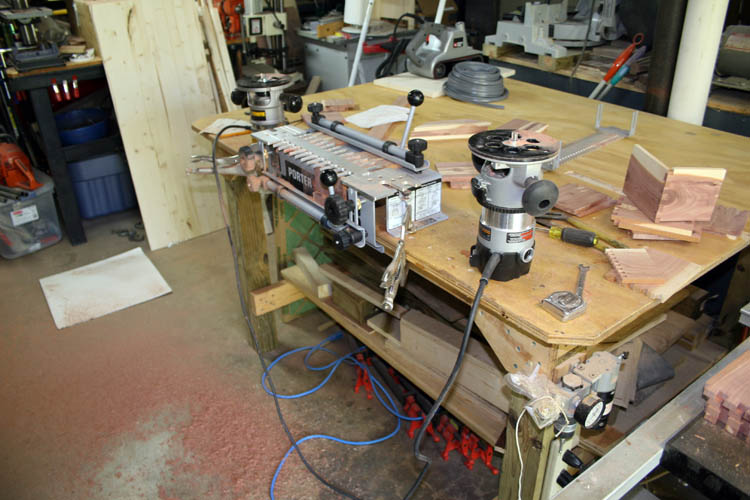
NAPKIN HOLDER CONSTRUCTIONI have a
Porter-Cable 12 inch 4216 Deluxe Dovetail
Jig Combination Kit that has been resting in the original
box since my 2012 retirement and finally got around to getting it out to cut some
dovetails for a few napkin holder boxes.
Most men, and I am certainly speaking for myself are not the quickest to
follow instructions of any kind.....grin if you must. Using a dovetail
jig whether made by Porter-Cable, Leigh, Akeda or other manufacturers, there is a learning
curve to operating the fixture/jig properly and the instructions must be
followed. I did not try and wing it and definitely used the
instruction manual that came with the jig.
Prior to actually setting the dovetail jig up, I watched a few YouTube videos which
makes it look very easy but those folks already have it figured out and have
practiced with it before firing up the camera.
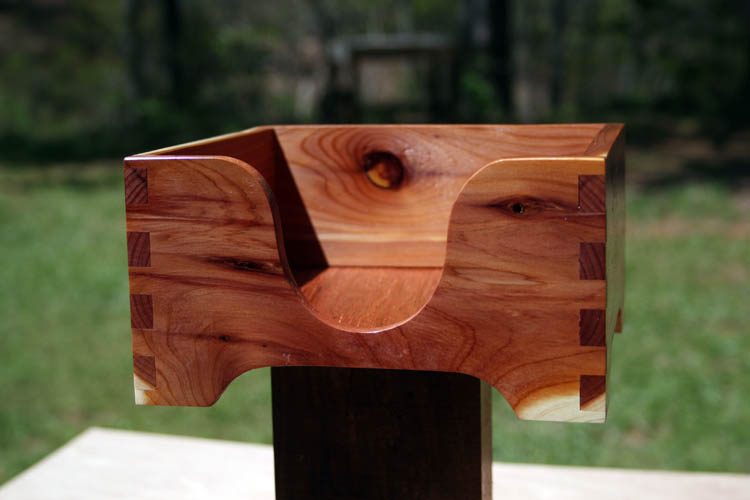
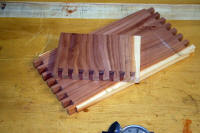
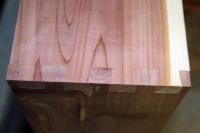
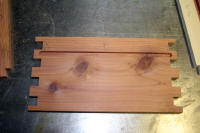
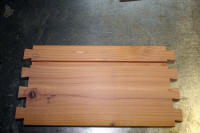
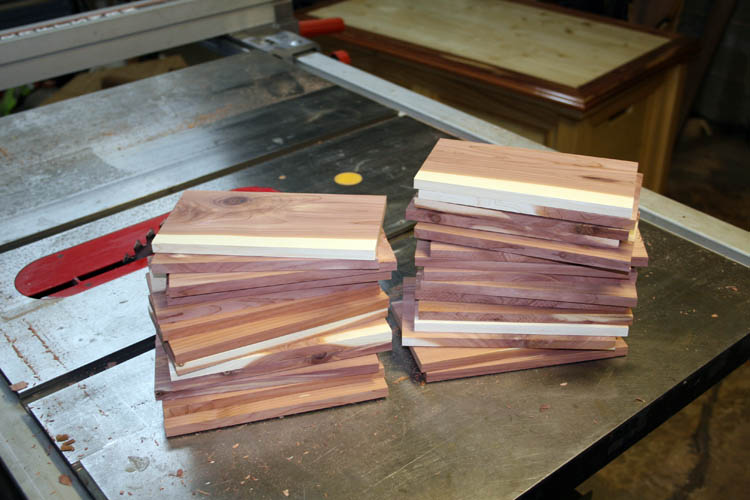
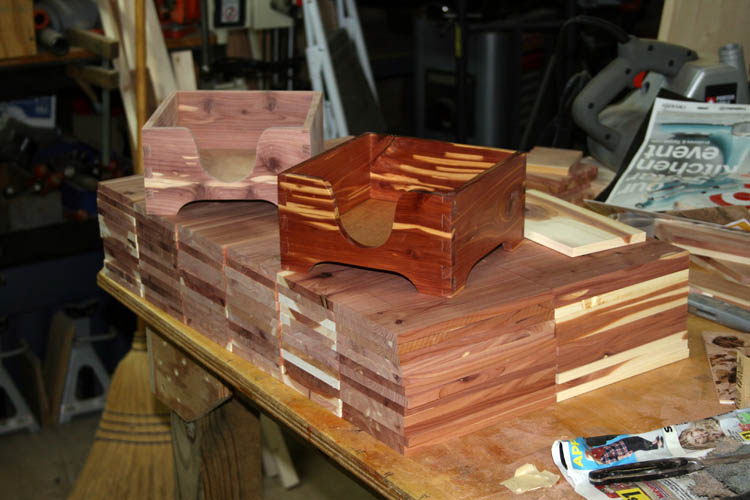
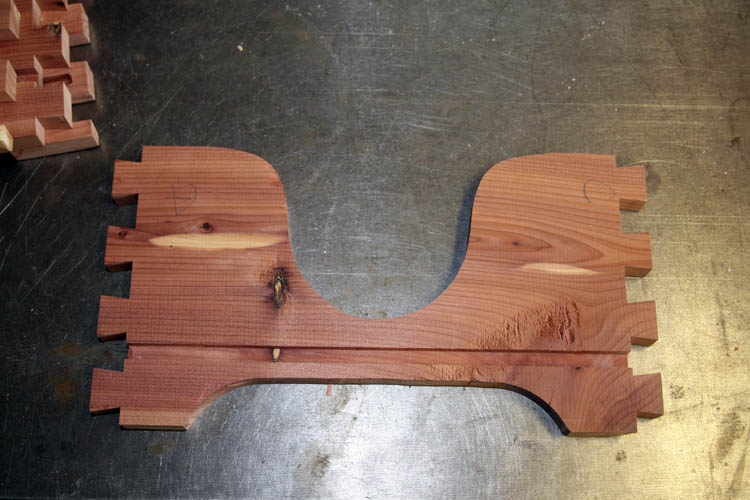
Above SN 1 of SN 43 completed napkin holders.
PERSONAL SAFETY AND LIABILITY ISSUES
My goal will be to keep Safety
paramount because hand and power tools can do serious bodily harm and death
if not used properly, therefore these pages are solely for
entertainment purposes only from
a personal liability standpoint. Please read the
Legal Stuff
page for additional information concerning liability issues
before going any further. Safety glasses and hearing protection is a must,
although I do forgo the hearing protection many times; my bad!
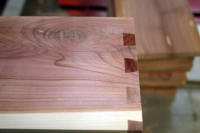
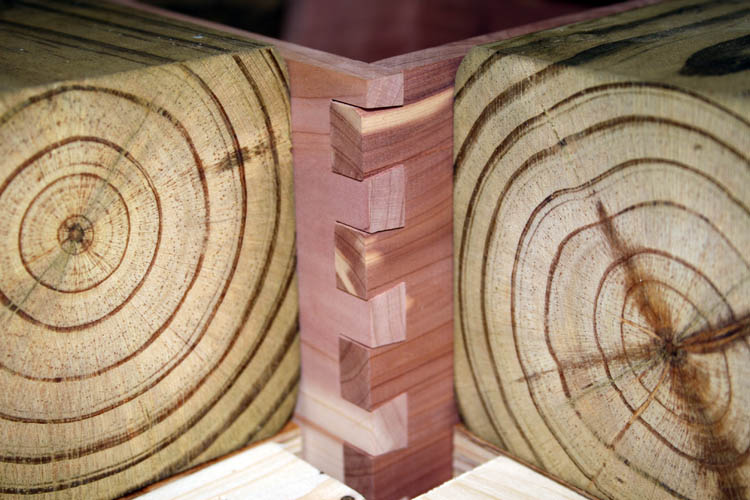
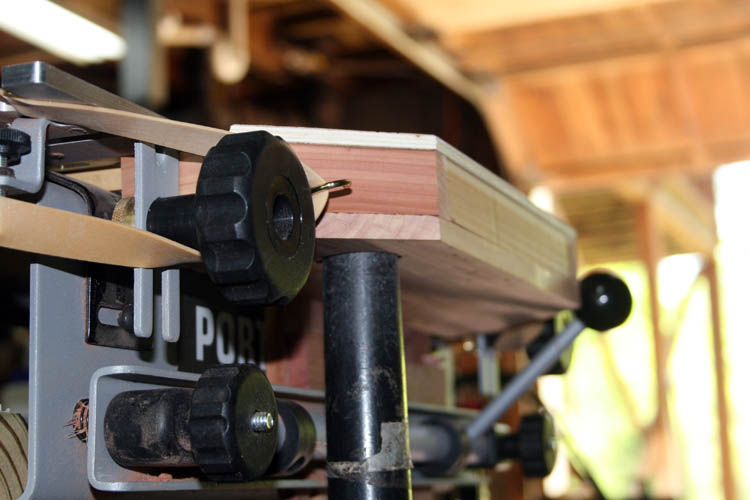
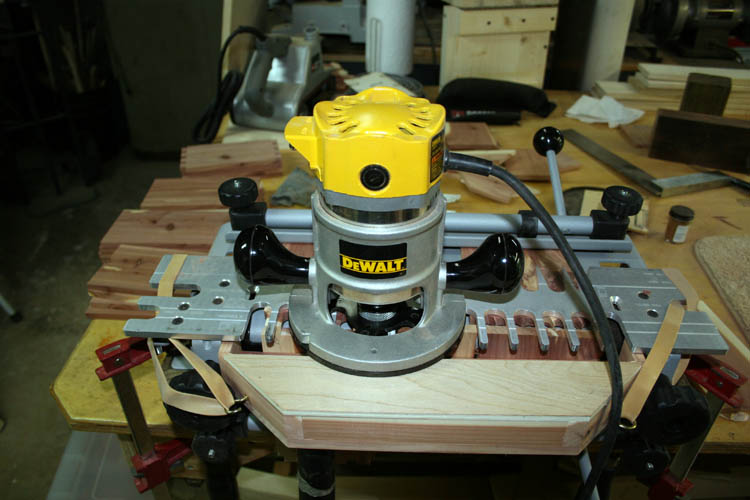
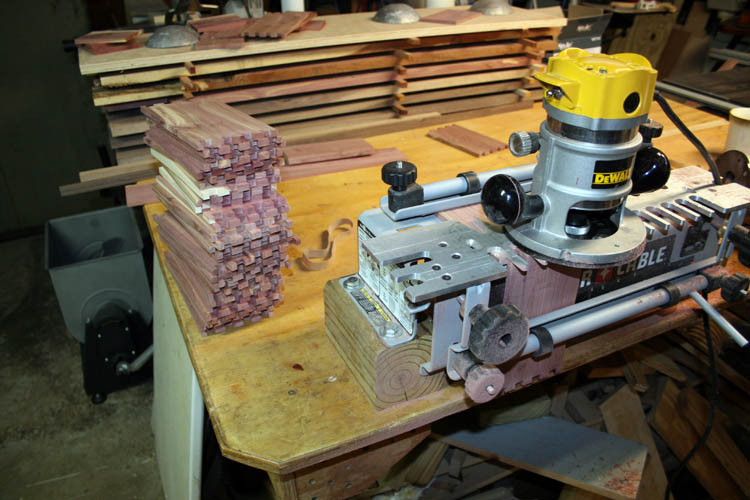
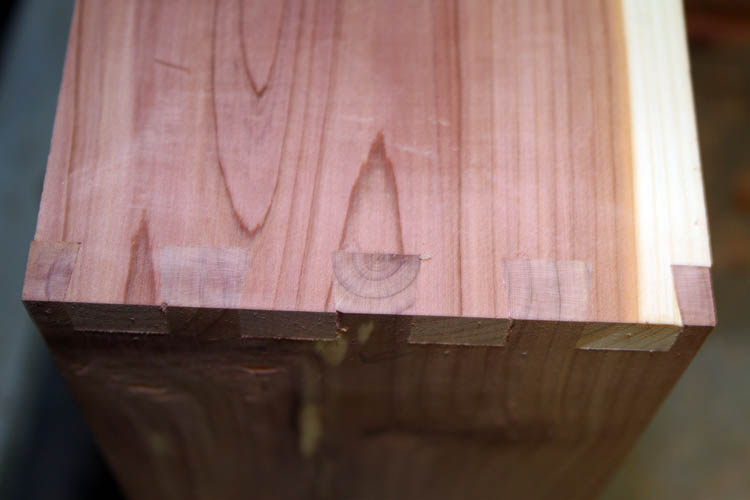
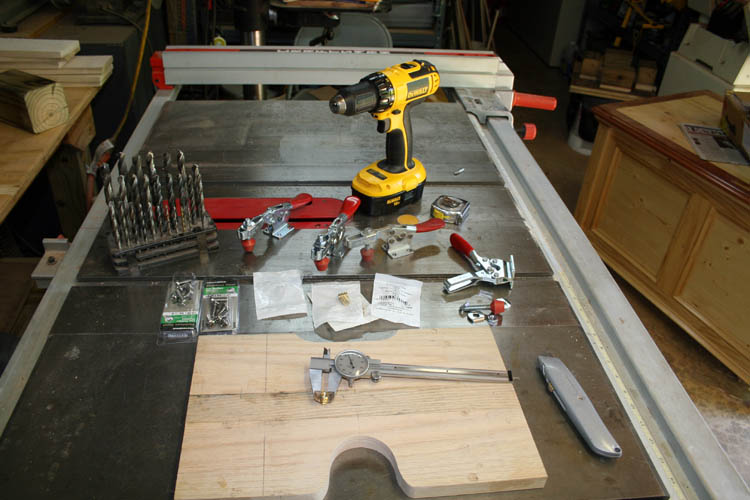
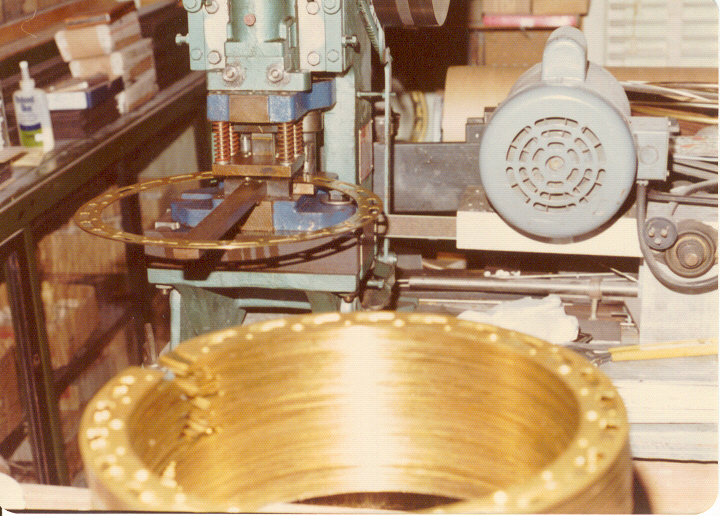
DOVETAILS AND PINS
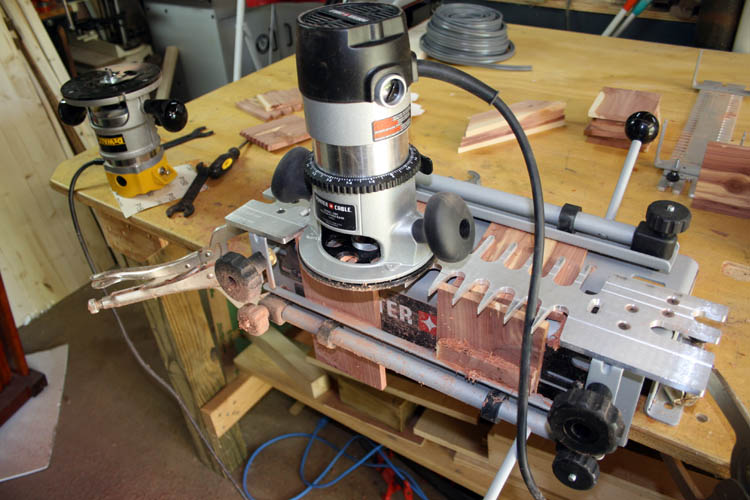
I purchased the above mid-sized router, A Porter-Cable model 690LR rated
at 1 3/4 HP just for the
straight two blade carbide tipped router bit used to cut the pins and used
an existing DeWalt model 610 router rated at 1 1/2 HP for the dovetail bit. If using
only one router, you have to change cutters and reset the router depth each time
you transition from cutting the tails and the pins. I planned
on doing about eight (8) of the napkin holder boxes along with other dovetail
projects and one more router will not take up that much real-estate. It
took only a short period of time to realize that I preferred the DeWalt model 610 router over the
Porter-Cable model 690LR because of the location of the on/off switch,
whereas the DeWalt 610 has a toggle switch and the Porter-Cable has a rocker
switch under clear plastic.
Also, I like the rack and pinion gear adjustment versus the rotating
adjustment of the Porter-Cable router. The Porter-Cable router has far more vertical height than needed for cutting
the tails and pins and more prone to tip forward since over half of the
router base is extended beyond the tips of the fingers on the jig plate when
moving from one tail/pin to another. I would have purchased another DeWalt 610 but they
stopped making that model sometime around 2002 and was outbid on EBay for a
used DeWalt 610 router that had been used a couple times and still with
the box, etc. The DeWalt replacement
model 616 does not have the rack and pinion gear assembly to change the depth of
the router cut and using the Porter-Cable rotating method instead.
DEWALT ROUTER 610 UPDATE
I believe the DeWalt 610 router is superior to the Porter-Cable 690LR
router for this application because the DeWalt 610 has a much lower profile
and the router height adjustment (rack and pinion gear) assembly is on the
back side of the router adding extra weight to help keep it from tipping
forward. I recently found a DeWalt 610 router on EBay, new and unused
in the original box, whereas used ones were selling like hot cakes since
that model hasn't been made since 2002. I had to pay top dollar for it
because several bidders wanted it as badly as I did.
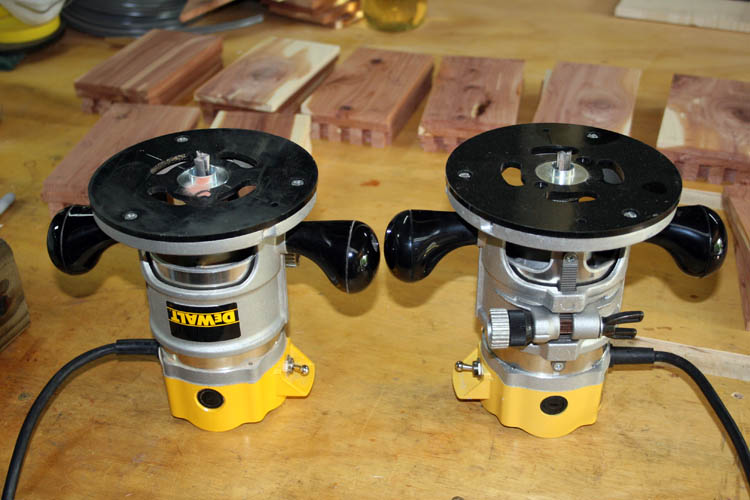
Above pix added on 05-17-16, whereas I started another dozen of those
napkin holder boxes but do not plan to add any sequence pixs since the
procedures are the same and it would be redundant.
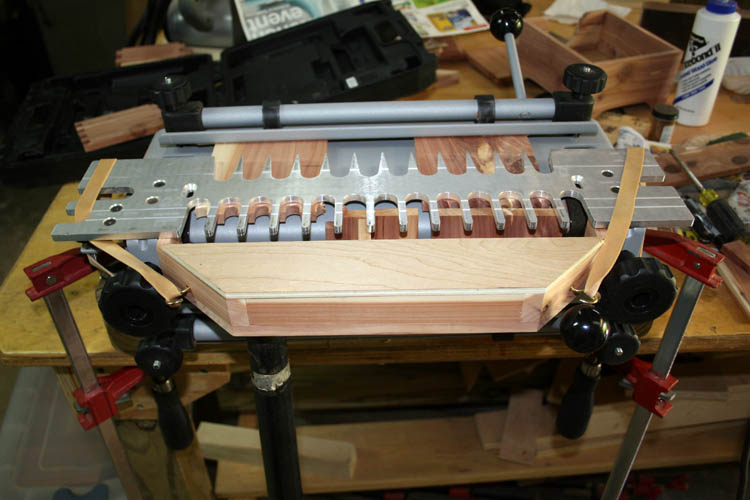
I originally set the dovetail jig up for cutting miniature dovetails but
they lack the eye appeal of the standard size dovetail in my humble opinion and settled for a
standard dovetail and pin set-up.
It took at least a dozen trial cuts on scrap material the same thickness
I planned to use for the napkin holder before the light bulb in my head finally came on
and realized that you only move the jig plate setting for loose or tight
dovetail joints on the pin side of the jig. The dovetail is totally
controlled by the jig and the dovetail router bit. There is
flexibility on the pin side of the jig plate as just mentioned.
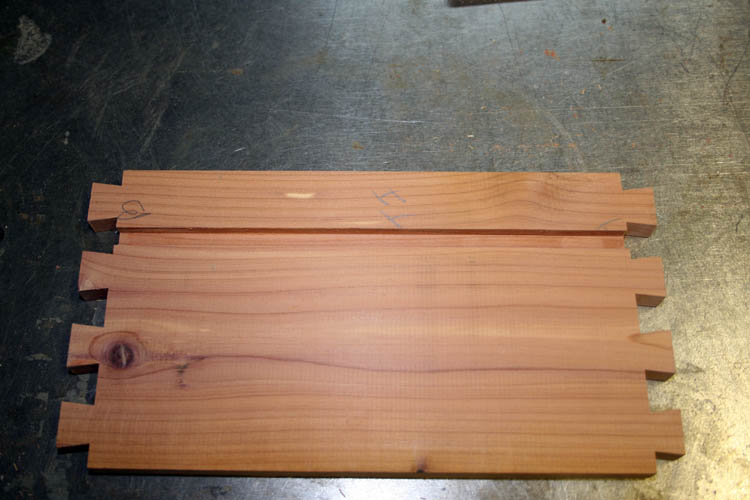
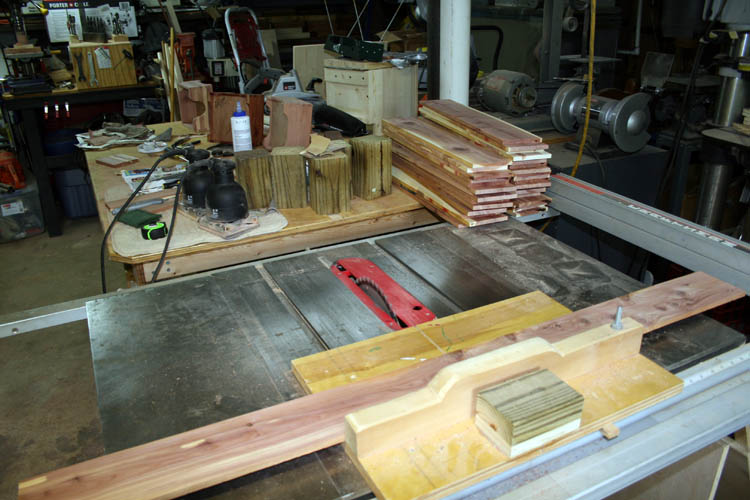
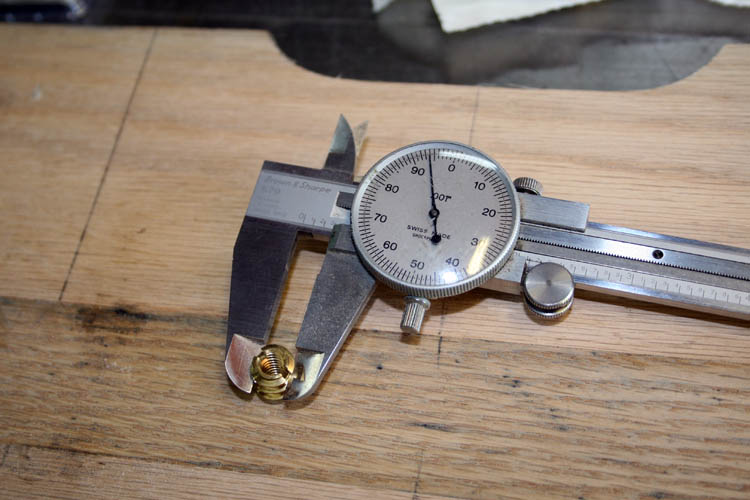
Another critical area for good fitting dovetails, your material has to
be sized the same thickness and cut square and each piece the same length.
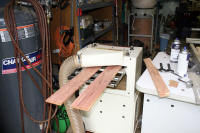
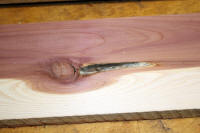
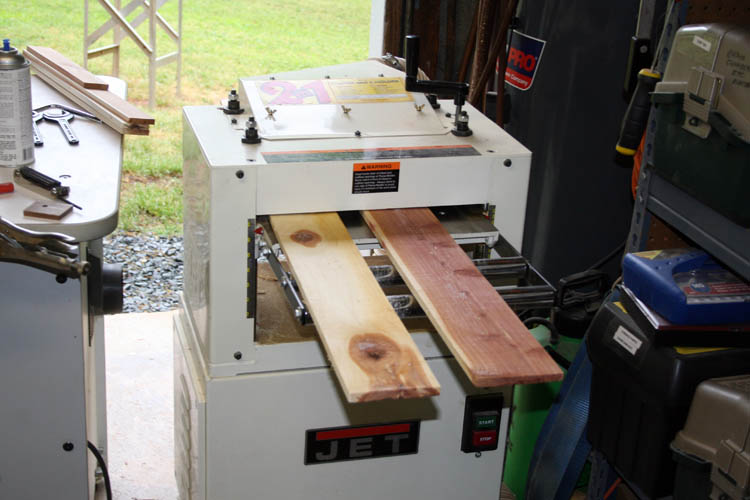
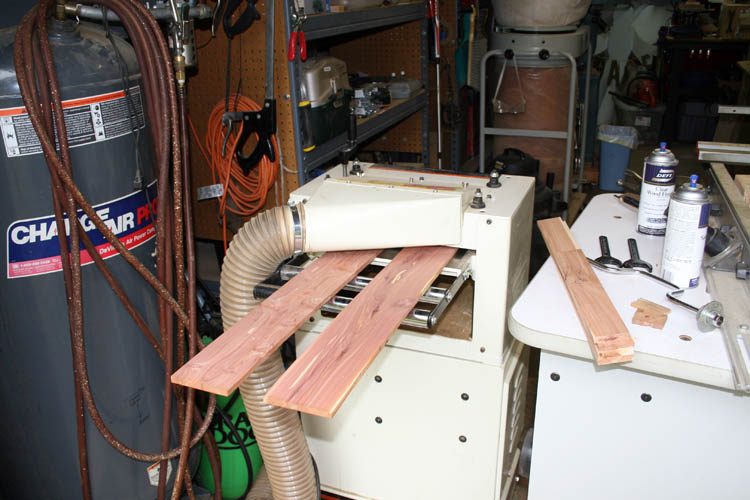
I have a good amount of 1/2 inch plus Eastern Red Cedar not being used for my turkey
box call lids and planed it down to 3/8 inch thickness. I didn't go
through steps of taking pixs of using the planer and table saw, etc.
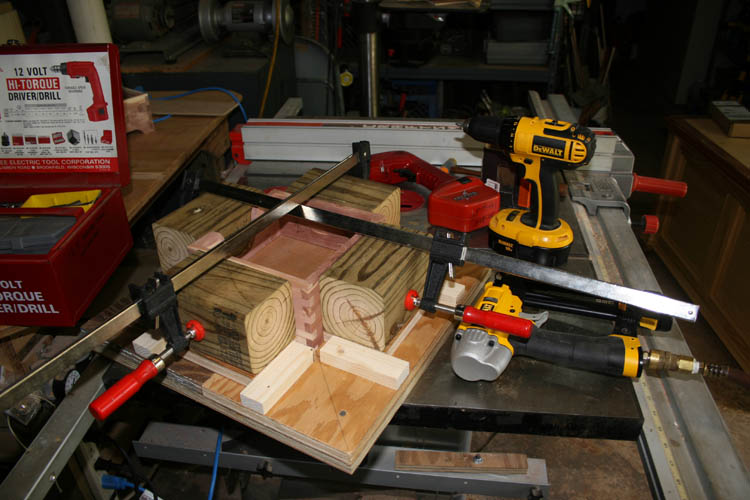
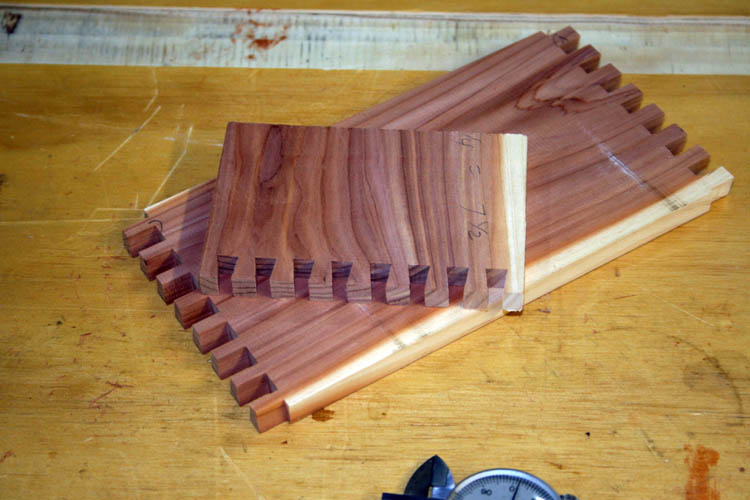
Click on below thumbnail pixs for a larger screen view:
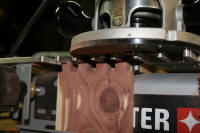

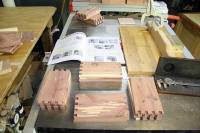
The last picture above shows the instruction manual is getting a good
workout too. After the jig is set-up properly and the depth of your
router bits adjusted, you start off cutting the dovetails first. After
all the dovetails are cut, the pins are then cut. This is where you
have to test the fit of your dovetail to pin for a too tight, too loose or
just right fitting and move the pin jig plate toward or away from the fixture.
There are plenty of marks and icons on the fixture to steer you in the right
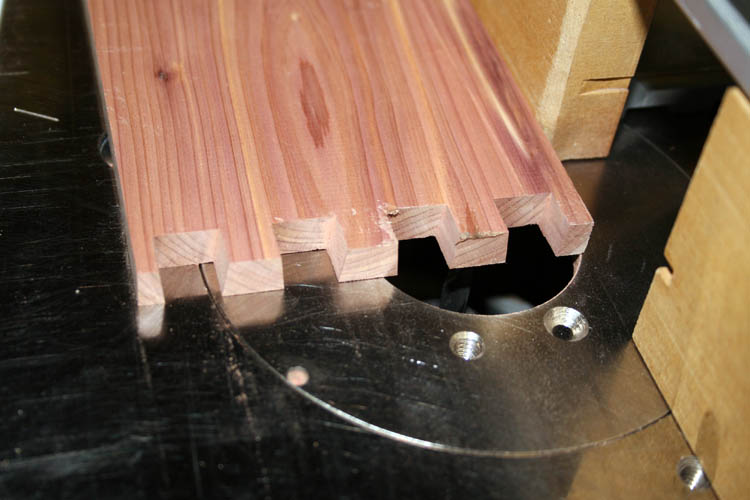
direction. After all the dovetails and pins were cut, I next set up my
router table with a 1/4 inch diameter solid carbide bit to route a
dado aka groove or slot into
the bottom inside of each piece for the bottom to fit in.
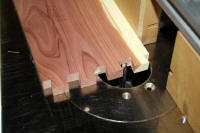
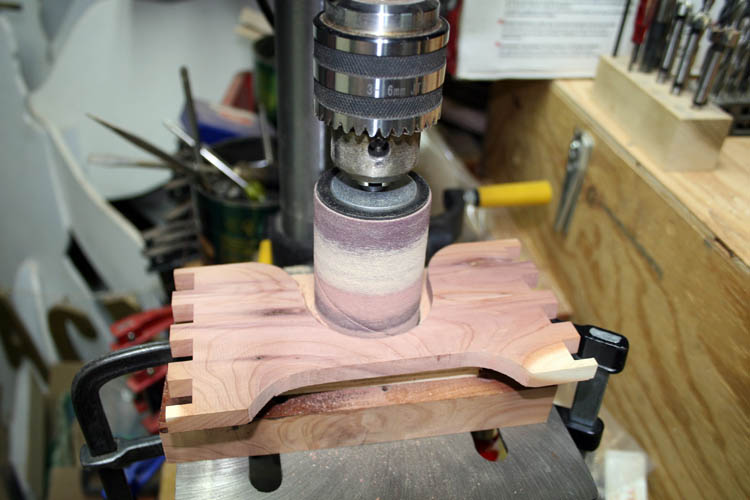
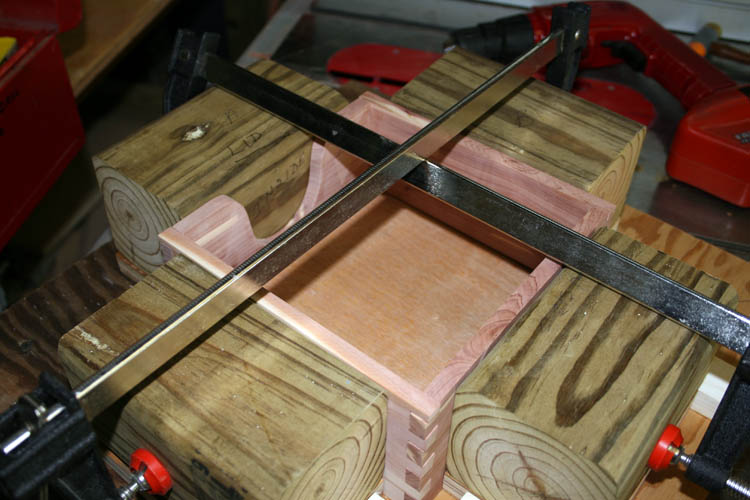
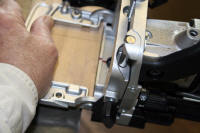
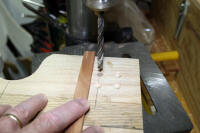
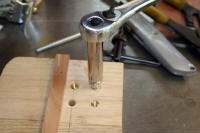
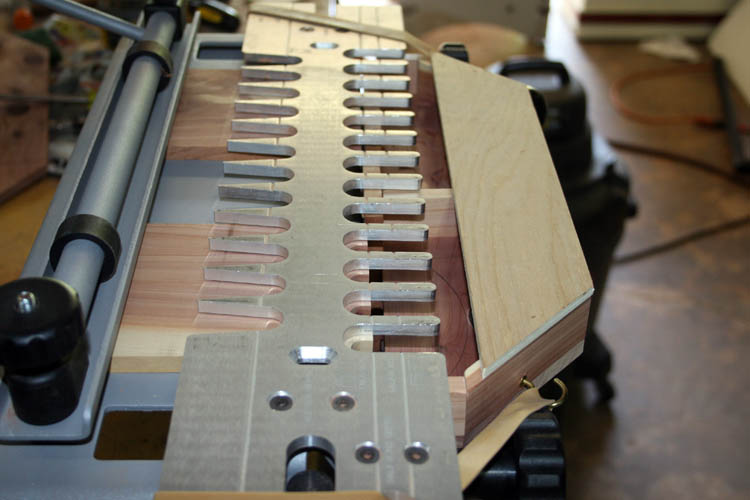
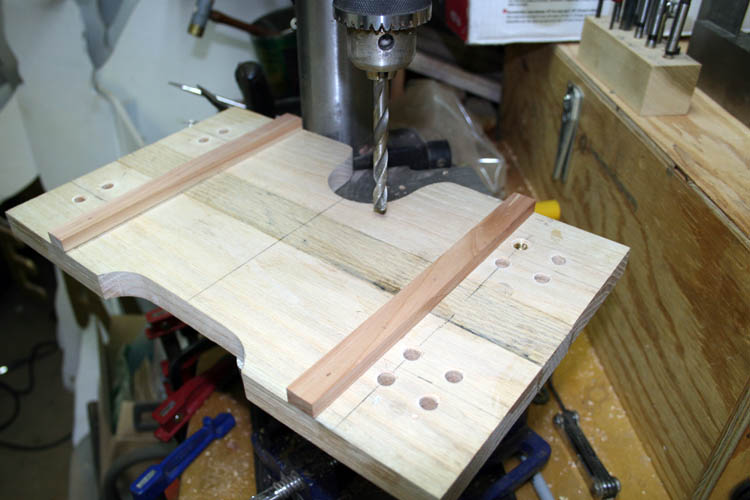
ROUTER TABLE SET-UP
Below pix of the router table with stops set utilizing a
"pivoting stick" type fence:

On the pin boards, you have to make what is called a
blind cut which I am really not
fond of because you cannot see what is taking place and that is where it
gets its name from. You lower the pin board onto the spinning router
bit and must maintain good control since the router bit can sling the part
away from the rotating bit and it is best to turn the router off after
making the blind cut before removing it from the router table. Spiral
bits work the best since some regular two bladed router bits do not plunge
well unless you have the router in motion contacting the wood and would be
opposite for a router table but definitely would not attempt it even with
the small bit. Since the router cutter is only 1/4 inch in diameter, it is not too
dangerous but I still don't like that technique since
Safety is not Paramount making a blind cut!
A safer method for cutting the slot would be using a plunge router with a
means to hold the board into position with end stops and a guide on either
side of the router. You could plunge your router bit into the material
without the possibility of it slinging it off the router bit. So far,
so good and I believe I damaged one piece of wood initially setting the
stops on the router table. You definitely have to
think and practice safety at all
times! I have a system to route such a mortise as described but it is dedicated for
another more permanent operation.
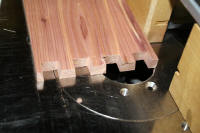
You want the routed slot to go about half-way into the tails on the pin
board, otherwise you will see your routed groove from the end of the tail which is
unsightly. The tail board is not a problem and the router table stops
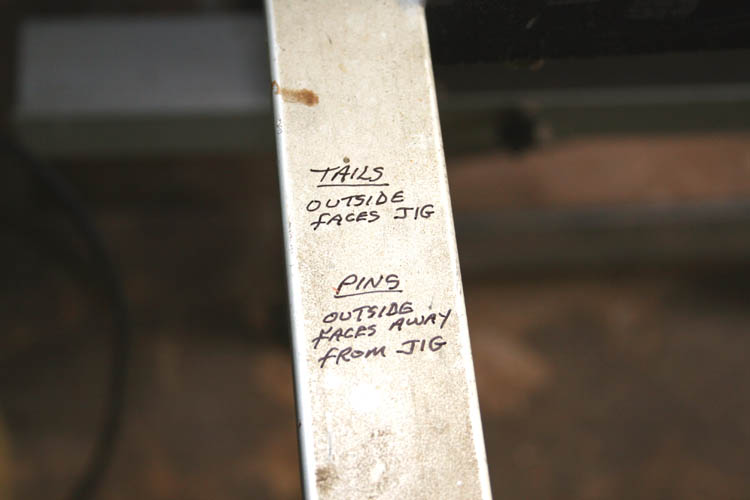
work for both the tail and pin boards. I think I have a mild case of
dyslexia sometimes and hard to distinguish between the pin and tail board
but marking them before you start the project and cutting the tails and pins
makes it a lot easier. On drawer fronts, you want the pin board
forward because it pulls tight against the angle of the dovetail.
However, it doesn't make any difference on the napkin holder box since you
are not pulling on the front but the tails have more eye appeal than the pin
side; just IMHO.
Click on below thumbnail pixs for a larger screen view to visualize the difference:
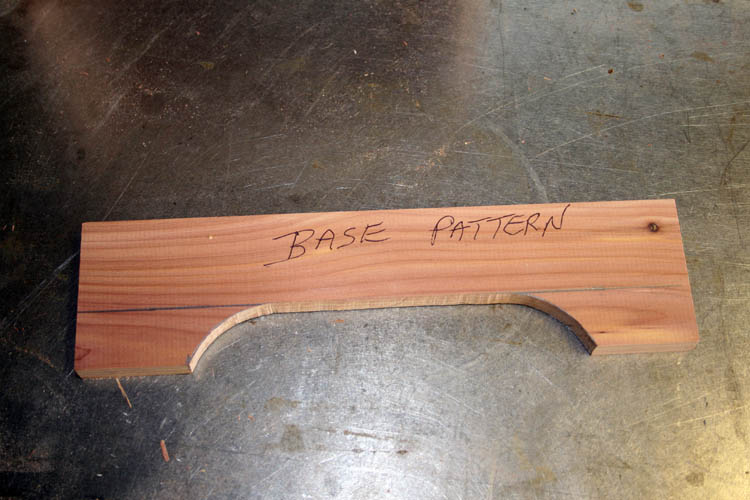
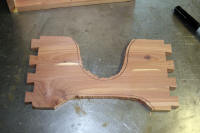
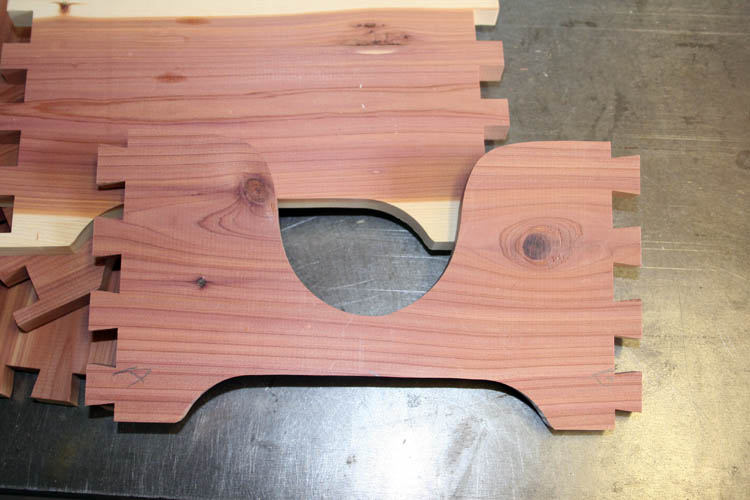
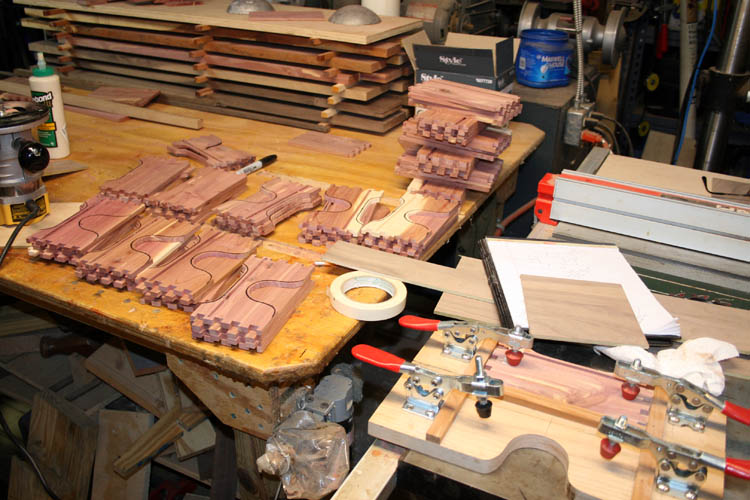
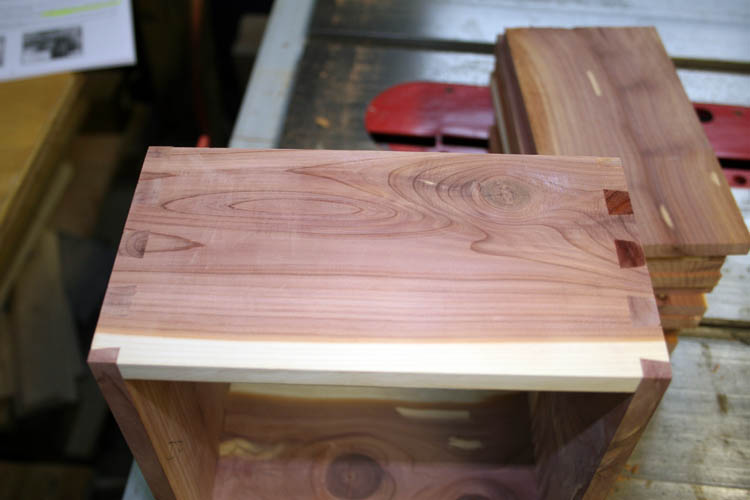
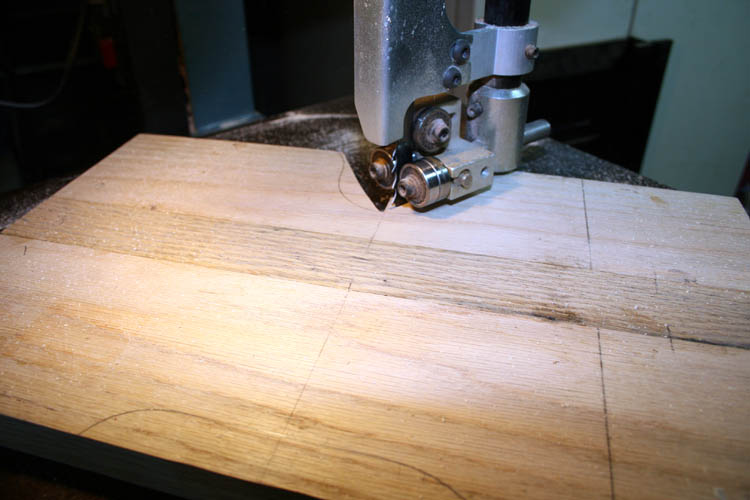
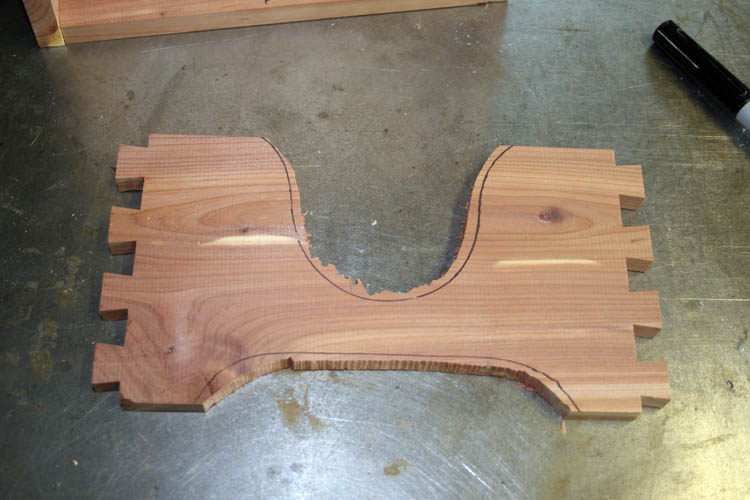
After the slot was routed on front, back and sides for the bottom of the box, a pattern was used
to trace the foot pattern onto each board.
I used my bandsaw to cut the pattern on each board and had to use the
chiseling method since my bandsaw blade is 1/2 inch in width and cannot
execute the radius of the cut. If I had to do a bunch of band sawing
smaller radius, I would switch to a 3/16 or 1/4 inch width bandsaw blade. The pattern for the front of the
napkin holder box where you access the napkins was traced onto the front board and
cut with the bandsaw.
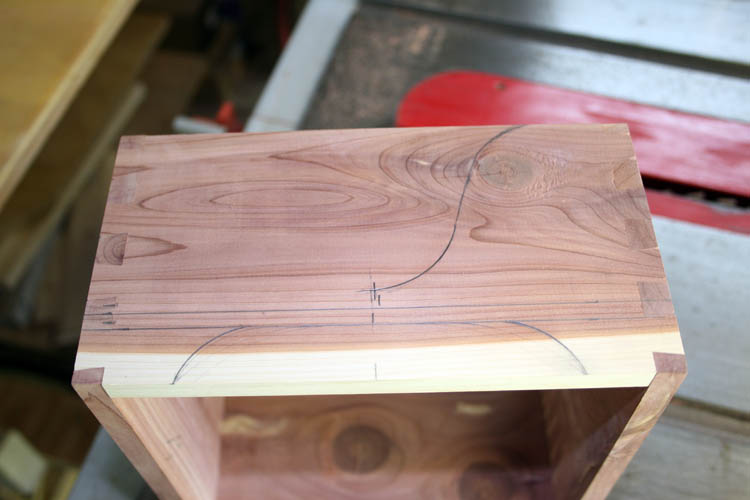
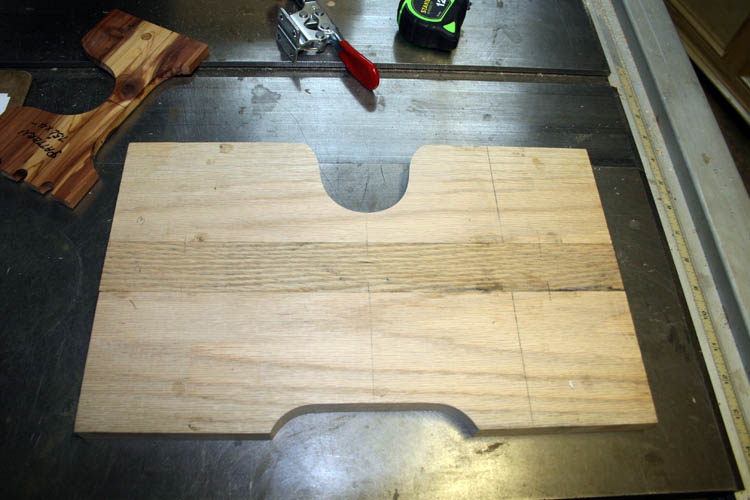
Below, I was testing out a few radius lines to make an opening to access
the napkins from the front of the box and later made a wood transfer pattern.
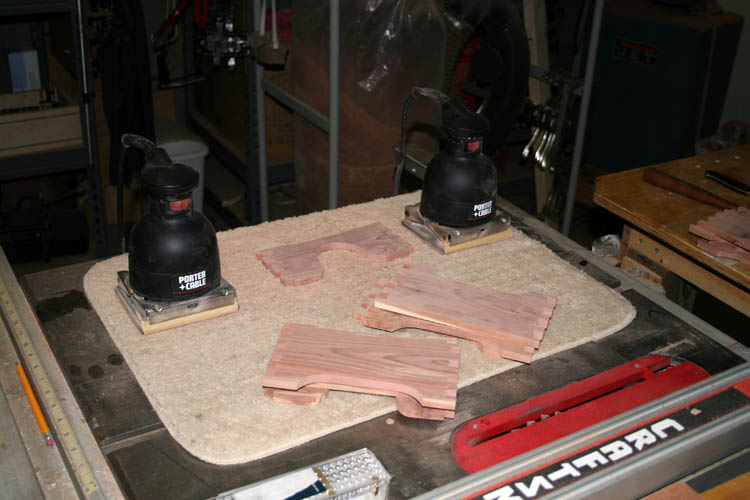
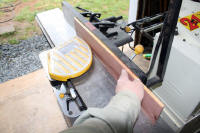
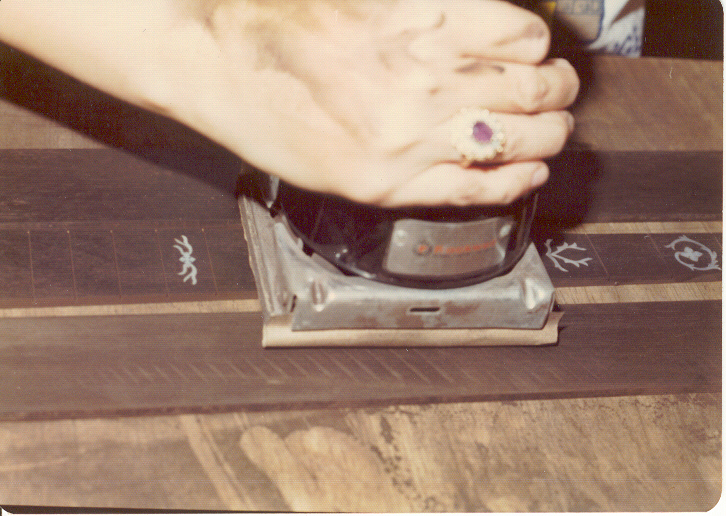
After the front, back and sides were cut, I used a sanding drum in a small
drill press to get rid of the bandsaw marks. I have been needing a
spindle sander for decades and seriously thinking about getting one because
about every project lately screams "spindle
sander please"....grin if you must!
The parts will be final sanded
using Porter-Cable palm sanders and then glued up. I finally had to
replace my 1969 Rockwell Speed Bloc 330 palm sander which is the same exact
model as the Porter-Cable. I definitely got my money's worth out of
that palm sander which was still working but had gotten far too noisy and
too much extra vibration. In the hyperlinked pix circa mid 1970s, my bride has an
awkward hand position on the Rockwell palm sander wanting to
"show case" a ring while she was
sanding a Gibson RB5 Wreath
pattern fingerboard recently cut and
inlaid by
yours truly.
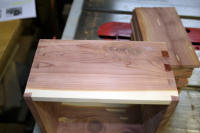
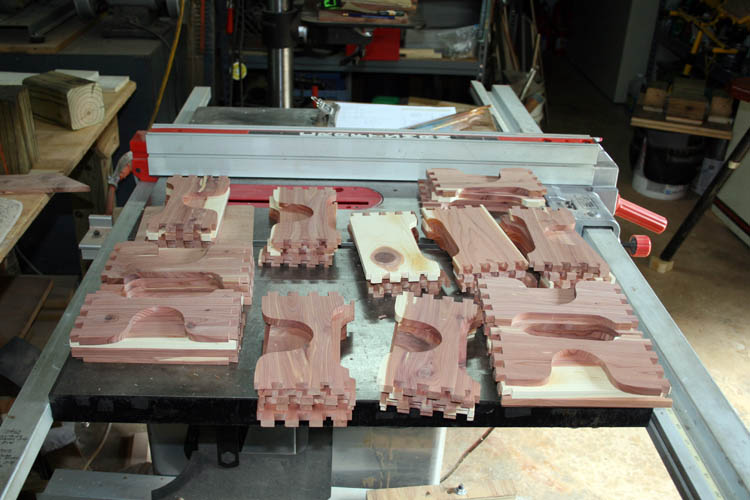
Below is the first test napkin holder
ready for glue-up:
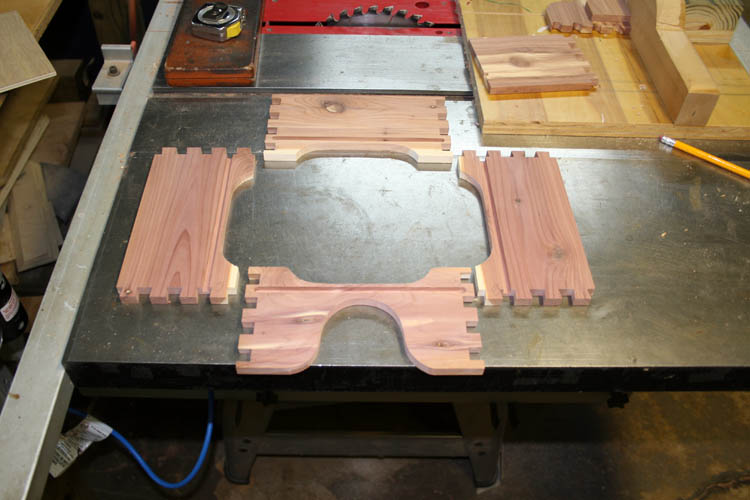
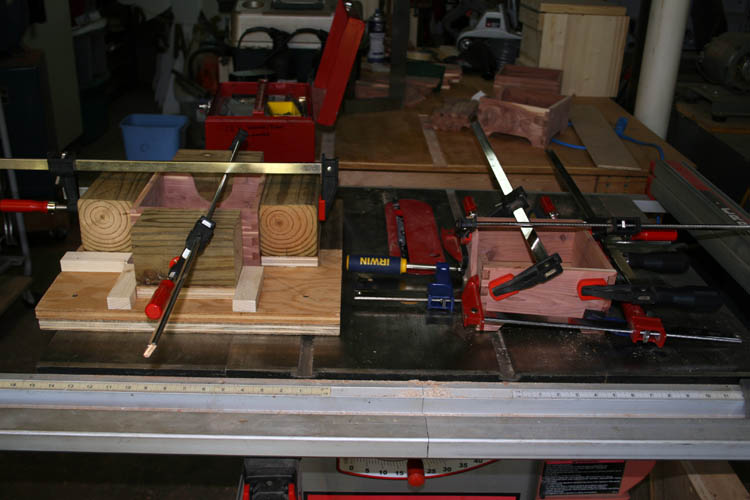
Ready for glue-up:
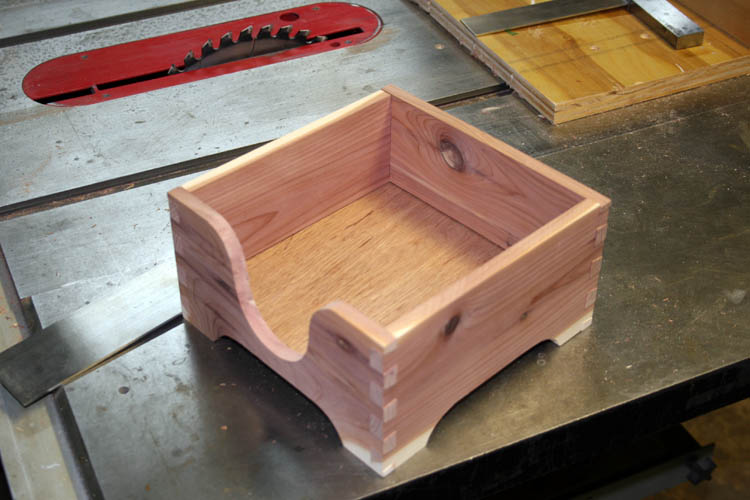
Glue-up below:
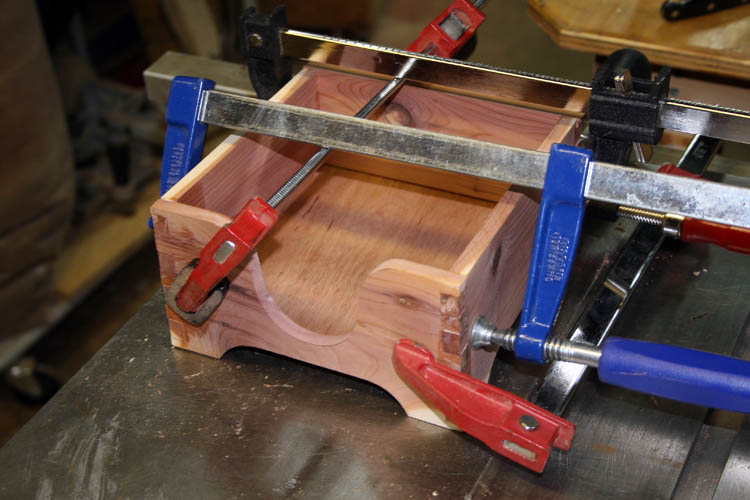
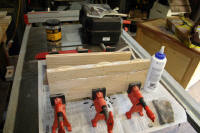
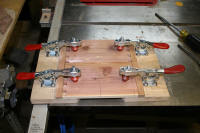
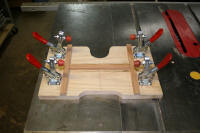
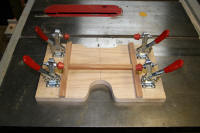
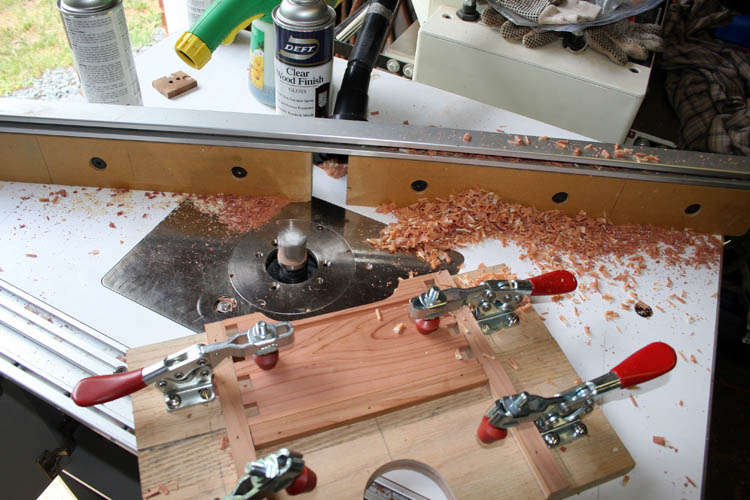
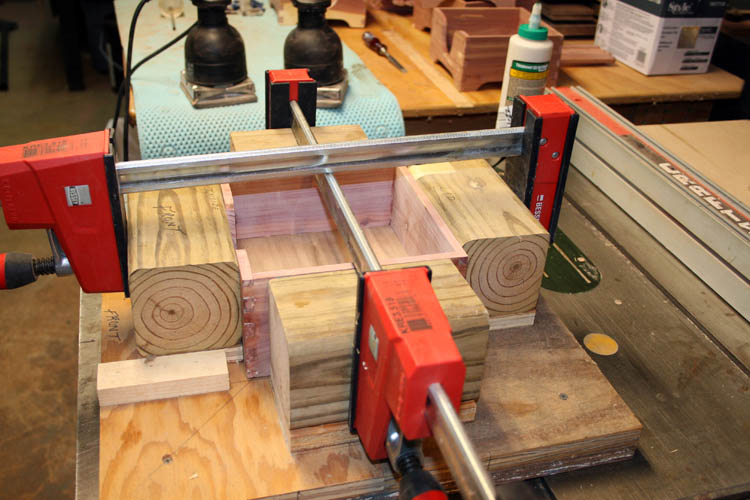
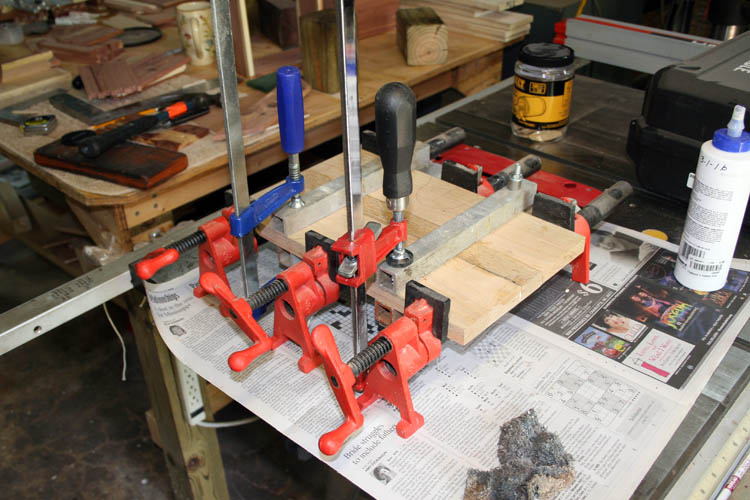
GLUE-UP FIXTURE
I glued a total of three of the
napkin holder boxes up without a glue up fixture and realized the Titebond
II extended glue was still too fast open glue time and difficult to pull the
dovetail and pin joints tight and maintain square. I was hoping I
didn't have a build a fixture for such a short run of the same size boxes
but decided to make one to keep from having the problems mentioned above.
Even with the glue-up fixture, you have to work fast getting glue applied to
the tail and pin connection!
Below is the glue-up fixture using some scrap
4 x 4s and 3/4 inch plywood. I positioned two of the 4 x 4 blocks
stationary that was square and glued and screwed them into place. The
other two glue blocks were moveable and had a small guide on each side of
the block to keep it into position. The 4 x 4s were not tall enough
and glued and braded a 3/4 inch plywood filler board on one side to where
there would be full contact with the sides of the napkin holder box.
It was taking from six to
eight bar clamps to get glue pressure without the fixture and now it will only
take two bar clamps since the 4 x 4 blocks provide full contact for the
sides of the box.
The
glue-up fixture keeps everything square and also has some flexibility when I
decide to use a thicker material for the next run of the napkin holder
boxes. I could have gone a little more high tech and used a pair of
DeStaCo clamps but the bar clamps will do fine. I didn't have any
aluminum angle large enough for the glue pressure points and used what
materials I had on hand.
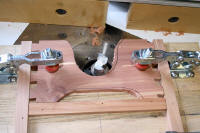
Above a close-up of the
glue-up fixture. I purposely left the tail and pins longer where I
could sand them down flush after the glue-up. The depth of cut is
control by your router depth setting.
I will give the glue-up
fixture a test run tomorrow.
NOTE: Used the glue-up fixture
and it worked great! Placed a piece of aluminum foil on the bottom to
catch any glue from the bottom dovetail/pin glue joint. I might line
the bottom with a thin glue resistant material but will see how long the
aluminum foil will last. Updated 04-08-16
Above updated by Bill
aka Mickey Porter on 04-08-16.
After sanding the
dovetail/pin joints and another quick sanding, a coat of sealer was applied:
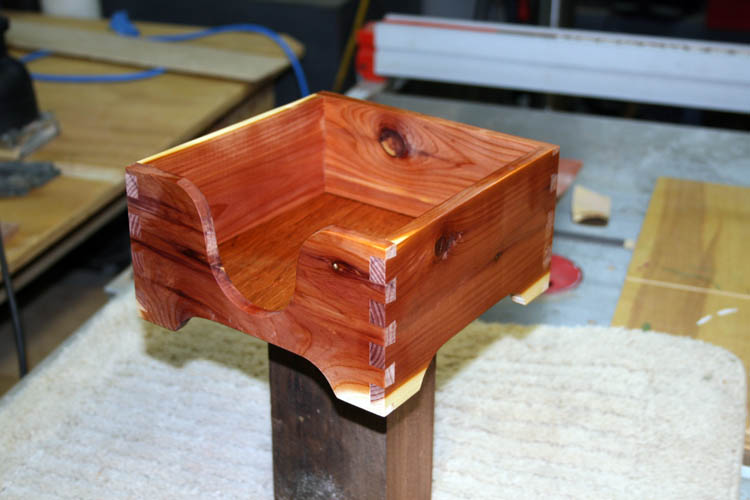
After the sanding sealer has dried, I will buff it down with a green
Scotch-Brite pad and then apply a couple coats of Deft lacquer from a spray
balm. I really like the contrast between the end grain wood of the
dovetail and pin connection. First coat of lacquer applied below:
I will later make a couple napkin holders in figured curly maple
wood which should pop.
DID NOT REINVENT THE WHEEL ON THE
DESIGN
The design of the above Napkin holder box was
observed on several older ones via the internet and pretty much generic and
no use reinventing the wheel since I like the simplicity and nostalgic look
of the napkin holder. I am kicking around a few ideas about a
simple attractive weight to place on top of the napkins but don't think it
is really needed unless you are in a wind storm.
REVIEW OF THE PORTER-CABLE 4216 DOVETAIL JIG
No
longer than I have used the
Porter-Cable Deluxe Jig Combination Kit, a
couple things come to mind such as; 1) No dust/router chip
collection, 2) Non-adjustable fingers on the dovetail and pin jig
plate. You are somewhat limited to your design width since you can
have the edge of the dovetail/pin narrow in height at the edge of your
material and the ends of the wood can easily chip out during routing even
with a backer board and also when assembling the parts if they are a little on
the tight fitting side. Of course, those two features are available on
the high dollar models and as I have stated so many, many times on this
website, "Most of the time, you get what you pay
for."
For the money and versatility, this is an excellent dovetail jig capable
of producing through dovetails, half-blind, half-blind rabbeted, sliding dovetail and box
joints.
Web published by Bill aka Mickey Porter on 04-05-16 and updated on
04-07-16 and 04-08-16.
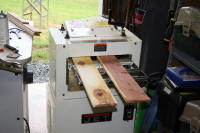
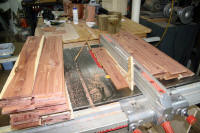
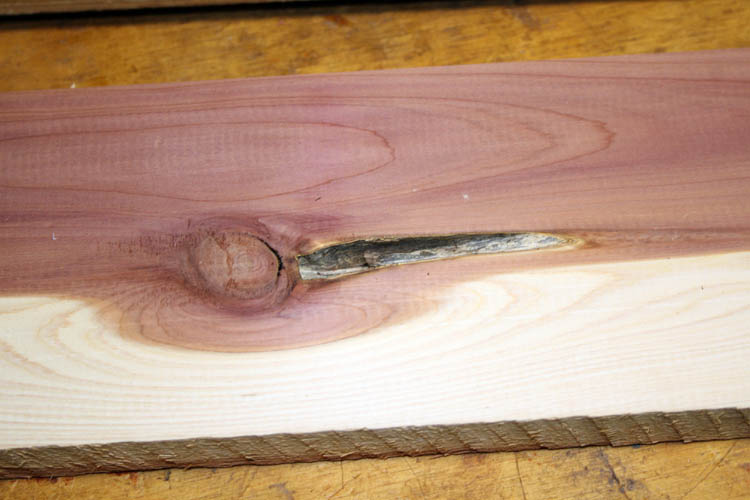
PREPARING BALANCE OF EASTERN RED
CEDAR LUMBER
With only a couple of the napkin holder boxes to final
sand, spray sealer and lacquer, I decided to utilize the balance of the
Eastern Red Cedar for additional napkin holder boxes. I had the cedar
"ear marked" for making turkey
box call lids but there are too many knots and it wasn't worth the trouble
to sort through to get just a few top quality lids. The wood also had
about a 25 percent moisture content when I received it years ago of which
it finally air dried to a much lower useable level. I let the EBay seller
of that wood know I was highly disappointed with his supposedly first
quality air dried cedar and he blamed the high moisture content on flooding
they recently had....grin if you must!
The cedar boards were four feet in length and a little over
1/2 inch thickness and planed them down to around .390 thousands of an inch
and one or two of them would not clean up in thickness and width of 4 inches and will use it for something
else.
Click on below thumbnail pixs for a larger screen view:
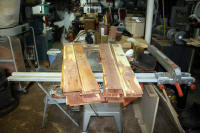


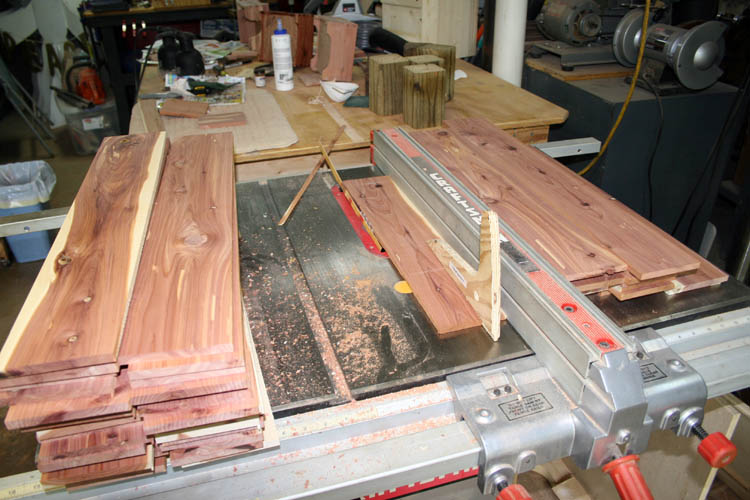
I have enough boards sized and cut to length to make 36 more napkin holder
boxes but there will probably be a few boards that has too much of a knot
close to the end where the tail and pins will be routed and will no
doubt blow
out that area rendering the board as scrap.
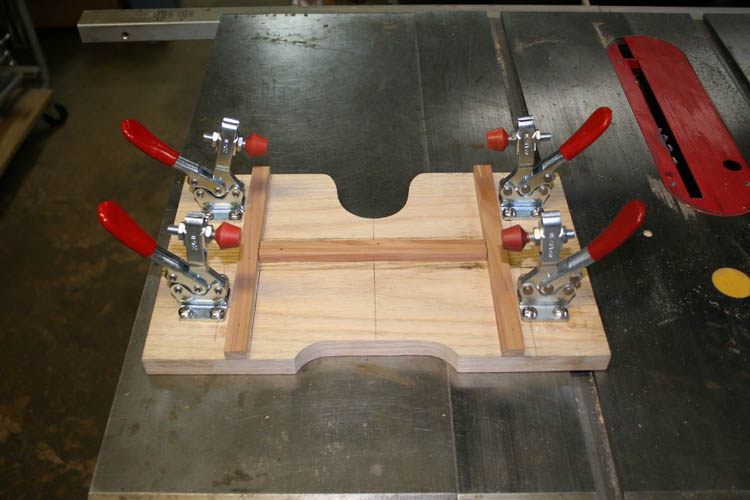
ROUTER PROFILE FIXTURE
In all probability, I will make a router profile fixture for the cutouts on
the box to reduce the sanding time. I would rough band saw the profile
leaving about 1/8 inch excess material and then route to the profile using a
fixture on my router table with a flush cut bearing bit. Since you
would be cutting against the grain on one end of the lower foot profile and
also one side of the cutout on the front of the box, you would have to flip
the part in your fixture to make the other cut to prevent wood tear out.
This would remove the sanding and clean up left by the bandsaw blade with
minimal sanding required to remove any cutter marks.
I am thinking about a platform base wide enough for doing both the large cut
out and the foot cut out and then rotate each one in the fixture to finish
off the other side. The wider platform would be much more stable and
there would be room if I thought I needed a couple upright handles for
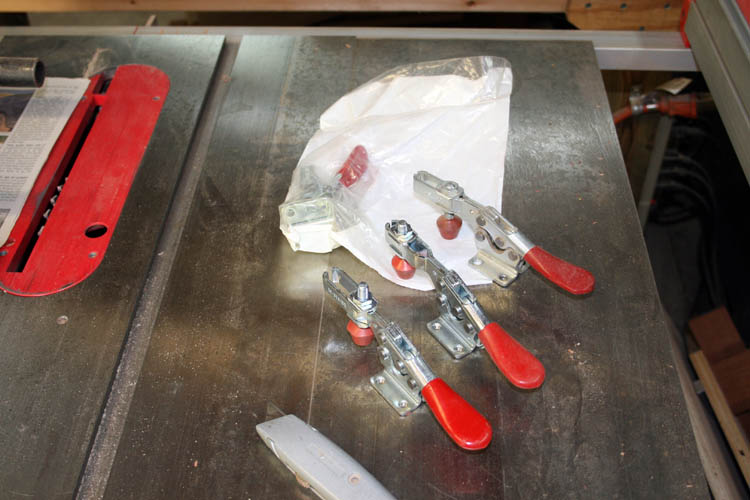
increased safety. I could scrimp and use two DeStaCo model 235U
toggle clamps but four (4) would be better.
STARTED ROUTER PROFILE FIXTURE ON 04-16-16
I located a couple scrap pieces of 3/4 inch thick white oak and ripped the
wider piece in half and used biscuits and glue to get the width needed for
the platform. I also had four (4)
DeStaCo 225U clamps on hand which would
be perfect for the profile fixture. You can never have enough of those
small toggle clamps on hand because you will usually find a use for them.
I wanted to add some 1/4 x 20 threaded brass inserts into the base to secure
the clamps and made a trip to the closest Lowe's in Rockingham, NC and they
only had four packs of two inserts that were manufactured by Hillman which
was only half what I needed but can get by with two inserts and screws at
opposite corners on the base of each clamp until I can order them via the internet.
After the glue set up over night, I traced the desired profiles onto the
white oak board base of which the router bearing will run along the edge of
the profile and any excess material beyond that profile will be removed with
the flush cut trim router bit. The profile was cut with the band saw
as close to the line as I could and sanded using a sanding
drum in the small drill press to remove the bandsaw marks and keep the edge
as vertical as possible.
After the sanding, layout for the toggle clamps was established, holes for
the base of the clamps center punched and next to the drill press. It
was a trial and error to drill the holes a little oversize due to the
hardness of the white oak but got it right on the third drill size upgrade.
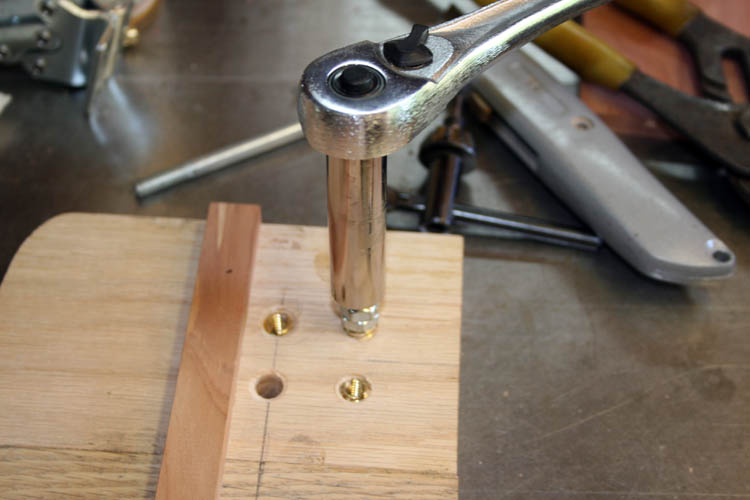
I used a 1/4 x 20 bolt with a couple nuts on the end to secure the brass
insert and used a socket and ratchet to install the inserts. A drill
press would be much better to keep the insert from going in at an angle of
which one of them did. Using a drill press or hand drill, you would
cut the head off the bolt and simply chuck it up. When the other inserts arrive, I will epoxy all
of the inserts in place which is probably an overkill but I am definitely known for that.
You could forgo the epoxy and later use the bushings for another project if
desired.
NOTE: The drill press works much better installing the drill
inserts keeping them vertical and if your insert hole in the wood is the
proper size and your drill press speed is very low, you can screw them right
in with the drill press using the installation arbor mentioned above.
If I build another fixture using the DeStaCo. 225U toggle clamps, I will
definitely make a drill guide using drill bushings to match the spacing of
the holes in the base of the clamp to reduce the construction time and
improve the drilling accuracy!
Click on below thumbnail pixs for a large screw view:


The double design pattern of the above fixture gives a good amount of
fixture real-estate on the router table which increases stability and safety. The
handles on the toggle clamps should be enough material to hold on to while
moving the fixture against the router bit bearing without adding separate handles.
I will give the fixture a field test as soon as the additional insert
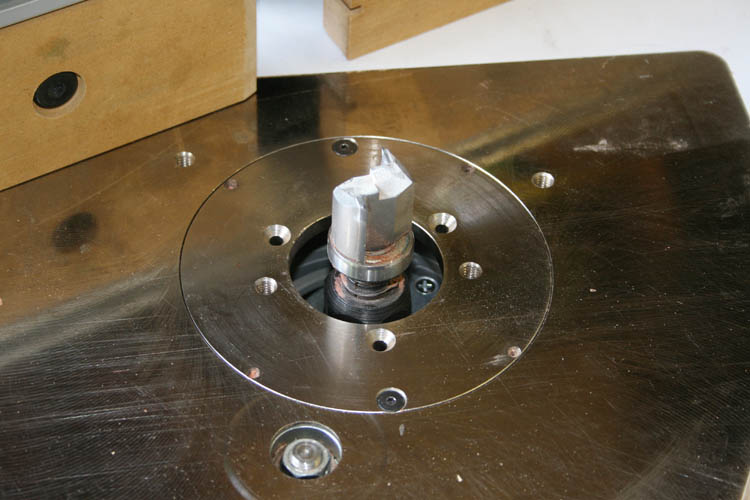
bushings arrive and post a few pixs of the fixture in actual operation. I also ordered a 7/32 diameter solid carbide router
bit for the mortise into the sides of the box for the bottom since the 1/4
inch slot was too large and a 3/16 inch slot was too tight. A
horizontal slotting cutter would not work in this particular application due
to not cutting through the tail portion on the pin board.
I will route the mortise slots in all the box sides before I make the cut
out for the feet and the front of the box using the band saw and then the
router fixture of which the slotting set-up and stops have to be removed
from the router table.
Using the left side of the fixture only for both the front cut-out and
bottom cut-outs, I didn't need to do a complete profile for the entire part
but if I changed to a different technique using something like a 1/4 inch
spiral cutter without fear of tear out, the other side would be necessary.
A CNC router platform would be the way to go for mass production but the few
I will make doesn't warrant such an expense!
Web published update by Bill aka Mickey Porter on 04-17-16.
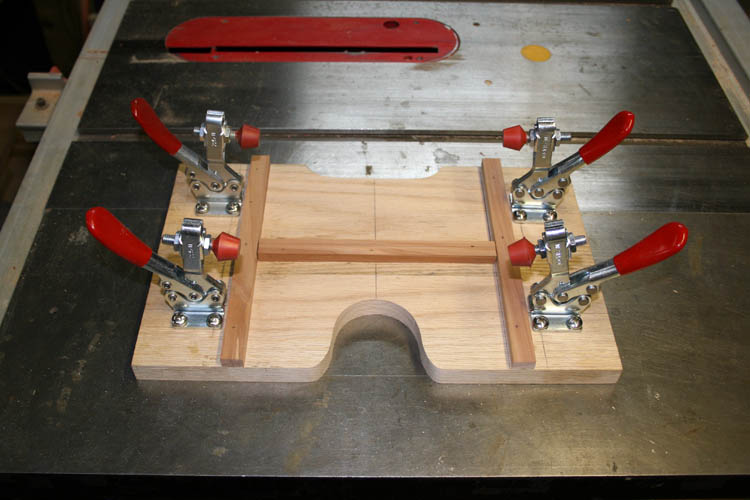
TESTING ROUTER PROFILE FIXTURE ON 04-25-16
I finished up the router profile fixture and gave it a test run today after
I slotted the balance of the cedar boards to make a dozen more napkin holder
boxes. I set the router table up with a 1.5 inch diameter two bladed
tipped carbide profile router bit and did a test run on a couple of the
boxes and it worked great. I went back and added a little more taper
on the profile fixture to have a more gradual entry into the cut-out of the
opening on the front of the boxes for more eye appeal. Everything was
going along real well until I broke the 1/2 inch band saw blade and did not
have a spare one in stock. I got on the phone and ordered a couple
from Precision Saw Works located between Wadesboro, NC and Burnsville, NC of
which they make all kinds of saw blades, large and small along with
sharpening saw blades. I will pick them
up tomorrow morning and be back in business.
Click on below thumbnail pixs for a larger screen view:


The profile fixture will about eliminate sanding those cut-outs and
all the sanding dust from the sanding drum and help this ole boy's
lungs for sure. This fixture
will definitely save time in the long run since it doesn't take much time to rough band saw
the profile out and let the router do the clean up.....this is
"building smarter not harder."
Below pix showing the rotating flush cut profile router cutter and can't be
dozing off while that bad boy is spinning and back the fixture a good ways
from the cutter when clamping and unclamping the part. There is plenty
of real-estate on the fixture to keep your hands away from the cutter while
the bottom cutter bearing follows the profile of the fixture. Rather
than cut against the wood grain, I flip the wood part over and finish the
cut going with the grain to prevent wood tear out. The cutter is
rotating counter clock wise and you start the profile cut on the left of
the fixture and move the fixture to the left into the cutter. If you
continued the profile cut from left to right, you would be cutting against
the grain on the right hand side of the wood and most likely wood tear out
will occur ruining the part. I have routed thinner materials against
the grain but extreme caution must be exercised and then you will still have
wood tear on some pieces of wood. It is best to flip the part over in
the fixture and cut with the grain for safety and to prevent wood tear out.
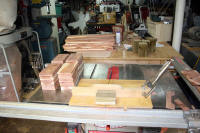
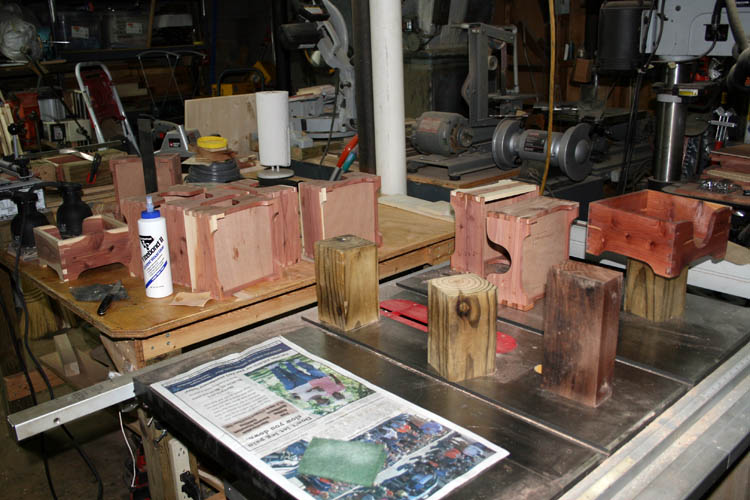
A dozen more of those napkin holder boxes ready for sanding and
fitting a 3/16 inch thick plywood bottom in place. The glue fixture
will get a good workout in the days to come.
A few of the boxes below glued up and ready for final sanding.
GOING BACK IN TIME TO THE MIDDLE 1970s
Old school manufacturing techniques used a double spindle shaper allowing
you to cut in both directions without the fear of wood tear out. I
once owned a Baxter-Whitney double spindle shaper with a 7.5 HP motor for each
spindle and that shaper was at least a couple thousand pounds in weight when I had my
musical instrument repair and mail order business. CNC machines have
replaced most of those older double spindle shapers which are outright dangerous
even with safety devices employed.
NOTE: I sold a complete wood working shop including the above
mentioned Baxter-Whitney double spindle shaper along with all the tooling and cutter
heads, etc. to a man near Advance, NC who traded the shaper for a much smaller
single spindle one. He took one of the cutter heads which was at least
4 inches in diameter to a wood working shop and the owner set the cutter head up on one
of his shapers. According to the individual I sold it too,
once they turned the shaper on, the cutter head started vibrating loudly and
before they could cut the power to the shaper, one of the profile cutters from the cutter head
assembly went flying through the side of the building and they never did find where the
cutter blade profile landed. I believe that was the last of that
individual using a shaper with any degree of confidence. Either of the two men could have been
easily killed by that mishap. In all probability, the shaper speed was
far too great for that large diameter cutter head which was massive with at
least a 1.5 inch inside arbor bore. The company that manufactured that
cutter head and cutters were located in High Point, NC catering to the then
flourishing NC furniture industry which is now about all gone overseas and
that company was at
the top of their game. I never did use that cutter head assembly and
it was high dollar at the time. It took two matching carbide tipped
profile cutter blades and they were not pinned into position; only held by
the force
applied from the upper locking nut which gave you flexibility for doing different
profiles. That was sometime after 1978 when I sold
my musical instrument company equipment, tooling, supplies and inventory.
The metal stamping equipment and dies used to manufacture the pre-war Gibson
tube and plate flange was also purchased
later by the same individual who kept the
equipment stored in his basement for 30 plus years and finally sold and/or traded it within the
last few years, never utilizing the tooling.
Frank Neat
located in Kentucky,
currently has the tooling mentioned above. I am glad I am not the only
"pack rat" around.
As usual, I got seriously side tracked there......grin if you must!
Before I start cutting
dovetails and pins on these boards, I have to figure
out and make a dust collection system for the dovetail and router fixture.
There is no commercially available dust collection system for the
Porter-Cable 4216 dovetail jig and the routers I am using do not have a
dust port on them either, but I will come up with some
Rube Goldberg
contraption that hopefully will work.
Web published updated by Bill aka
Mickey Porter on 04-12-16.
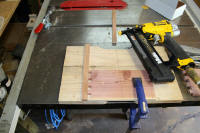
RUBE GOLDBERG DUST COLLECTOR
ATTACHMENT
Below are a few pixs of a dust collector made for
the Porter-Cable 4216 dovetail jig using scrap materials on hand.
There isn't much room for a dust collector and the large adjustment knobs
are in the way for any serious design but I worked around them. I used
a pair of rubber bands to hold the attachment in place since you have to
remove it when you change from cutting dovetails to pins. I blocked
off about 2/3 of the length of the dust/chip collector box to increase the suction
since I am only cutting dovetails and pins in four (4) inch width material
for this project. I can later remove the divider and/or reposition the
air vacuum port for wider or full width stock if needed.
The top of the dust/chip
collector box is flush with the dovetail/pin jig plate and could add extra
support for the base of the router if a stronger attachment means is used
instead of the impromptu rubber bands. Over half the real-estate of
the router base is forward on the jig plate when moving to the next dovetail
and pin location and care must be used to keep the router from tipping
forward.
I believe the DeWalt 610 router is superior to the Porter-Cable
690LR router for this application because the DeWalt 610 has a much lower
profile and the router height adjustment (rack and pinion gear) assembly is
on the back side of the router adding extra weight to help keep it from
tipping forward. I recently found a DeWalt 610 router on EBay, new and
unused in the original box, whereas used ones were selling like hot cakes
since that model hasn't been made since 2002. I had to pay top dollar
for it because several bidders wanted it as badly as I did.
I used 5/8 inch braid nails to secure
the bottom, sides and top.
I did a
few test dovetail cuts and the Rube Goldberg looking contraption did a great
job in collecting the router chips and dust.
There is adjustability for
using thicker materials with this dust collection being pretty low tech but
the important thing is that it works great!
I added 4 x 4 blocks
under each end of the dovetail jig to add additional height off the "work
bench" which gets double duty as my table saw out feed. The extra
height places the jig in a more user friendly position requiring you to bend
over less;
ergonomics is the word for the day!
Below some cheat notes that I
placed on my table saw fence guide rail to offset the CRS disease:
Web published update by Bill
aka Mickey Porter on 04-13-16, 04-17-16, 04-25-16 and 04-26-16.
FIRST SALE OF NAPKIN HOLDER BOXES
Below
pixs from one of my friends
Calvin Jones of Wadesboro, NC who purchased a
couple of the napkin holder boxes for his home:
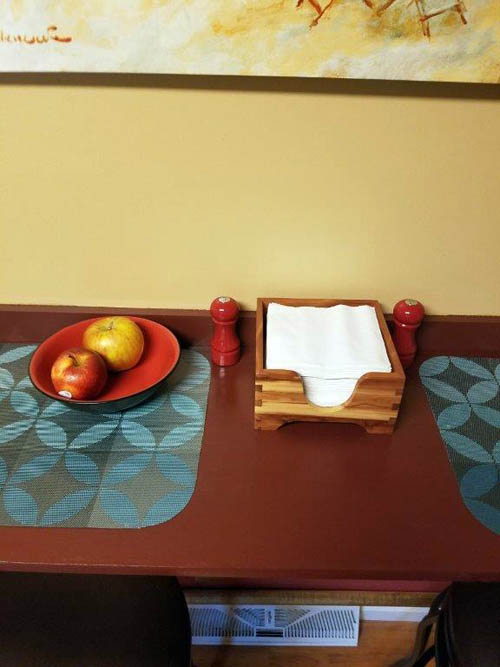
CJ custom built the
drop down bar above too!
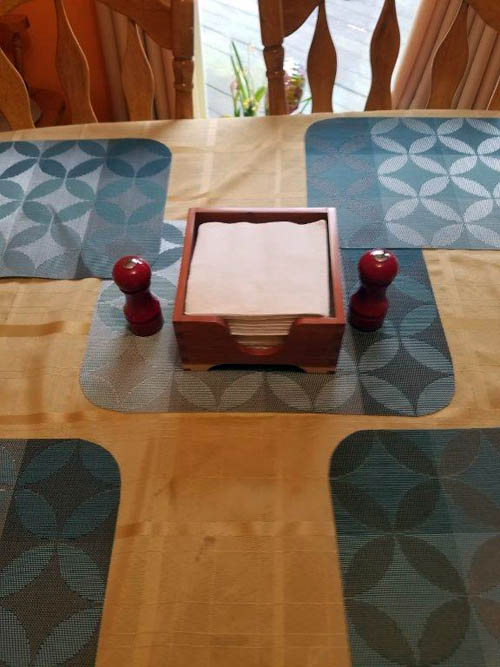
The salt and pepper
shakers match the cedar napkin holder boxes very well.
Web published update
by Bill aka Mickey Porter on 04-30-16 and 05-17-16.
MURPHY'S LAW NEVER SLEEPS
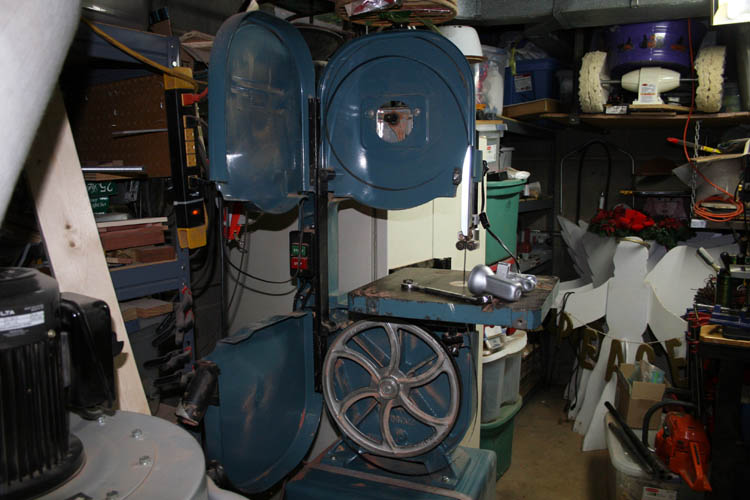
Got started on a dozen
of the napkin holder boxes and cruising along; got my new purchase DeWalt
610 router circa 2002 set-up and working like a charm cutting the pins on
the boxes, whereas, I have my original DeWalt router set-up for cutting the
tails on the boards. Routed the groove for the box bottom and started
to rough band saw the front opening and the lower cut-outs on the boxes when
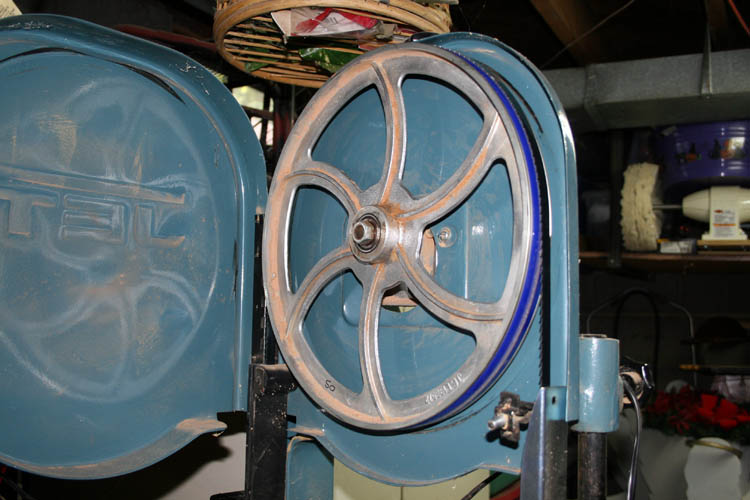
the ole second hand worn out Jet 14 inch band saw's blade stopped
cutting/rotating. After quickly switching the power off, I smelt
something like rubber burning. After opening the access panels to the
unit, the rubber tire had slipped partly off the upper wheel. I
removed the wheel and it was very evident that the tire was worn out and
stretched to the point where it was not staying on the wheel and the glue
that held it in place didn't hold either. I have a
friend in Wallace,
SC that I do some trading with every now and then and the last two trades for
equipment certainly wasn't in my favor. A small South Bend lathe had a
worn out place near the center of the vee way bed and no good for turning stuff needing more than
.0015 accuracy and the band saw was worn out too. I reminded him of
that the last time we chatted either via telephone or in person.....grin if
you must! I did get one good trade out of him many years ago on a
firearm before all the red tape came about third party transfer of firearms.
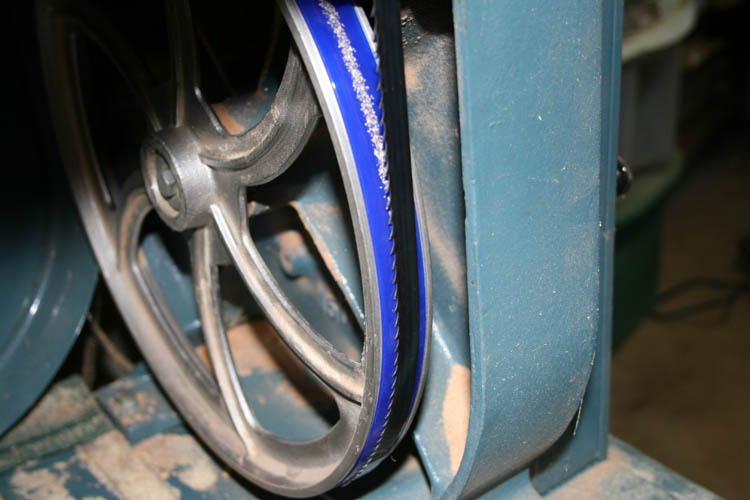
I
ordered a couple of the
Carter Ultra Blue urethane 14 inch tires from
Woodcraft.com and will install them when they arrive. I am in no hurry
since the napkin holder boxes are another fun project and will get the four
that I already did the band saw cuts on before the breakdown and did the
finish profile on the router table. I will sand them down and do the
glue-up on them, etc.
Below is a pix of Murphy's Law in action:
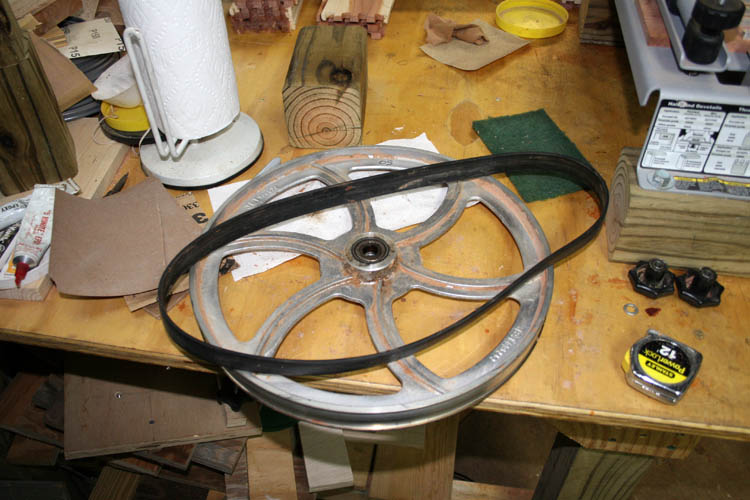
I read a few blogs about
worn tires on band saw wheels and most recommended a replacement instead of
trying to glue them back on and upgrading from the regular black rubber
tires to urethane of which I did.
Web published update by Bill aka Mickey
Porter on 05-18-16
UPDATE: Installed new tires on 05-23-16 and working fine.
Carter recommended soaking the tires in 120 degree F. hot water for 5
minutes but you need about four (4) hands to stretch the urethane tires onto
the band saw wheels. I used a two inch wide cloth strip tied tight to
secure the tire in place while stretching the tire onto and around the
wheel.
Added above two pixs on
07-25-16.
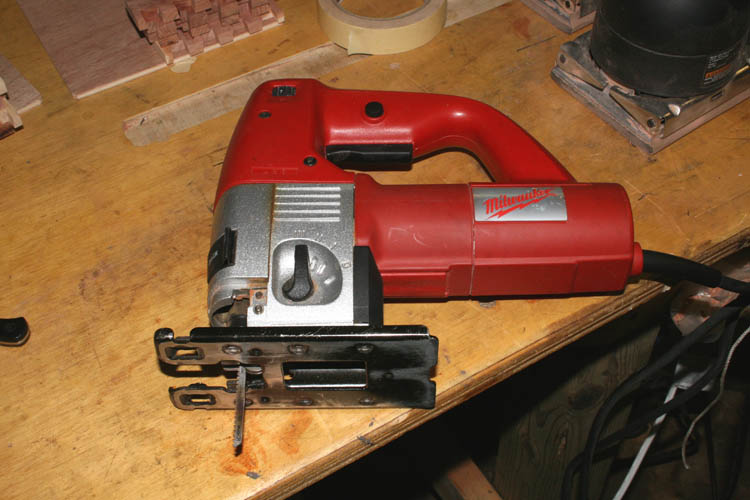
PLAN B UTILIZING THE JIG SAW VERSUS
THE BAND SAW
It will be several days before the tires for the
band saw wheels arrive and had 8 boxes to rough cut the material for the
front opening and the sides and got the Milwaukee jig saw out and finished
the cuts. Not as smooth sailing as with the band saw but got the job
done. It didn't take long to route the finished profile and got most
of them sanded down and ready for the gluing jig.
Web published update by
Bill aka Mickey Porter on 05-19-16, 05-23-16 and 07-25-16.
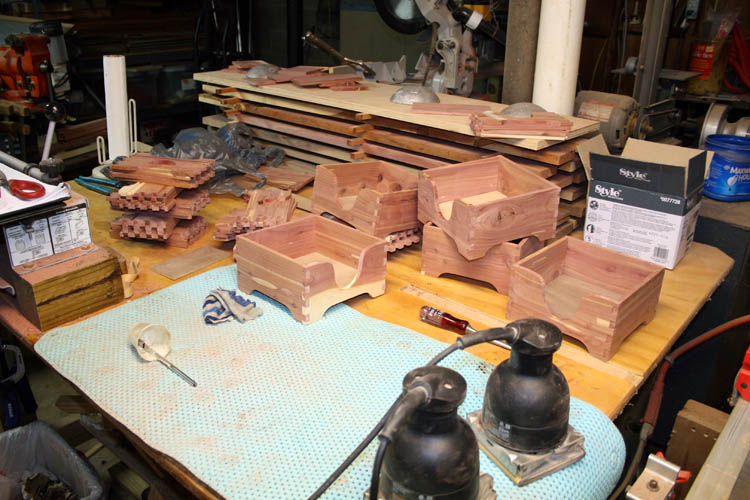
SHORT RUN OF NAPKIN HOLDERS
After finishing the
last batch of ceramic and wood pot holders aka
trivets, I trimmed one edge
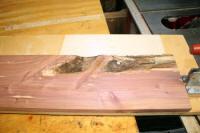
of the red cedar boards, sawed them to 4 inch in width and band sawed them
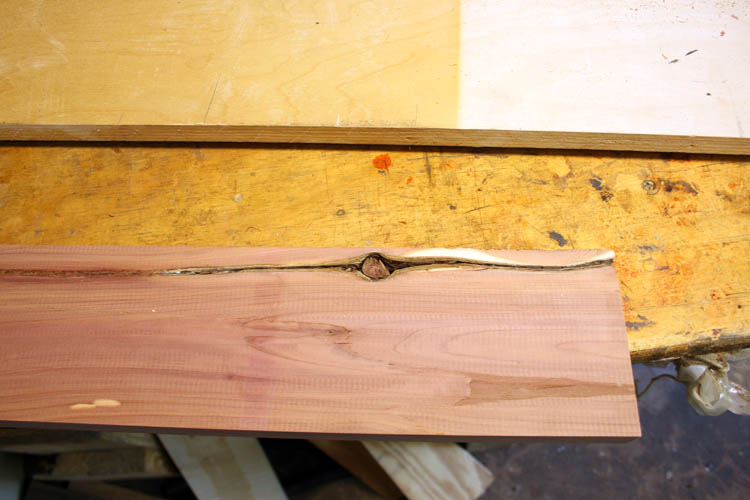
in half (vertical) orientation. The red cedar wood had a lot of bad
places in the wood and several boards were split near the ends.
The
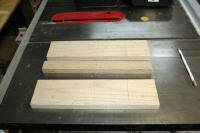
dimensions of the napkin holder is: 7 7/16 inch square, .329 +- inches
thickness and 4 inches height.

I will have at least $ 4.88 material cost in each napkin holder not counting
wood sales tax and due to the bad waste wood and wood not wide enough to make a
napkin holder. Maybe I can find a use for the scrap aka unallocated
red cedar wood.
I viewed a
couple YouTube videos on making dovetail drawers to refresh my memory since
I had not routed any dovetails and pins since 2016 using the Porter Cable
4216 fixture.
To make a long story short, I might get seventeen (17)
napkin holders if
all goes well. I had a couple pieces of the wood after running them
through the planer, routing the dovetails and pins and the slot for the
bottom, whereas the wood split and had to glue them back together.
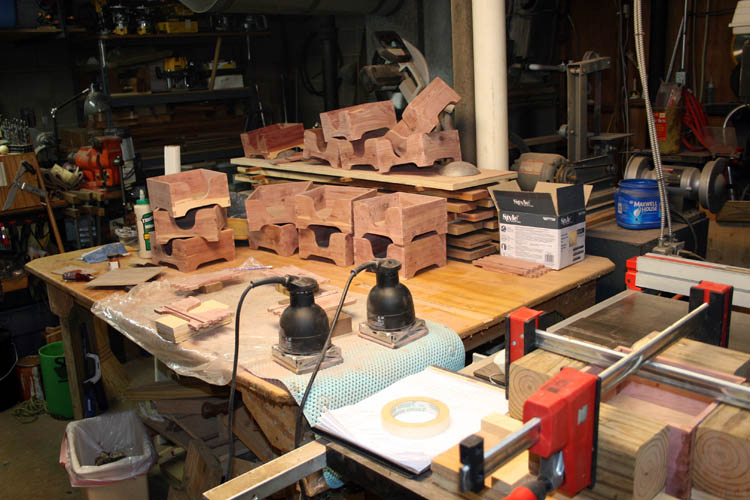
Router set-up for routing the dovetails. I have two routers set-up
just for doing dovetails.
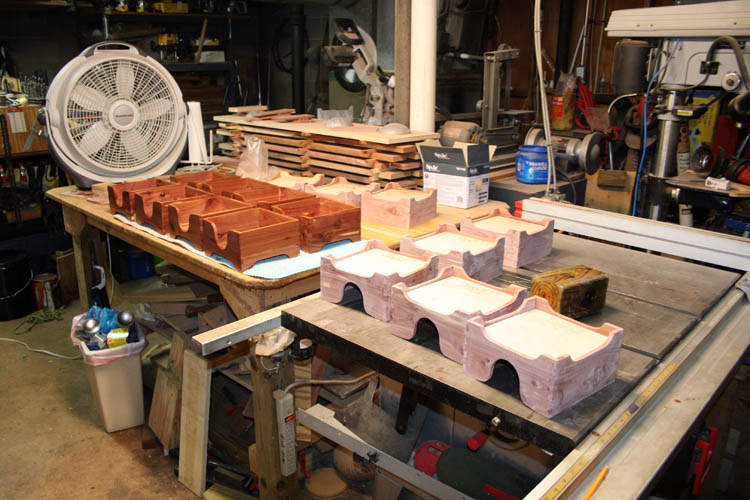
Dovetails and pins completed and pattern routing (template jig) for the lower cut out and
the opening in the front of the napkin holders.
Above gluing jig. The front and one side of the jig is moveable.
I
plan to glue up a couple napkin holders each working day, our Lord willing
of course. Prior to glue up, I will sand the inside of the pieces.
If wood is under stress, it is best to leave the clamps in place twenty-four
(24) hours. The Titebond Ultimate III is fast setting and you have to
work fast during the glue up.
Web page updated by Bill aka Mickey Porter on 05-20-2022.
NAPKIN HOLDERS CONTINUED
As
stated, I am gluing up a couple of the napkin holders a day. I could
rush this process, but in no real hurry.
Web page updated by Bill aka
Mickey Porter on 05-24-2022.
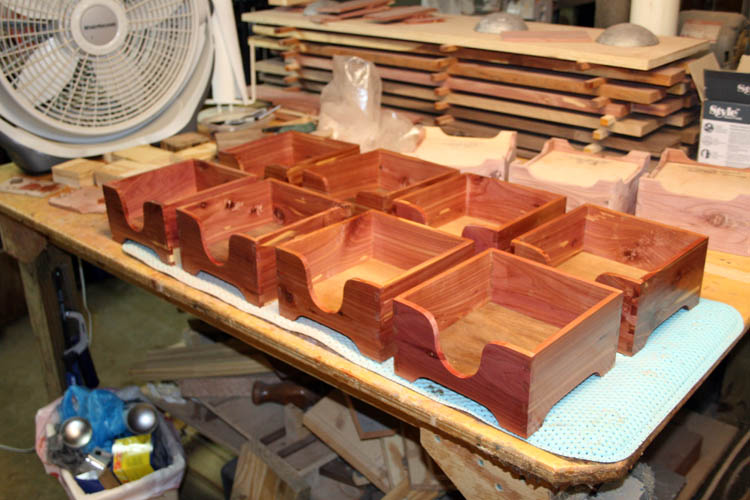
COMPLETED NAPKIN HOLDERS
I will be applying finish to the last eight (8) napkin holders today.
The humidity was low enough to spray the other nine (9) napkin holders on
05-28-2022. This short run of napkin holders will be serial numbers
128 thru 144.
I
presented our new neighbors Connie and Steve Marsh with a napkin holder and
ceramic and
wood pot holder aka trivet on 05-29-2022 as a house warming gift.
Web page updated by Bill aka Mickey Porter on 05-30-2022.
LEAVING ON A
SPIRITUAL NOTE
If you do not know Jesus Christ as your Lord and Savior, please take
this moment to accept him by Faith into your Life, whereby Salvation
will be attained.
Ephesians 2:8 - 2:9 8 For by grace are ye saved through
faith; and that not of yourselves: [it is] the gift of God: 9 Not of
works, lest any man should boast.
Hebrews 11:1 “Now faith is the substance of things hoped for,
the evidence of things not seen.”
Romans 10:17 “So then faith cometh by hearing, and hearing by
the word of God.”
Open this
link about faith in the King James
Bible.
Romans 10:9 “That if thou shalt confess with thy mouth the
Lord Jesus, and shalt believe in thine heart that God hath raised him
from the dead, thou shalt be saved.”
Open this
link of Bible Verses About Salvation,
King James Version Bible (KJV).
Hebrews 4:12 “For the word of God is quick, and powerful, and
sharper than any two edged sword, piercing even to the dividing asunder
of soul and spirit, and of the joints and marrow, and is a discerner of
the thoughts and intents of the heart.”
Romans 6:23 “For the wages of sin is death; but the gift of
God is eternal life through Jesus Christ our Lord.”
Romans 3:23 “For all have sinned, and come short of the glory
of God;”
Micah 6:8 “He hath shewed thee, O man, what is good; and what
doth the LORD require of thee, but to do justly, and to love mercy, and
to walk humbly with thy God?”
Philippians 4:13 "I can do all things through Christ which
strengtheneth me."


