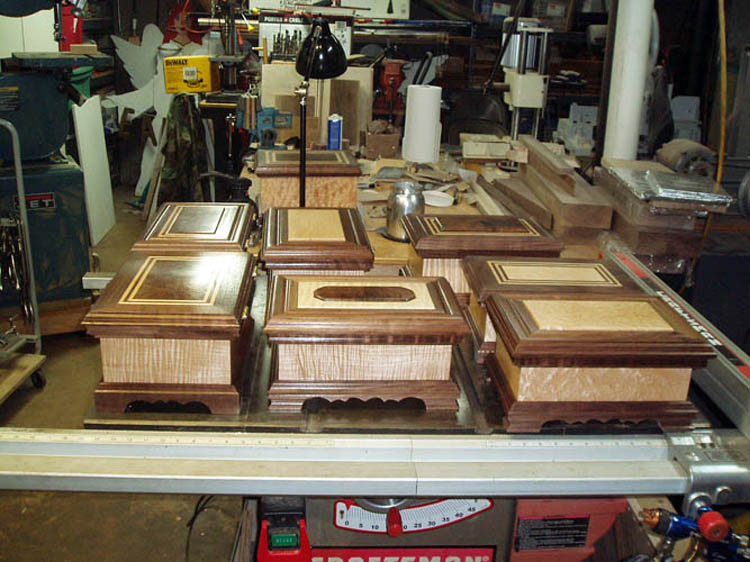
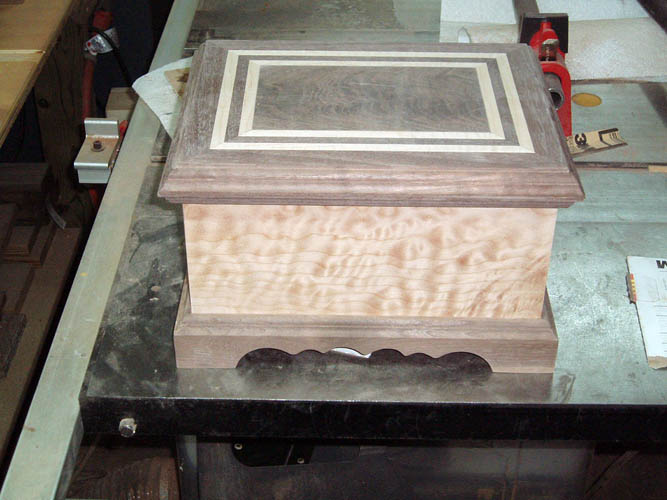
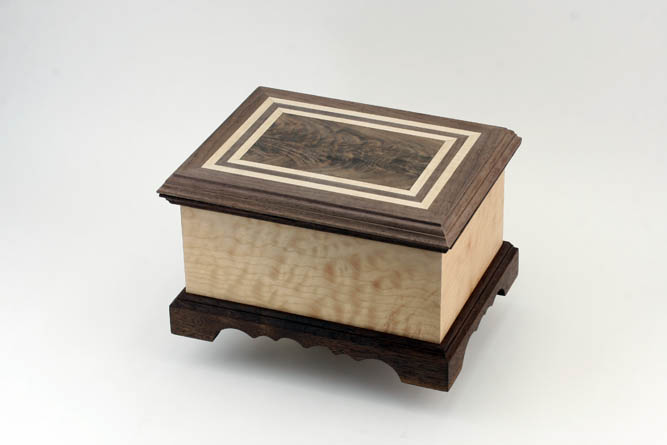
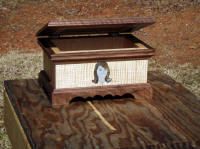
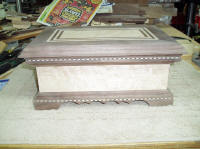
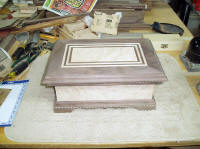
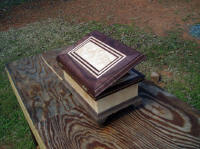
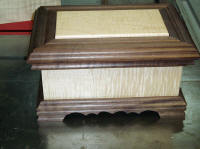
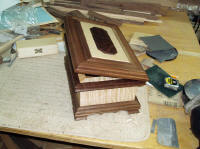
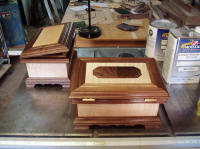
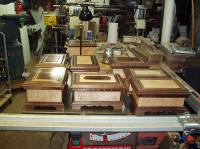
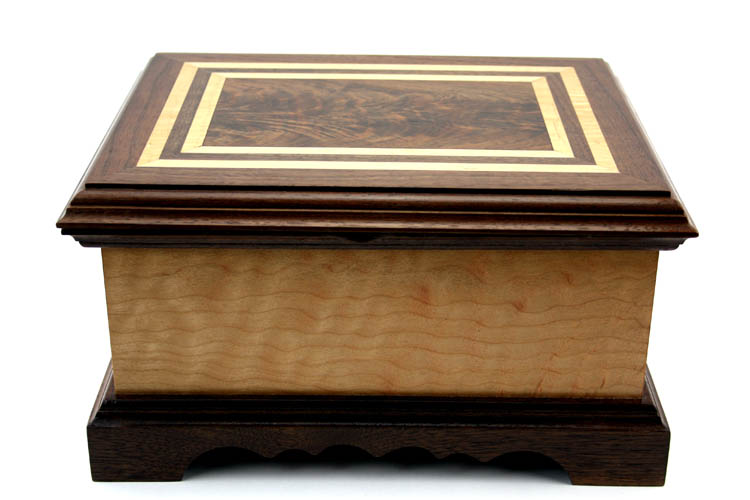
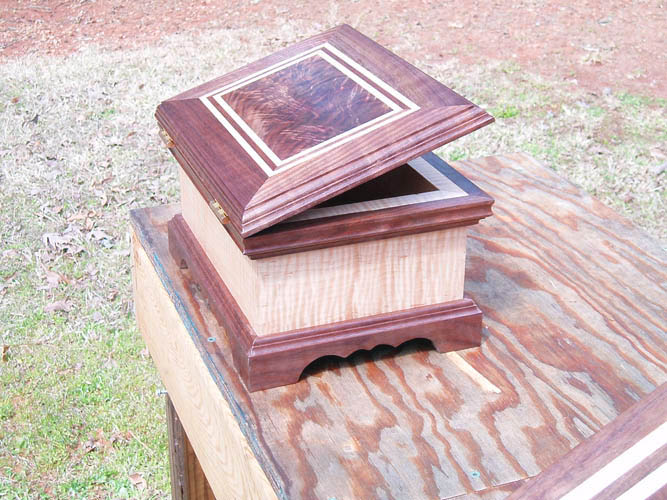
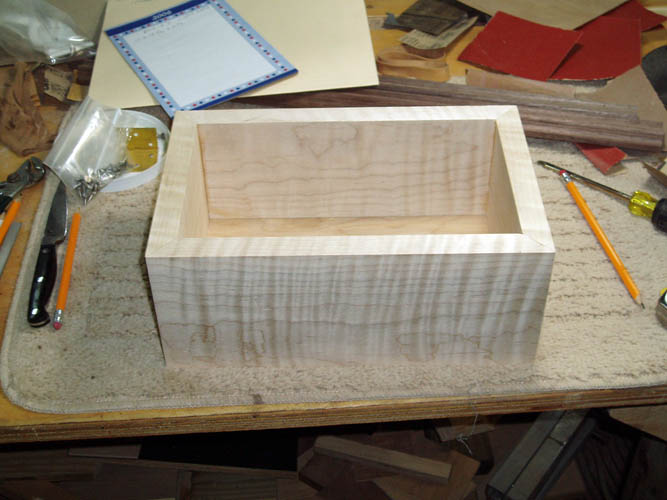
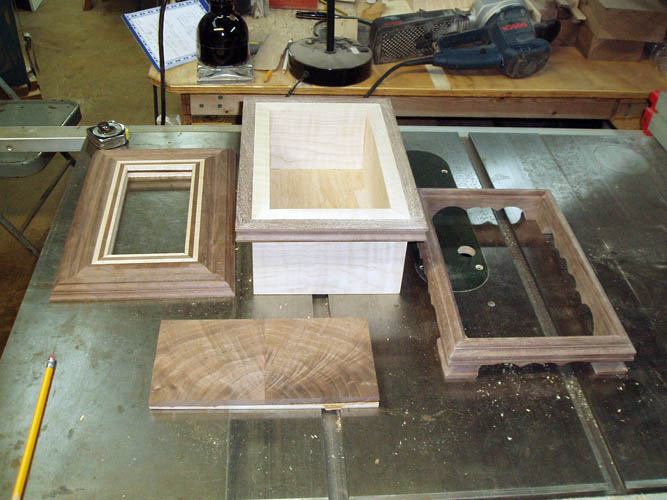
COMPLETED KEEPSAKE HEIRLOOM BOXES
PERSONAL SAFETY AND LIABILITY ISSUES
My goal will be to keep
Safety paramount because hand and power tools can
do serious bodily harm and death if not used properly, therefore these pages
are solely for entertainment purposes only from a personal
liability standpoint. Please read the
Legal Stuff
page for additional information concerning liability issues before going
any further. Safety glasses and hearing protection is a must although
I do forgo the hearing protection many times; my bad!
LETS GET STARTED
After getting
my woodworking table saw sleds calibrated, I finally got around to starting
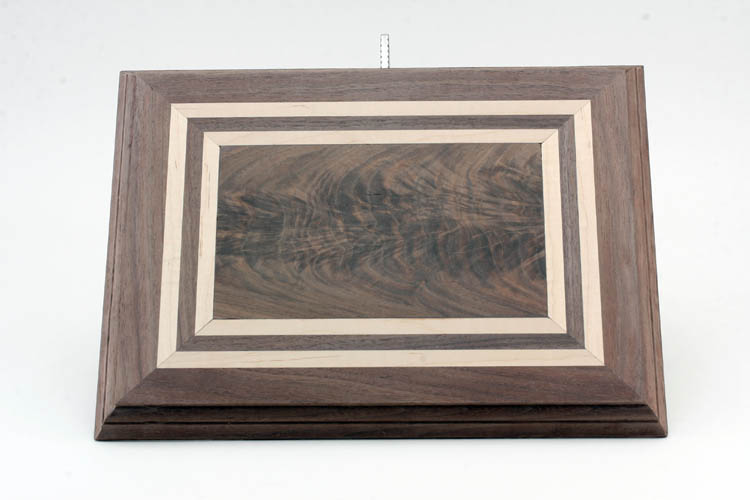
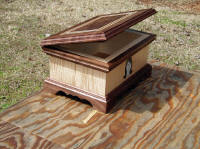
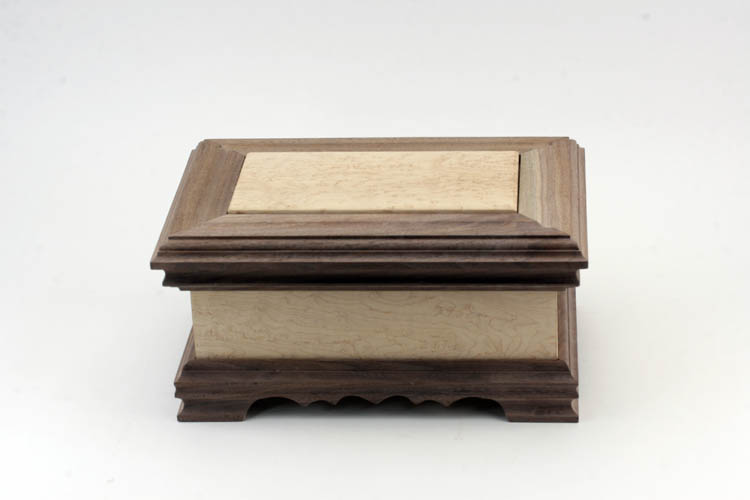
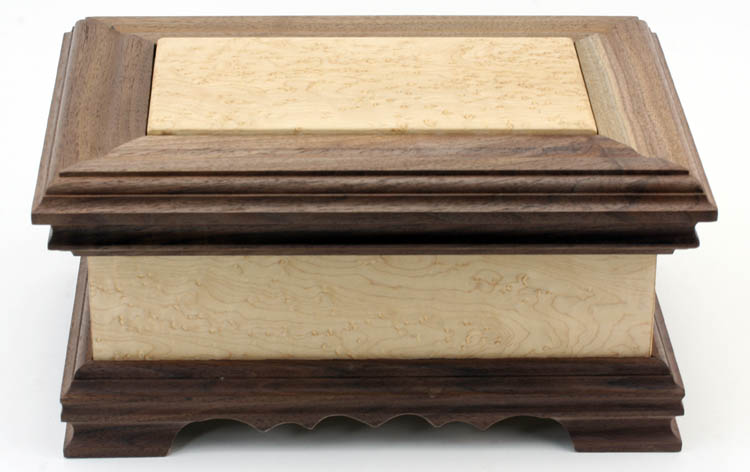
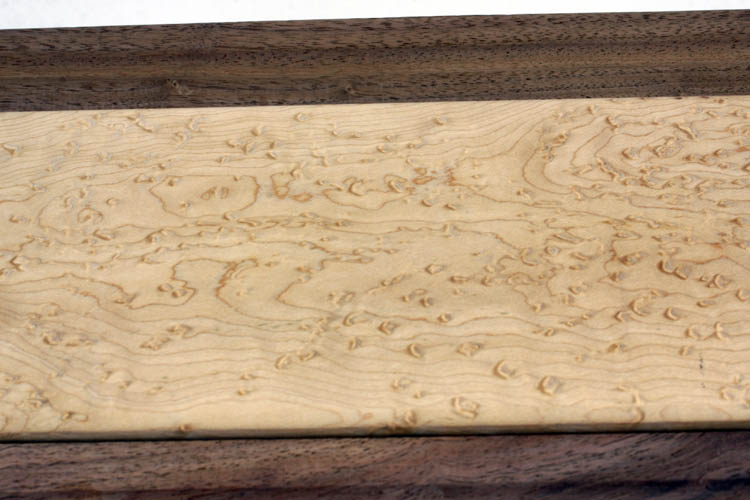
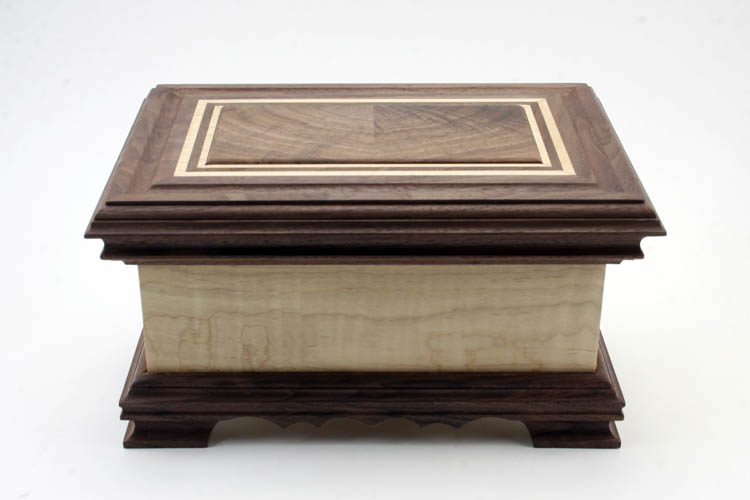
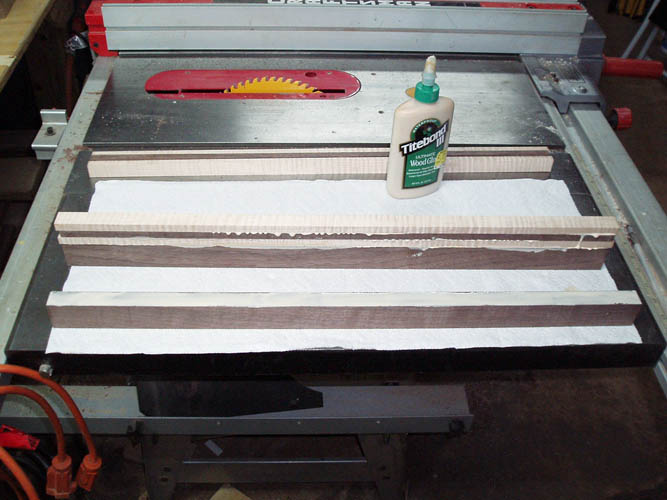
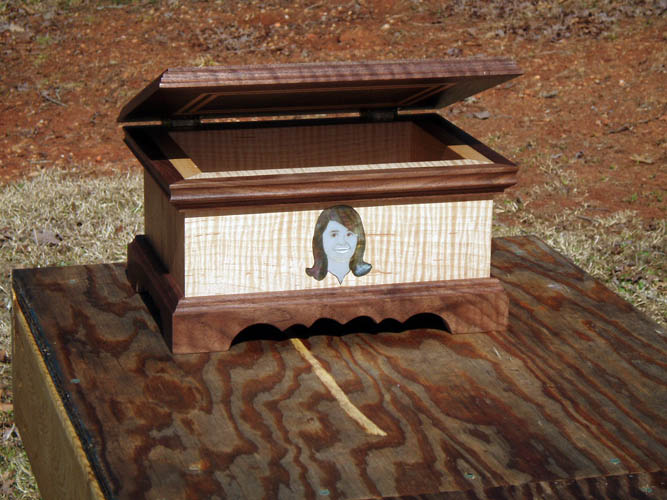
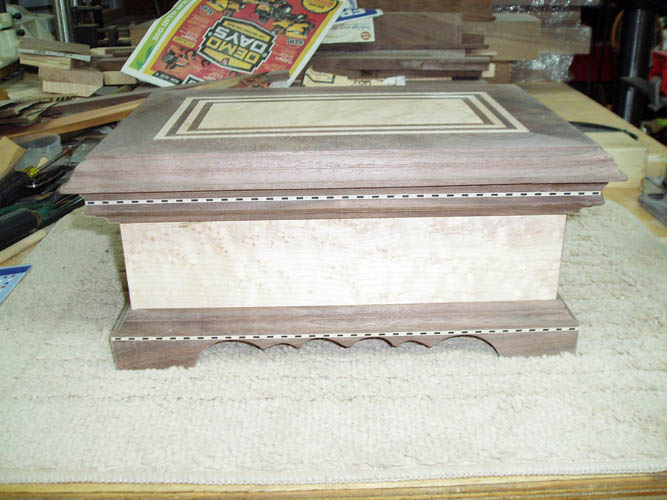
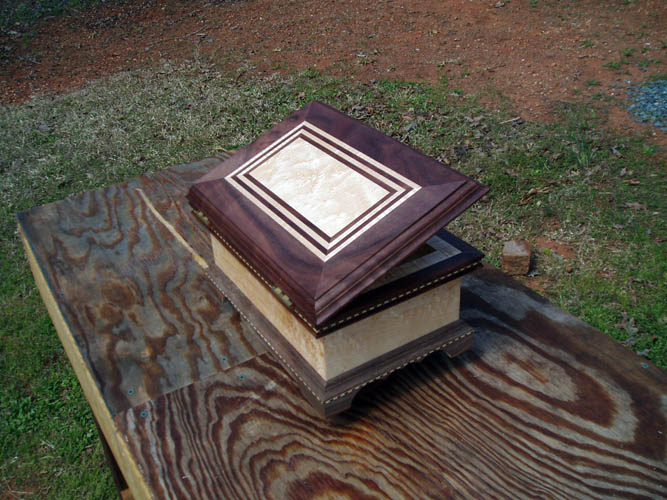
a custom keepsake heirloom wood box for my bride of forty-seven (47) years. I decided to
use quilted figured maple for the box and walnut for the base and trim with a walnut
lid with a maple, walnut, maple inner band and a nice piece of crotch
figured walnut for the inside panel. I had the crotch walnut air
drying for about 8 years and hopefully it will be stable enough to use.
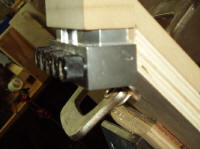
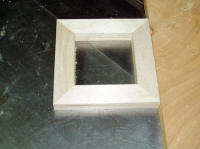
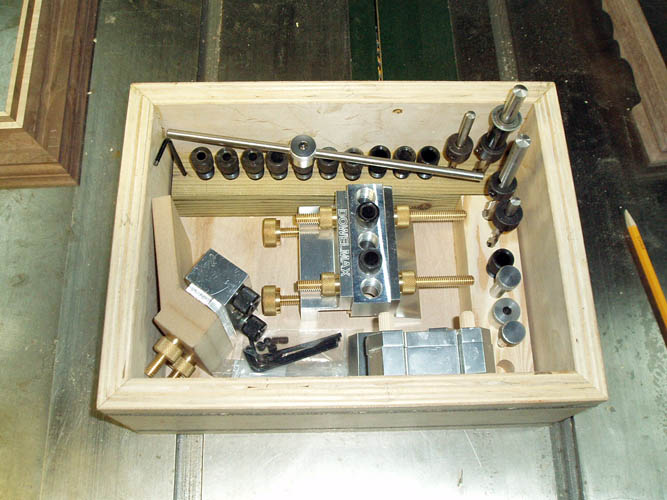
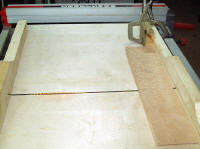
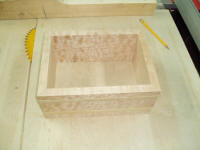
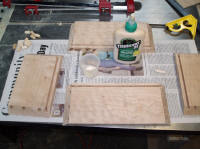
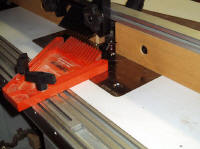
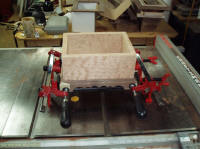
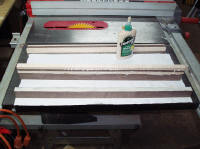
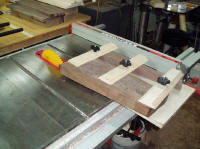
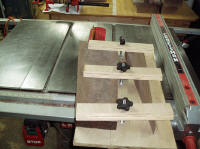
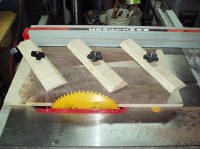
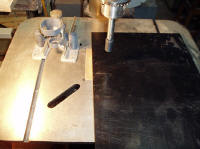
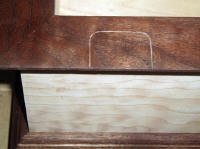
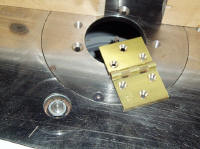
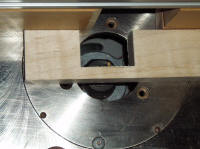
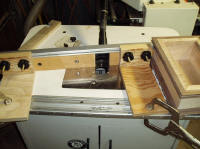
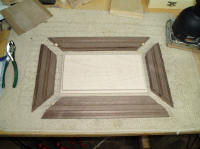
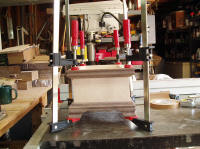
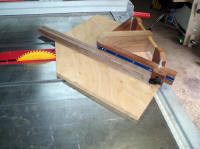
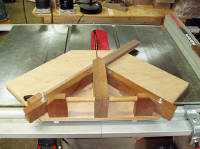
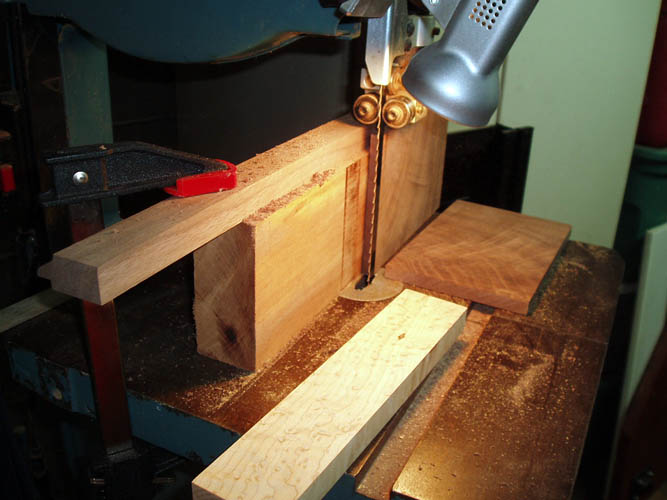
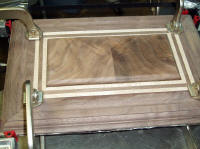
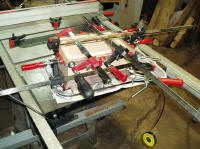
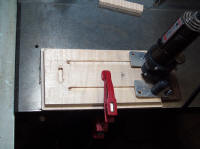
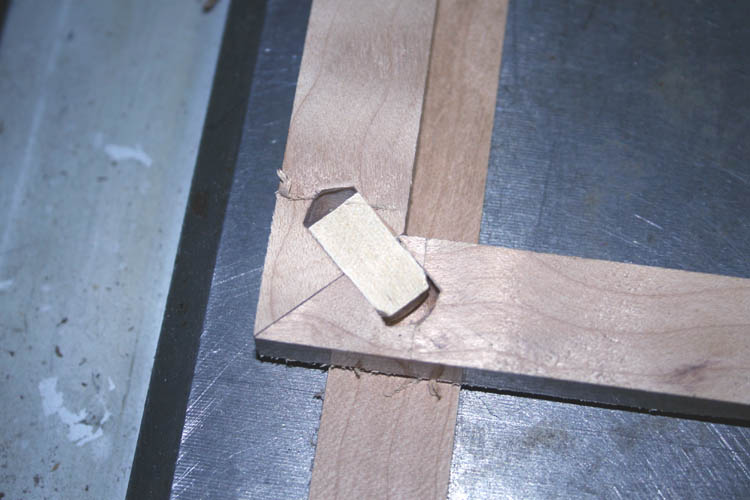
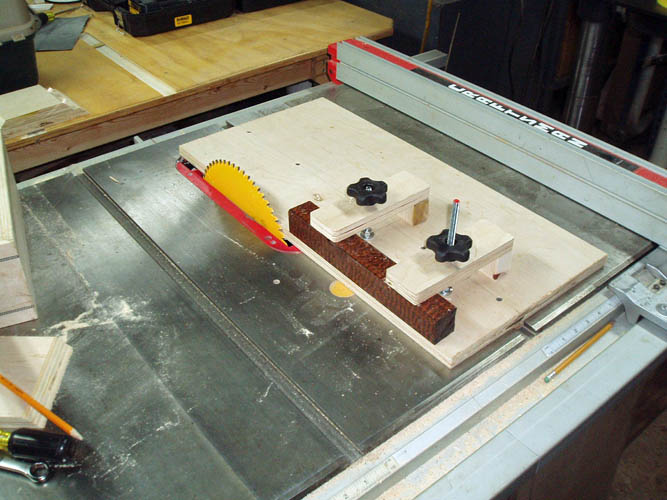
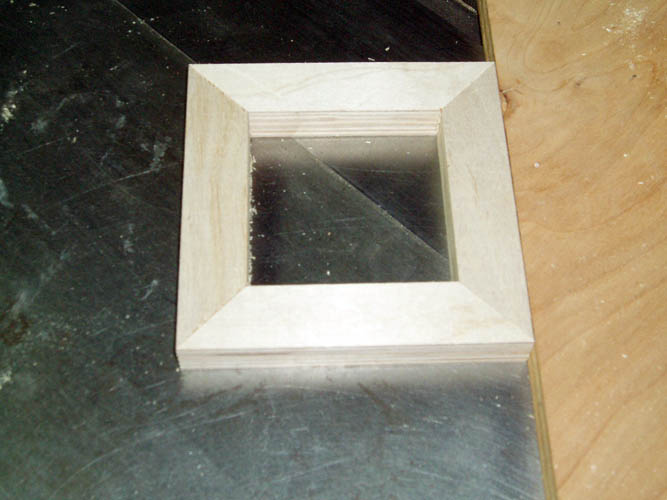
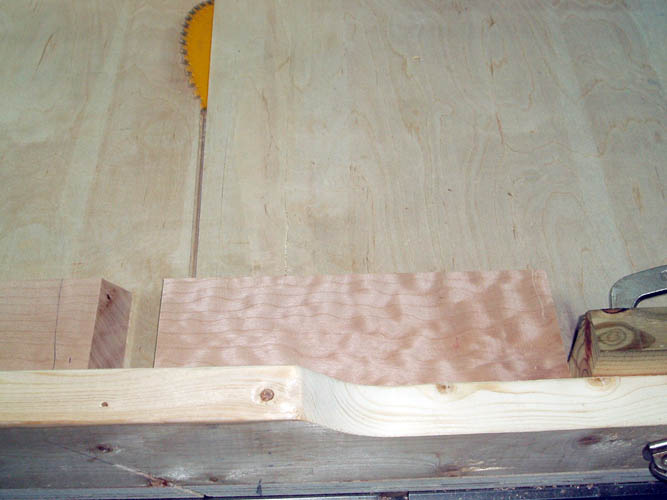
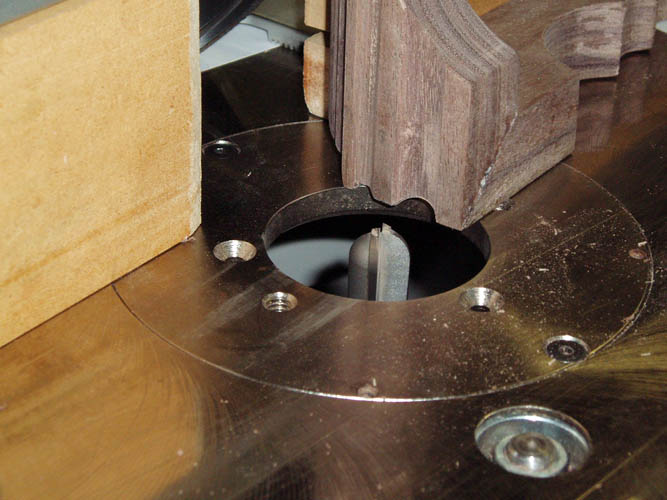
I tested out my crosscut slide using some 3/4 inch birch plywood and it
was pretty close and made a box to contain the
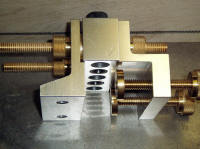
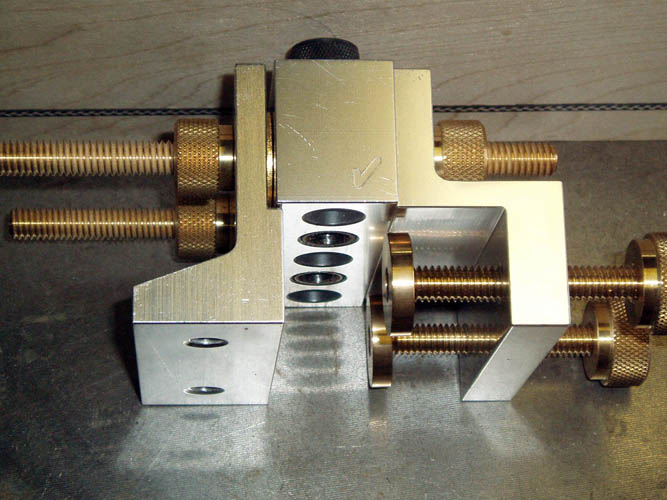
Dowelmax jig system that I
recently purchased to add dowels in all the forty-five degree miter joints since
end grain wood does not glue that well and wanted the extra strength of the
wooden dowels. The Dowelmax system is one of the best woodworking
products I have ever used and totally stoked with its top notch quality and
performance. I will add pixs that I have taken along the way and
didn't photo every detail but there are plenty to view. Click on below
thumbnail pixs for a larger screen view of setting up the sleds and doing
some test runs on the birch plywood and also testing out the Dowelmax
doweling jig.

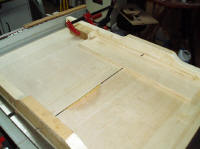


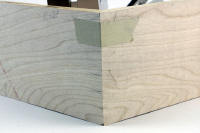


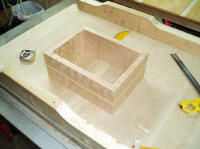
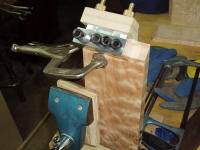
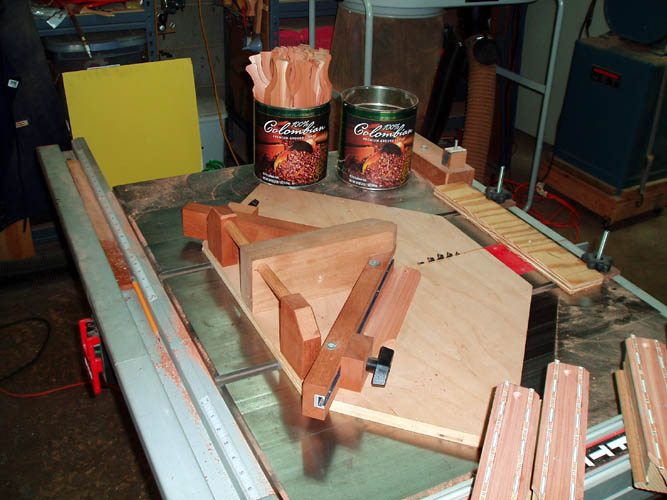
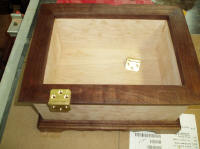
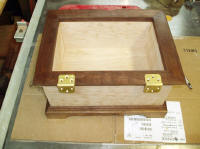
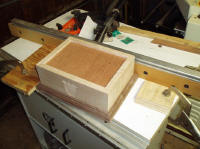
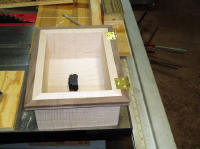
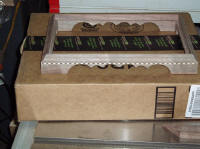
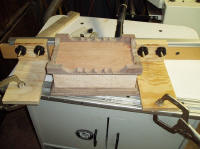
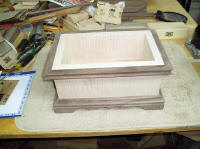
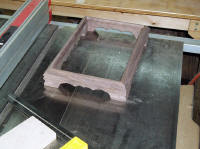
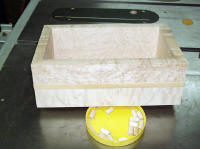
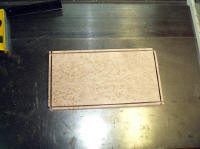
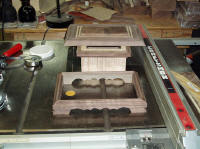
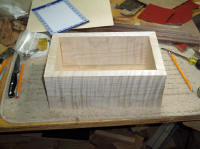
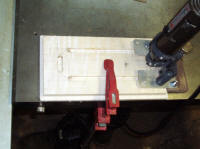
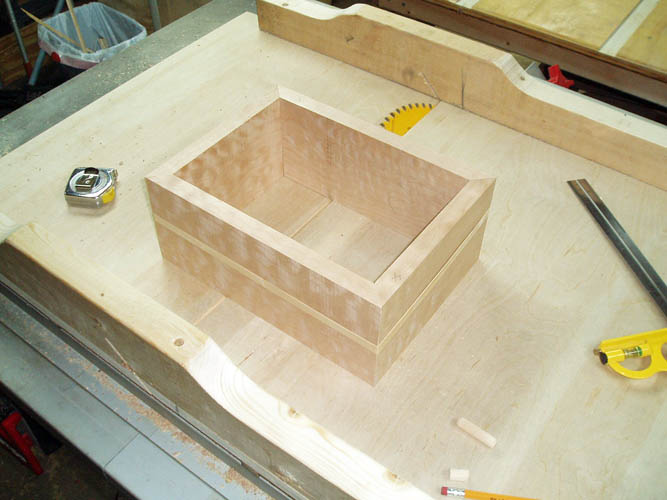
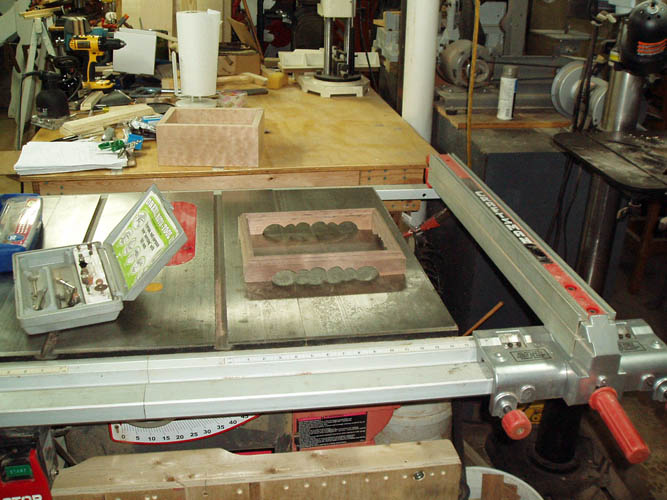
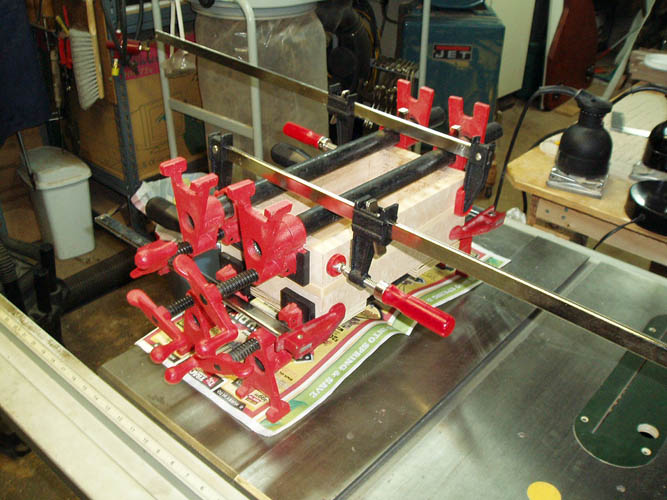
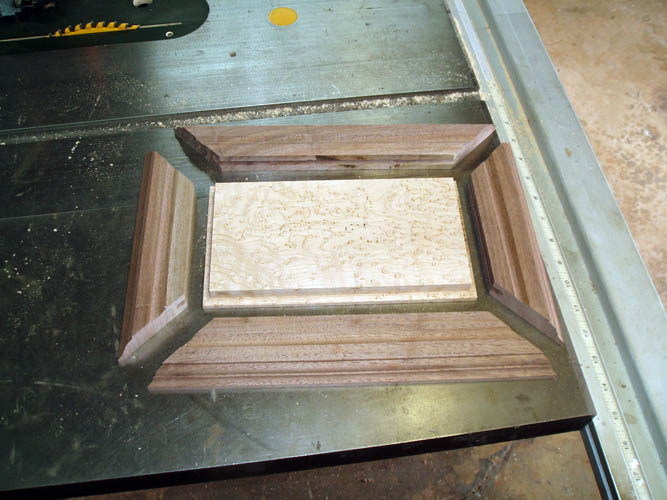
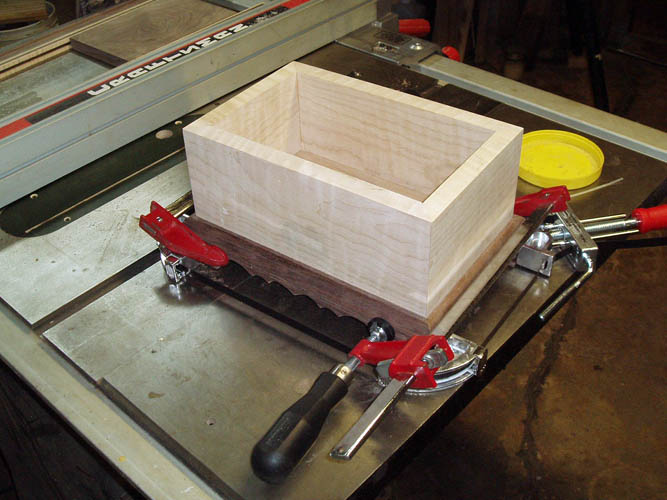
Below is first test box using birch 3/4 inch plywood and using it to
store the awesome Dowelmax jig. I have one Dowelmax set up just to
install the vertical drawer type forty-five degree dowels and another
complete Dowelmax for all the other dowel installation needs:
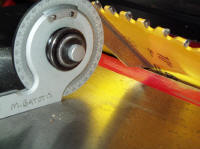
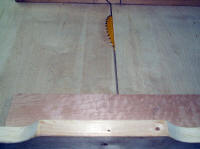
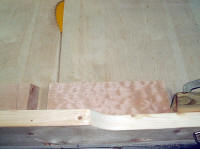
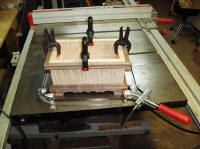
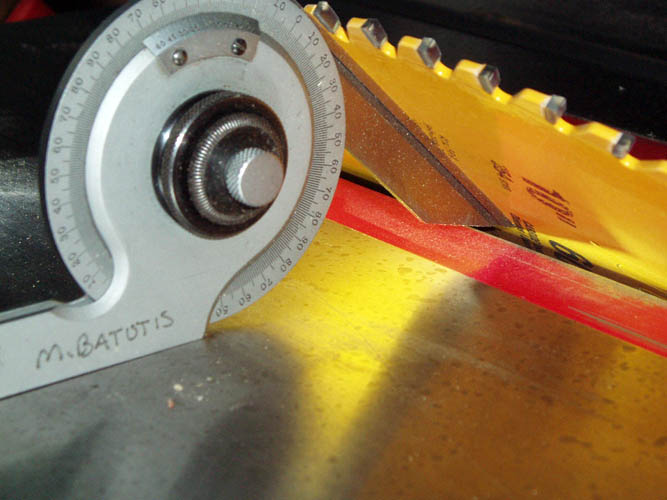
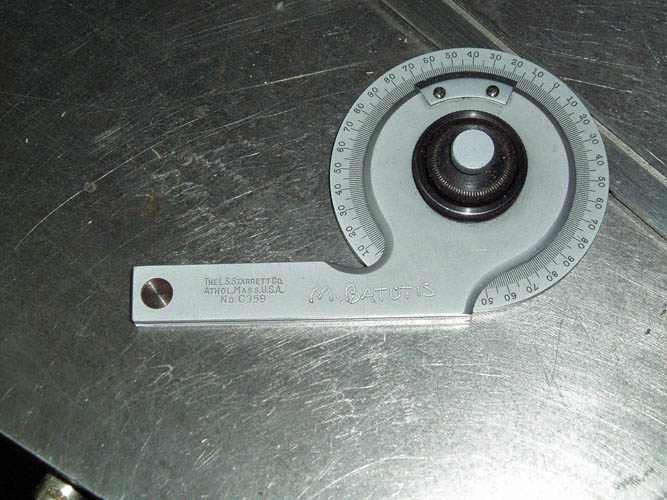
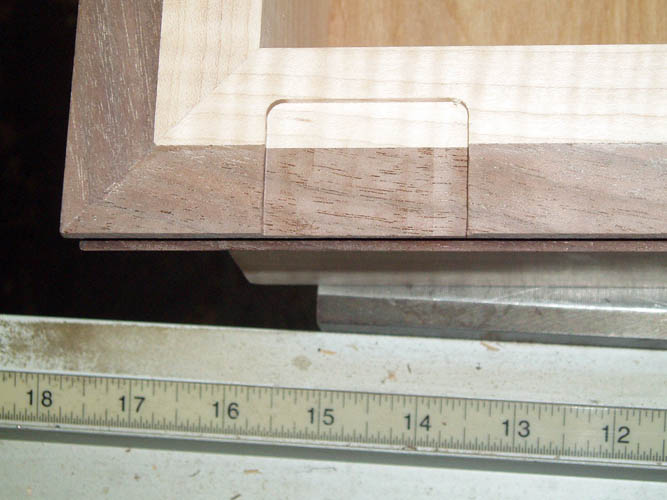
After testing out the calibration of the sleds of which I found out very
quickly that just using an accurate miter gauge
(Starrett C359) purchased used off EBay to adjust your table
saw blade tilt will get you very close to your target but the real acid test
is when all four (4) miters come together without a visible gap showing and
corners are ninety (90) degrees.
This is a trial and error process until you get it set as perfect as
possible. However, the table saw tilt set screw is not that accurate
since you can torque the setting and a few thousands of an inch from perfect
makes a big difference. Also, the stop set screw is located where
sawdust can easily get onto the blade tilt mechanism inhibiting accuracy and
a dawg to reach to clean.
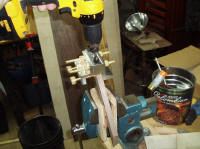
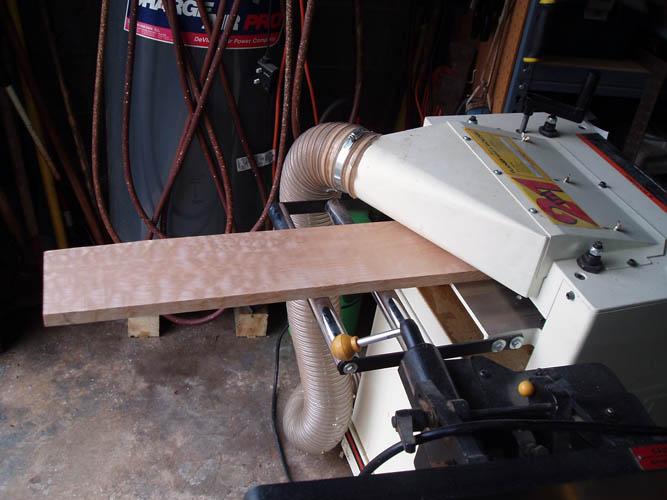
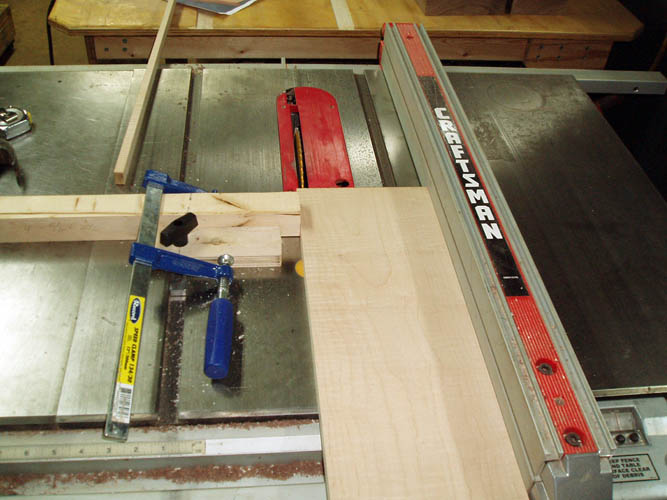
Next was to surface plane the piece of figured
quilted hard maple down to about 3/4 inch and rip the width to around 4.5
inches and cut the maple to the lengths with a forty-five degree miter on
each end. The miter saw table sled comes in handy since you can use an
adjustable stop to have each side, front and back cut to the same length.
If one length is shorter or longer, you will not have a
"perfect" forty-five (45) degree
miter joint rendering a "perfect"
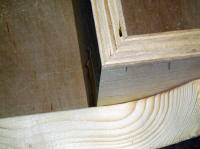
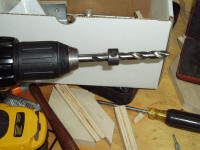
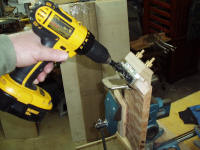
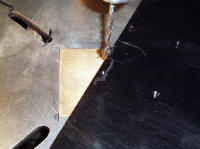
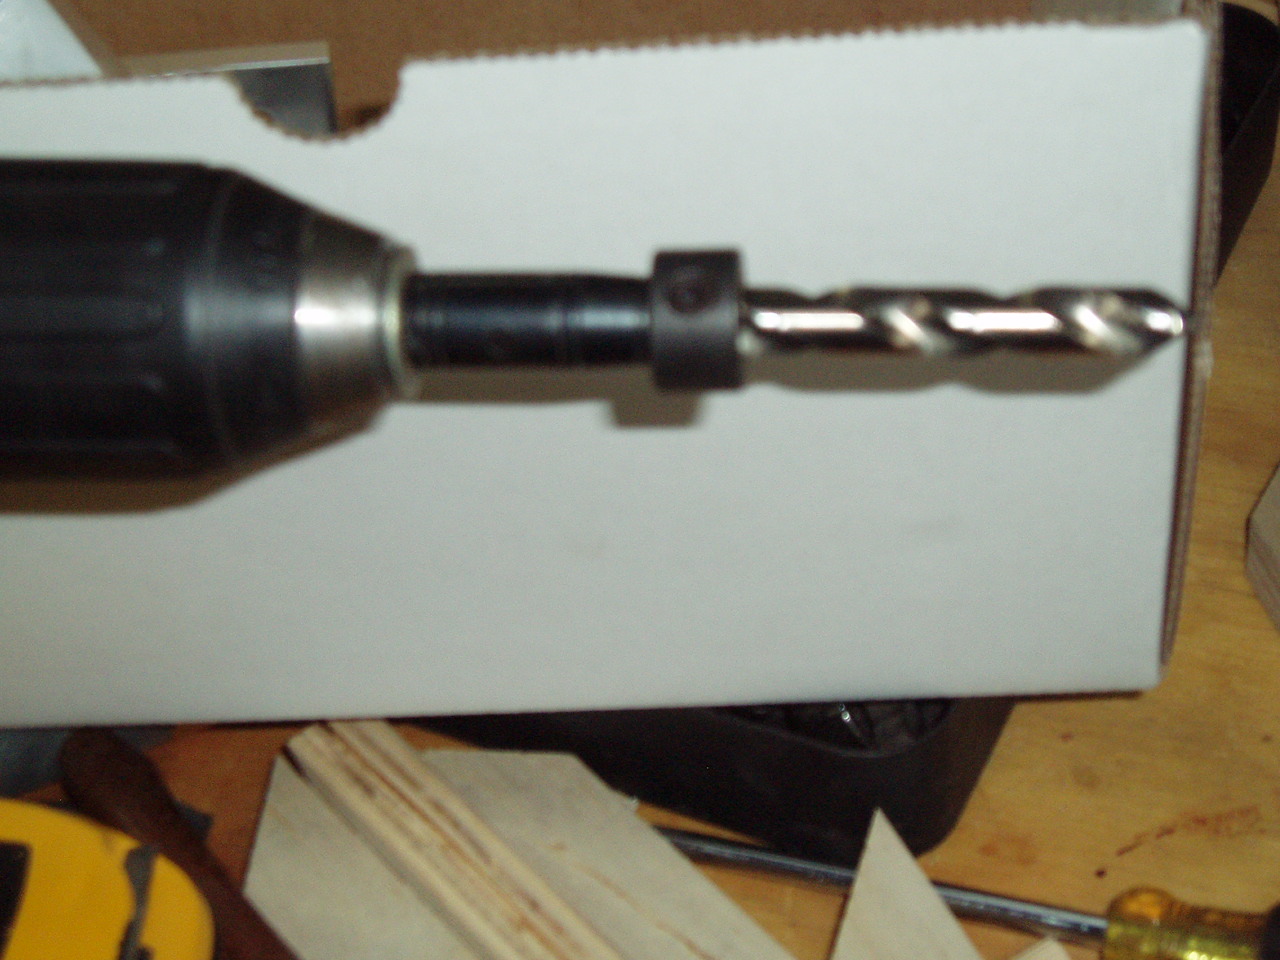
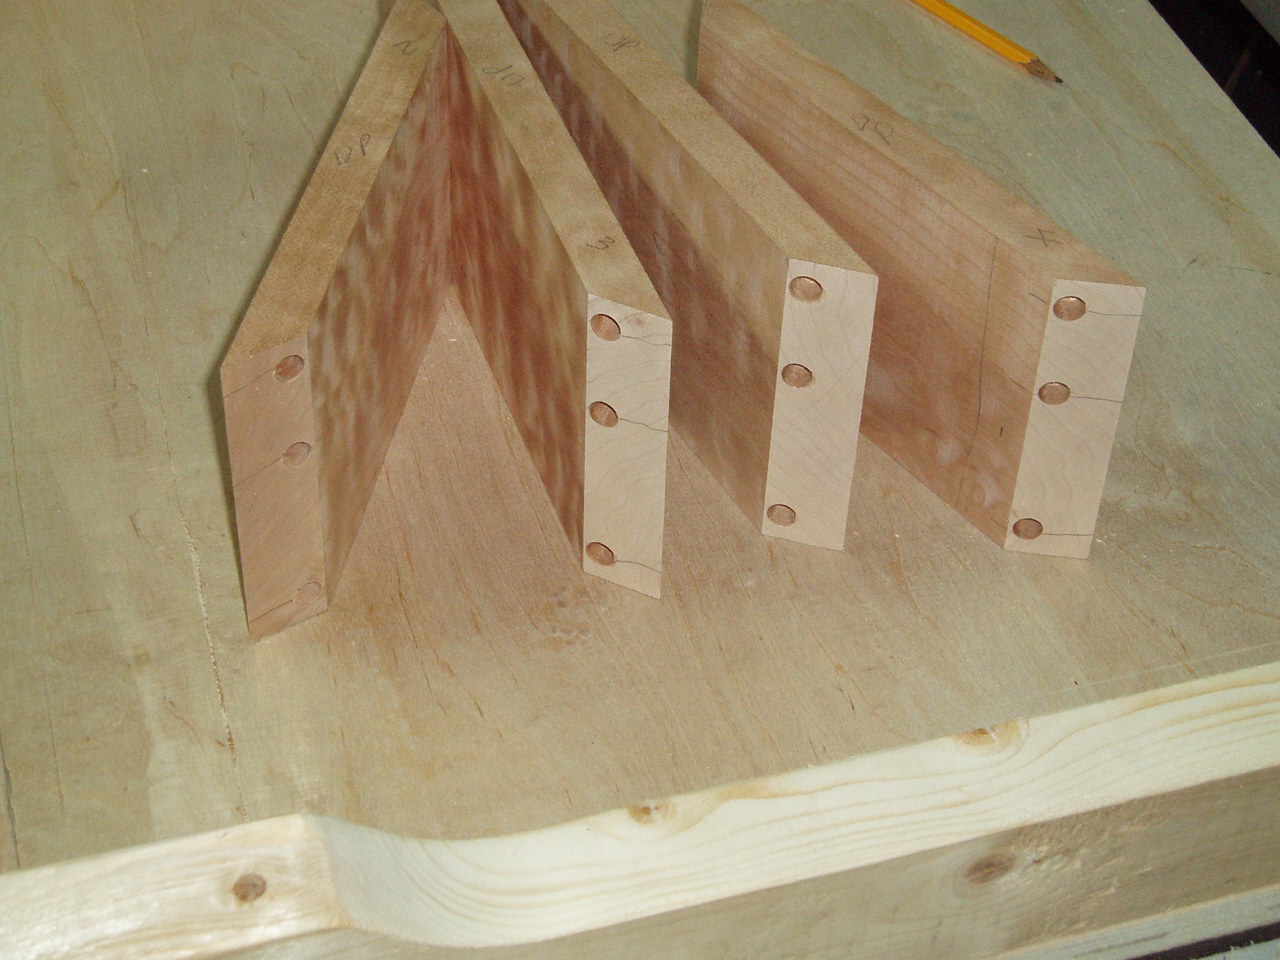
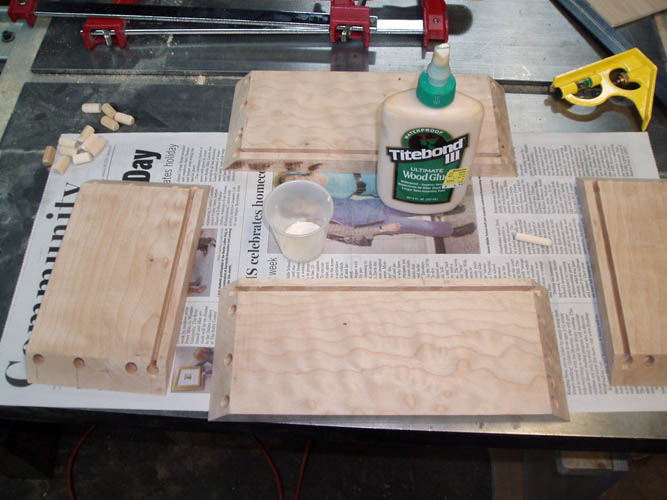
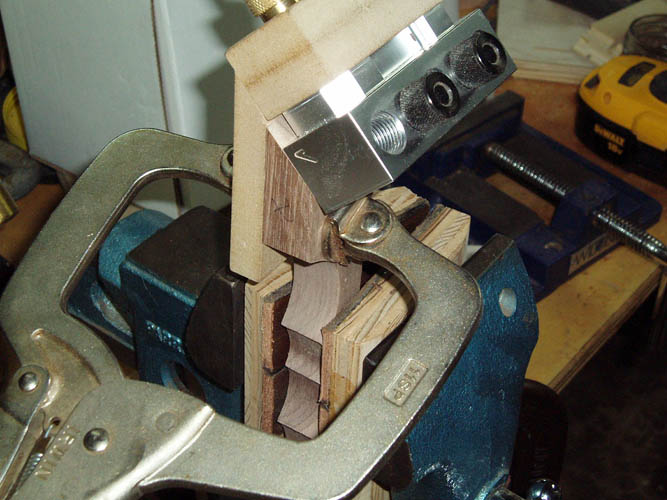
ninety degree right angle. Since end grain glued is not that strong, I drilled three
holes in each end of the miters to insert wooden dowels for the extra
strength which for this application is probably an overkill but I want this
box to last a very long time for the next generation, etc. I made an
additional stop sleeve for the drill bit to bottom out in the drill chuck because I know that set screws can
and will come loose and destroy a part when critical depth drilling is required
and Murphy's Law
never sleeps.
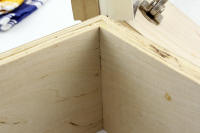
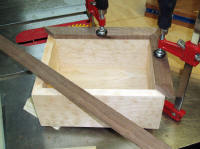
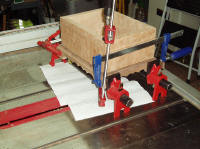
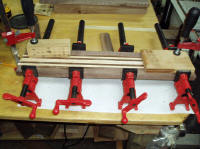
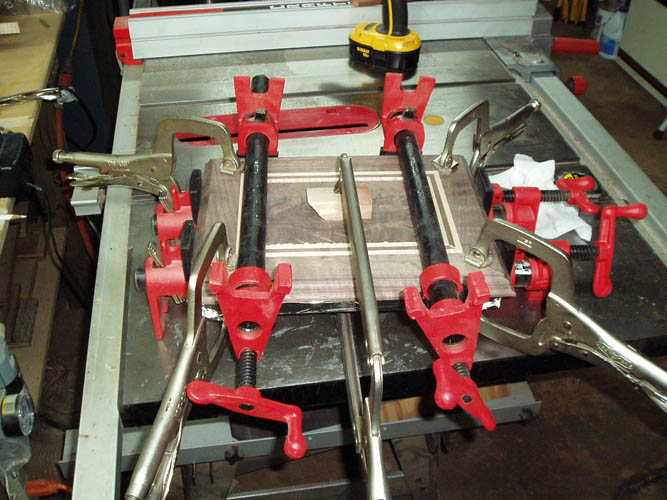
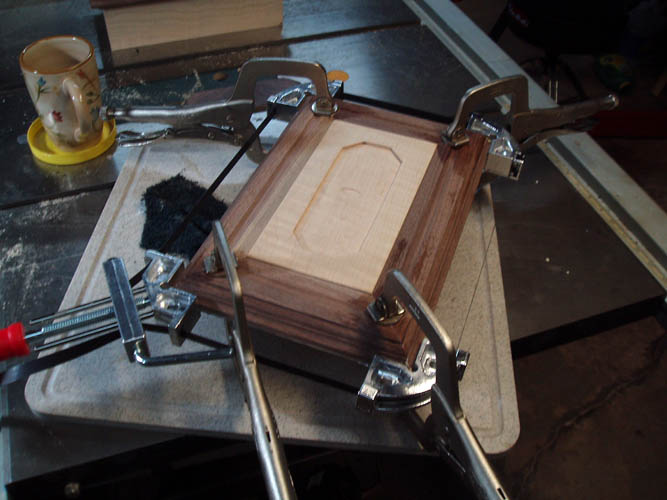
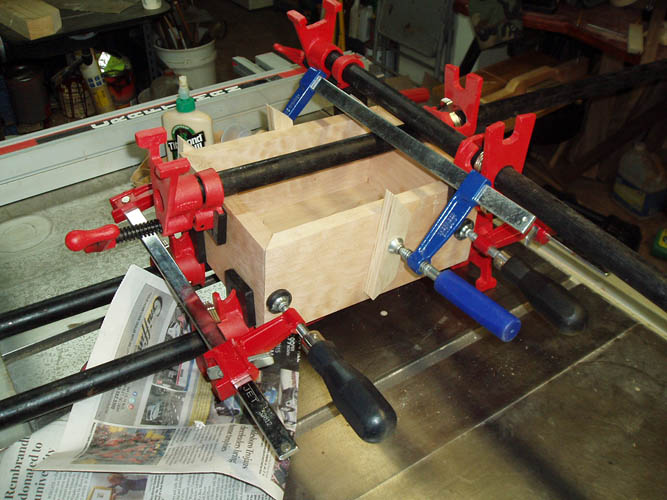
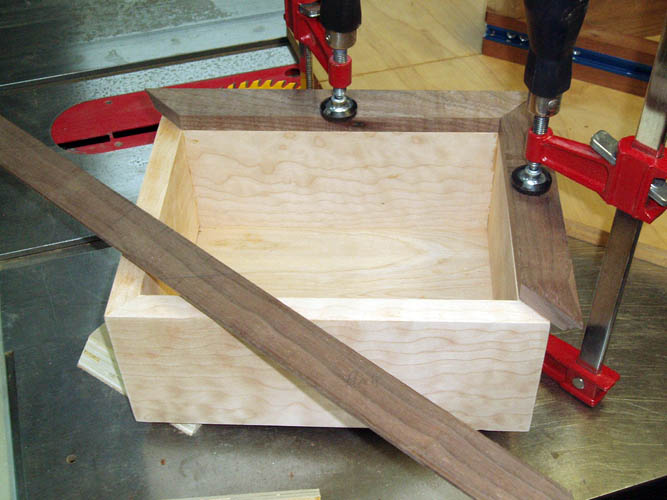
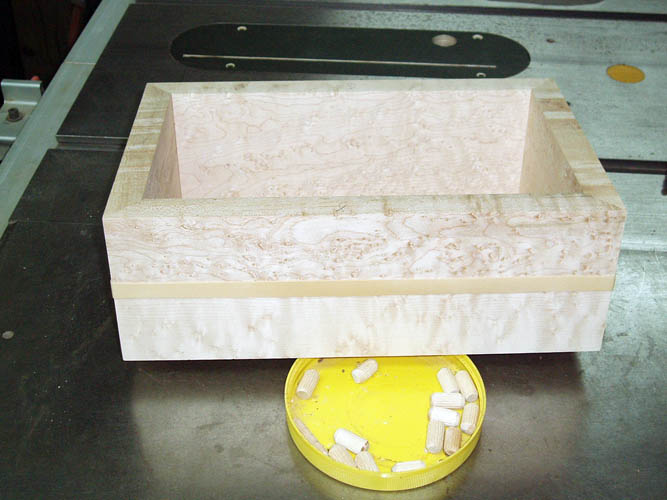
Everything went real well until the actual glue up of the box of which the
Titebond III glue that I used was too fast setting; e.g., not enough open
glue time and the box ended up being a little out of square of which I tried
to push it into square but the glue had already done its thing and will have to
deal with that later. Since then, I have received a
bottle of
Titebond II extended time glue which is working out great. I
used a 3/16 inch thick piece of plywood for the bottom of the box which
should be strong enough.


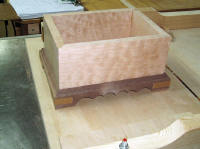
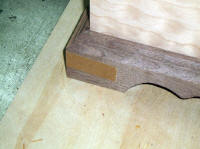
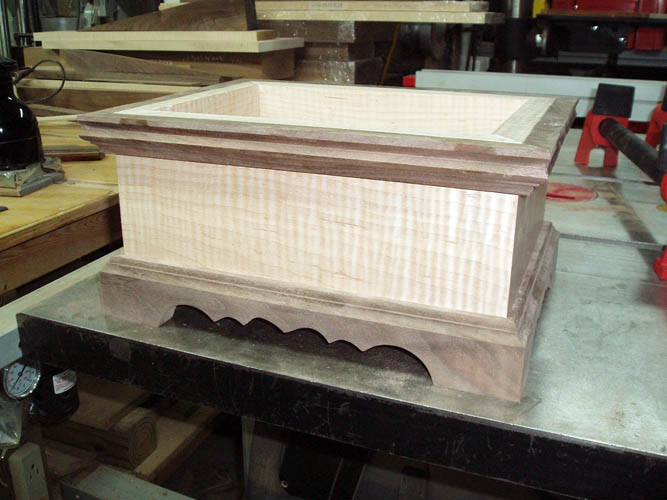
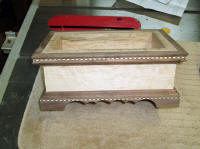
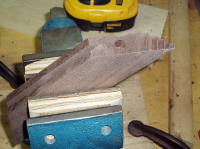
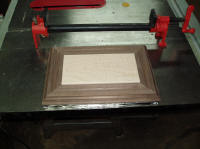
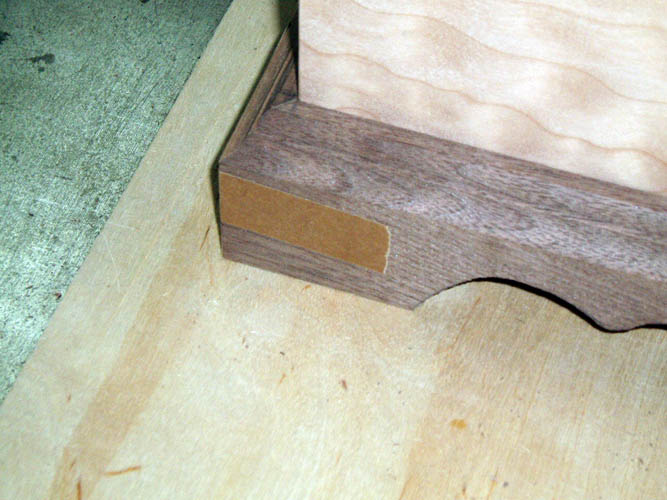
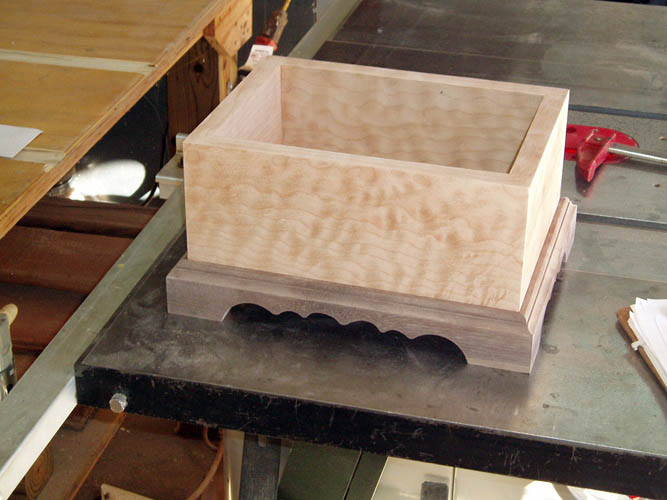
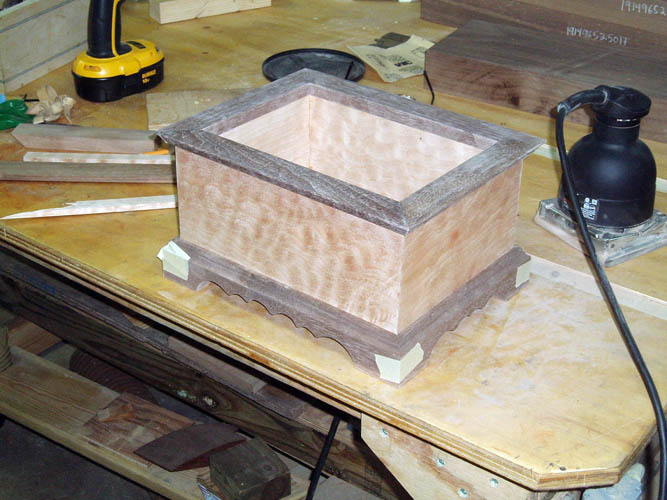
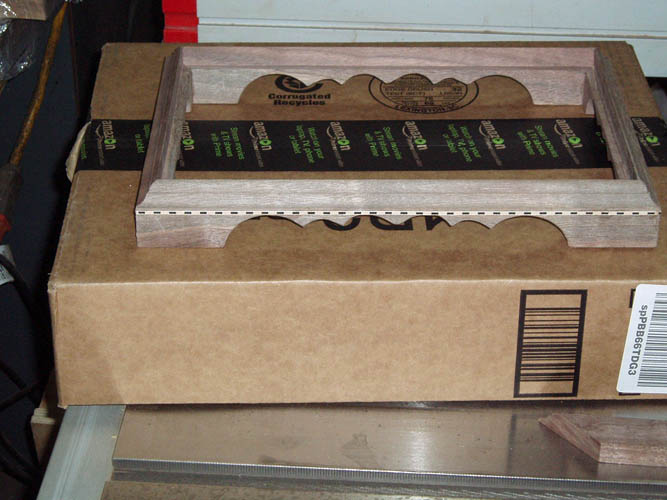
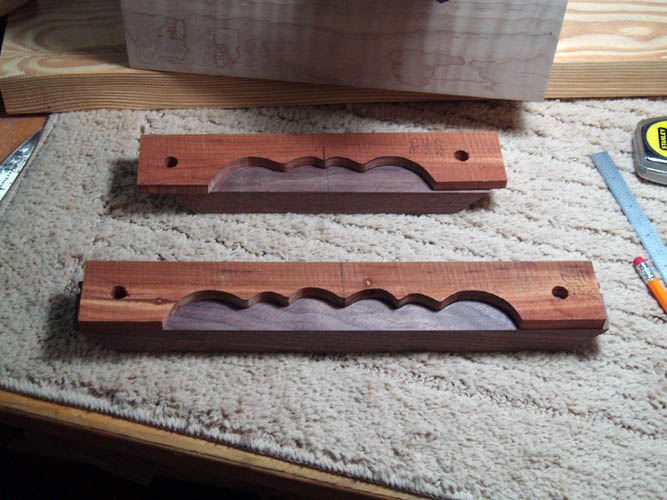
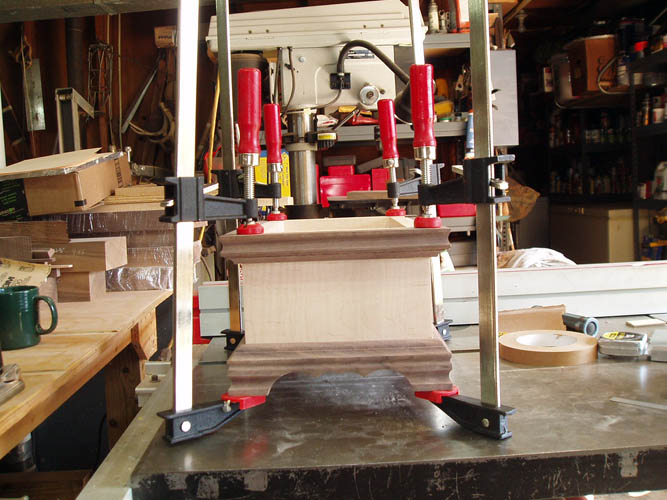
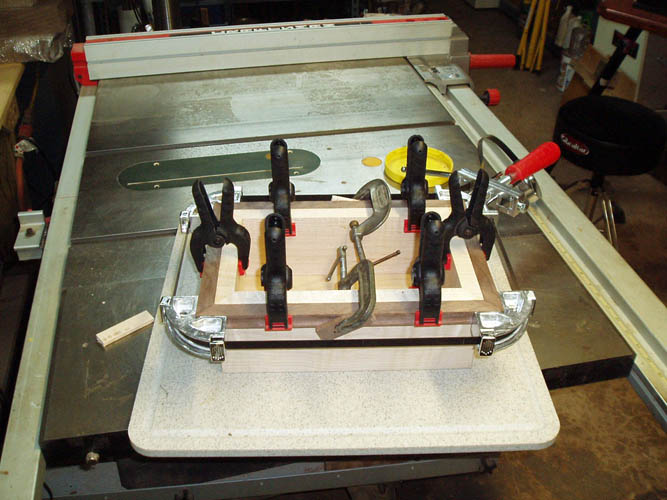
After the box was assembled, it was time to start the bottom rails to
function as feet and give some decorative design element to the basic box shape.
I used walnut of which I surface planed to thickness and then ripped to the
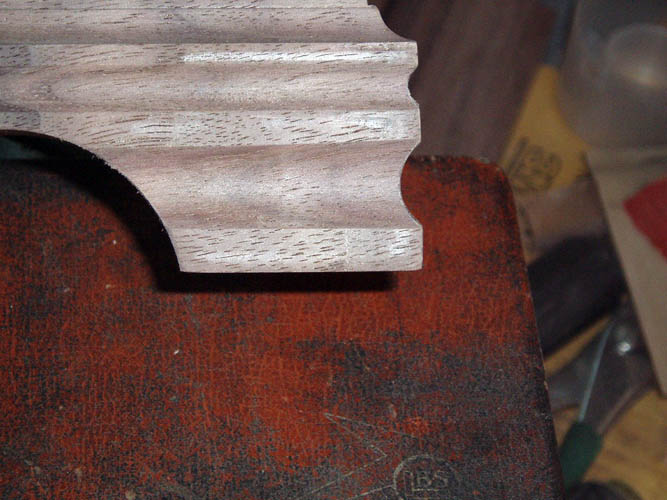
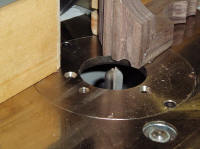
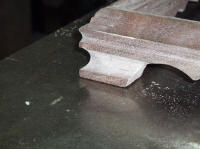
required width. I used the Porter-Cable 3.25 HP table mounted router with a molding bit to
make a pleasing shape to the edge of the base trim and also routed a rabbit
groove to the inner edge so the box would recess down into it about 1/4 of an
inch. I didn't do those sequence pixs; guess I was "brain dead" a little;
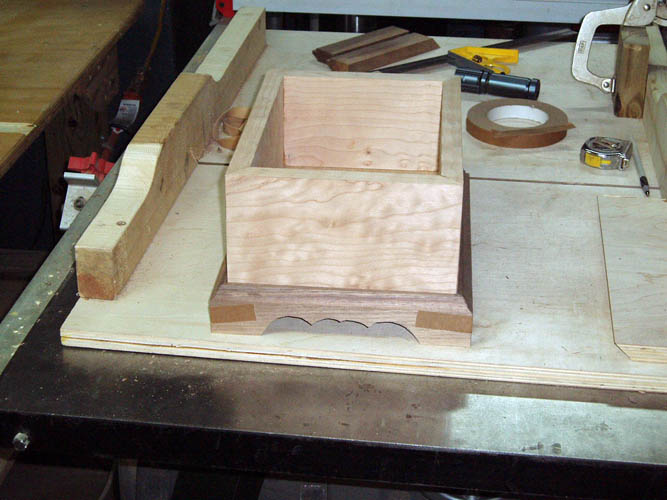
grin if you must. After getting the profile for the base trim routed, I then
band sawed the scallops out on the bottom edge of the trim and then mitered
each piece to the correct length. I also drilled each corner for a
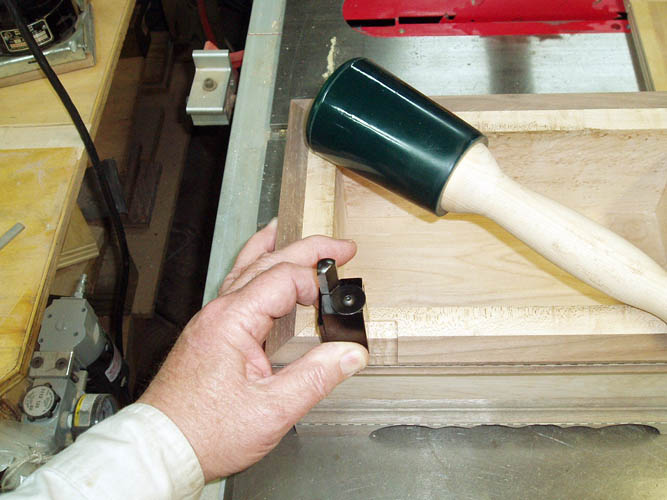
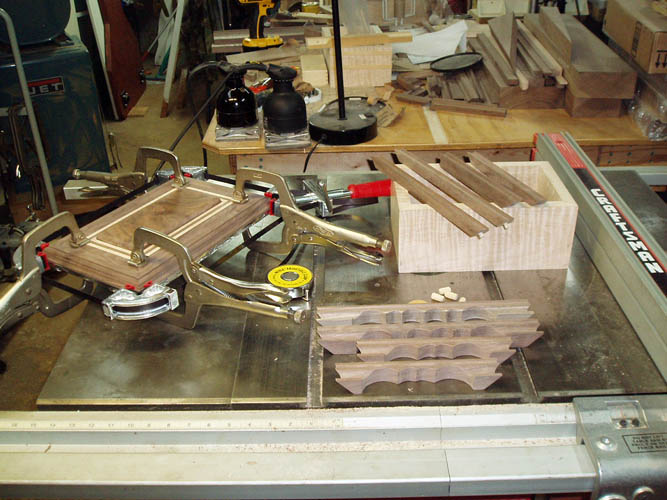
wooden dowel using the Dowelmax doweling jig and then glued the base trim miters.
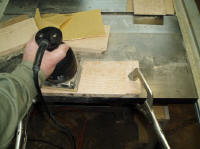
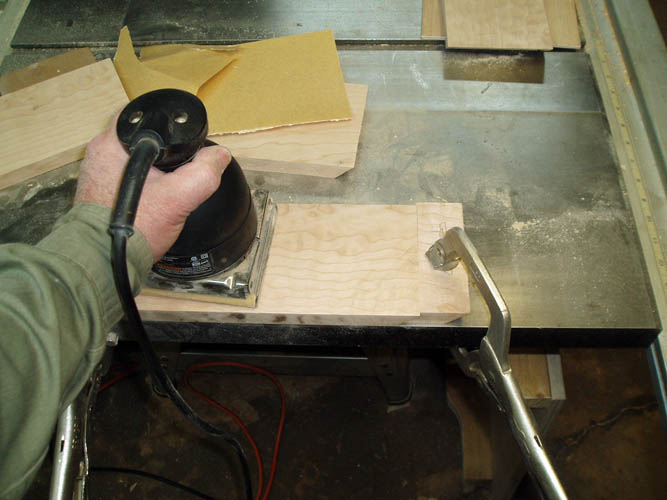
After the glue dried, I sanded the band saw
marks out using a Dremel tool with a 3/4 inch diameter drum sander and also a
1.5 inch diameter drum sander on the drill press.


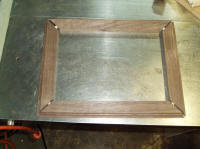
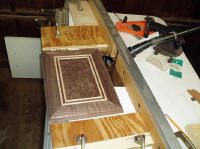
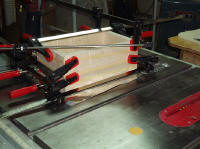
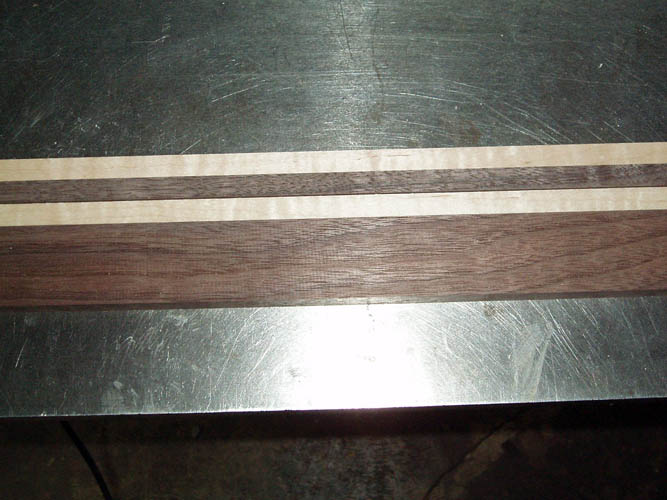
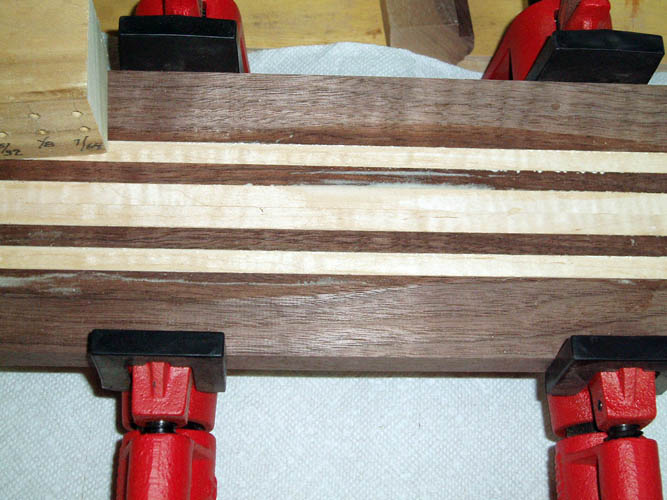
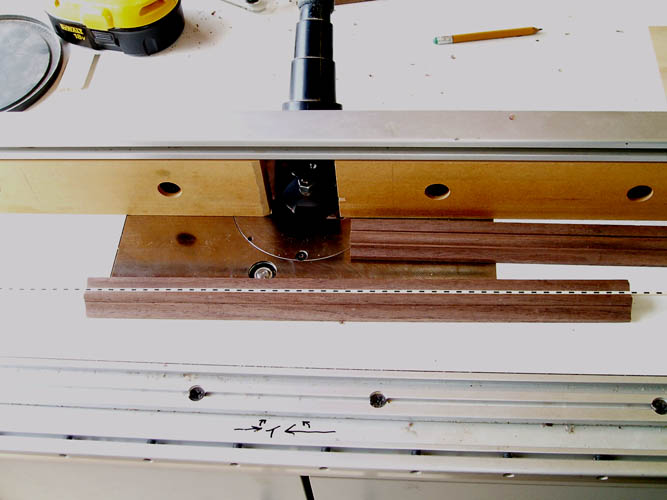
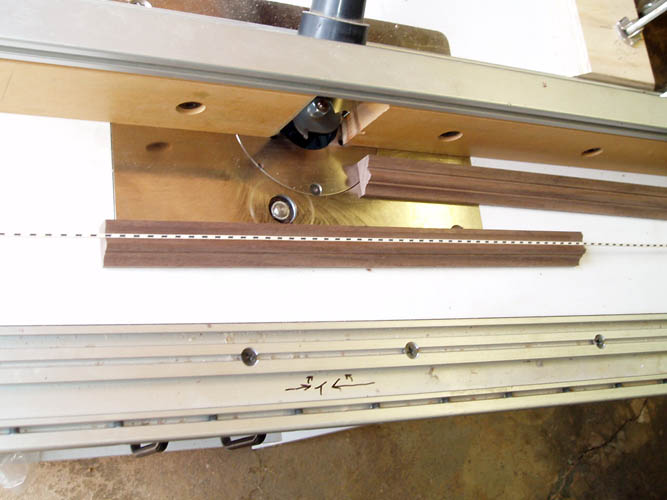
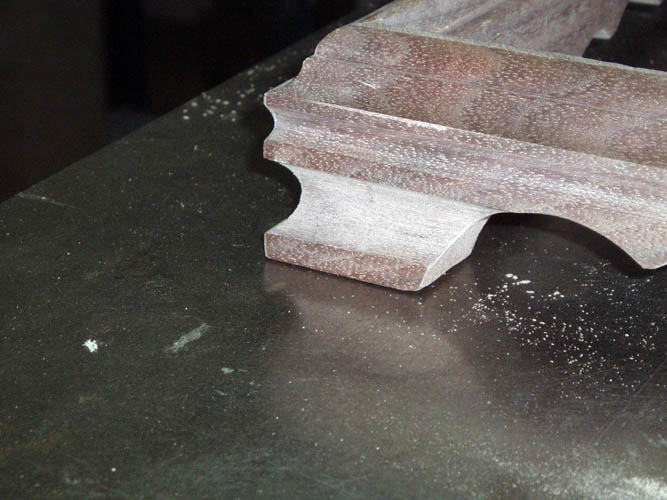
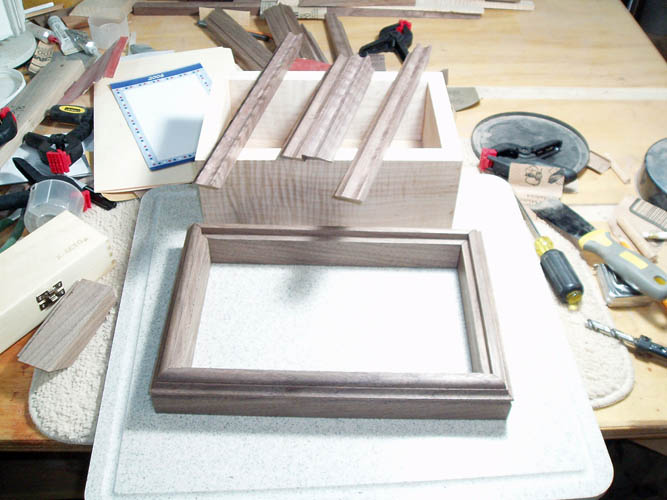
I wanted a walnut trim around the top of the box that extended outward to
the same size as the base trim and sized the walnut and headed to the router
table. I used the same router bit I have used so far for the molding
but changed the orientation of the wood to vertical instead of horizontal.
The same doweling procedure was used for the edge molding miter corners to
add strength to the
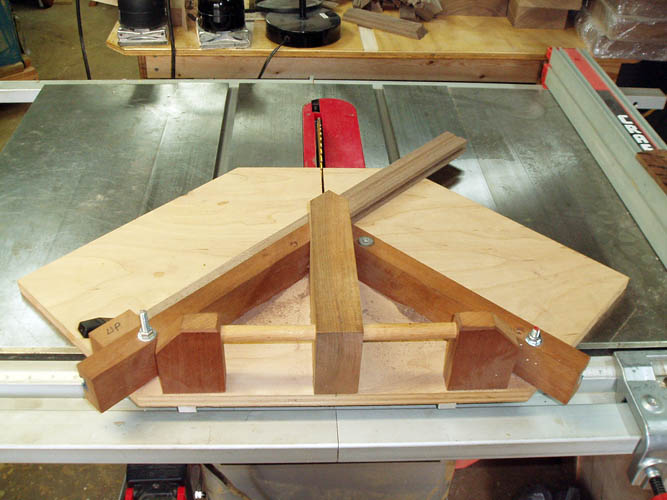
miters. I used my forty-five degree crosscut slide to make the miter
(picture frame type cuts) that I use for trimming the ends of my turkey box
call lids. Below is an achieved pix:

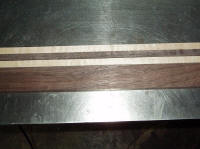
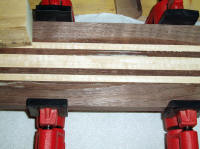
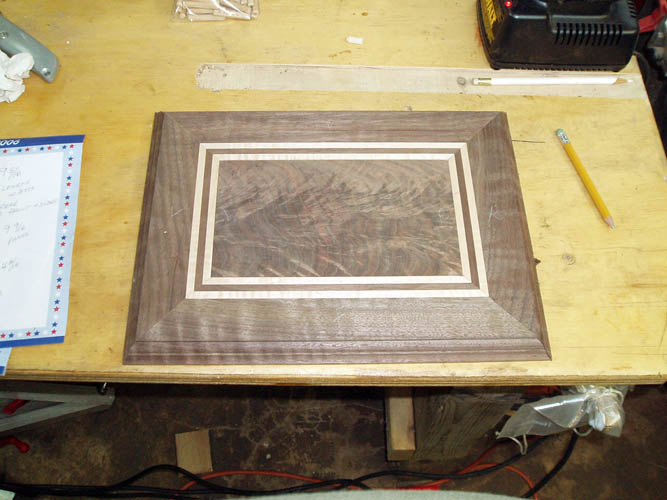
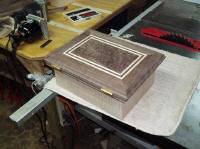
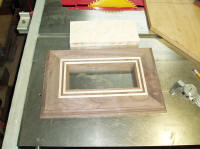
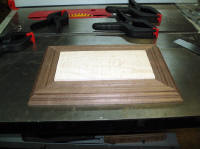
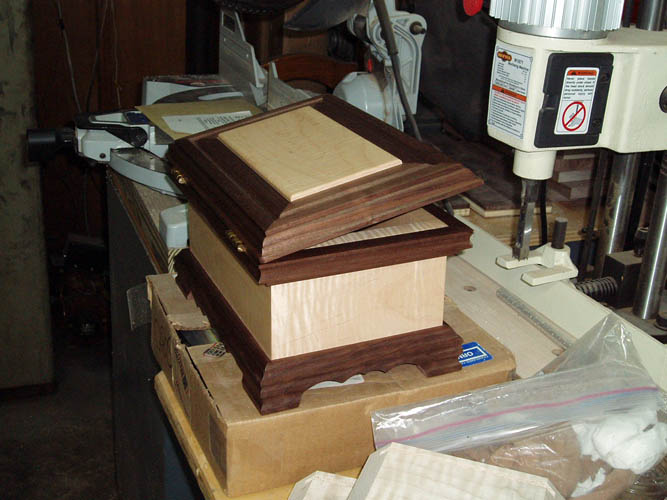
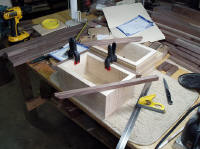
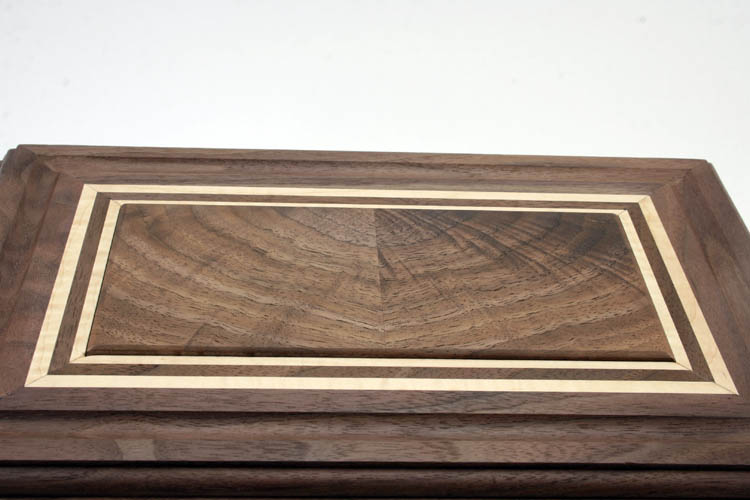
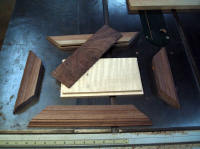
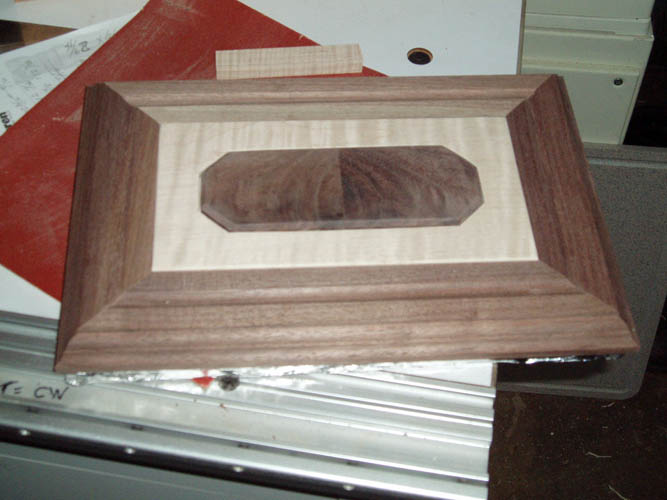
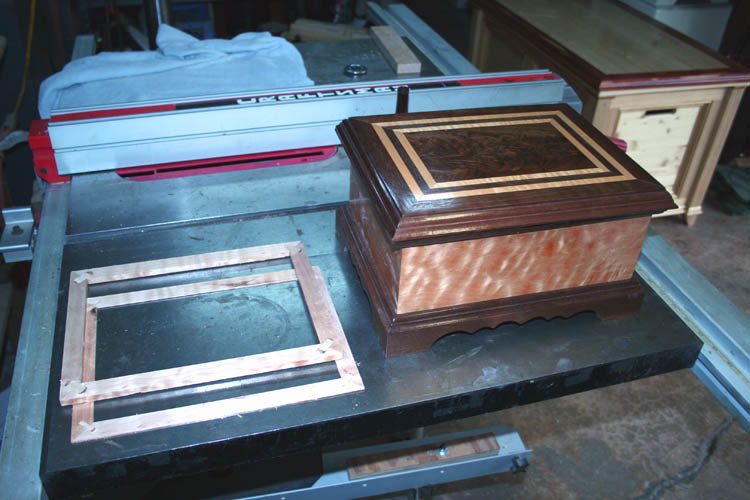
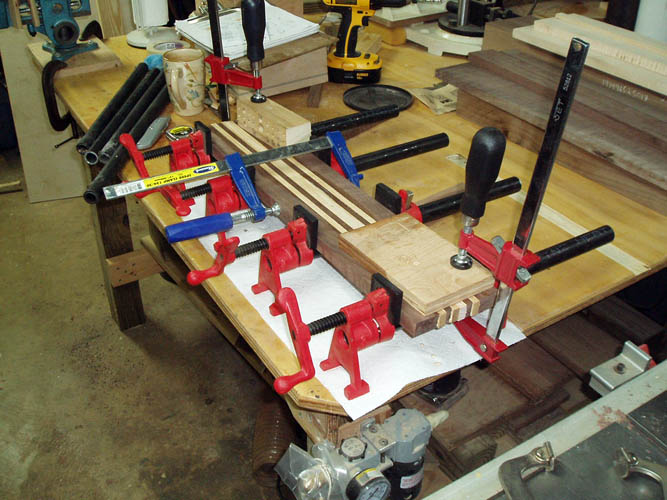
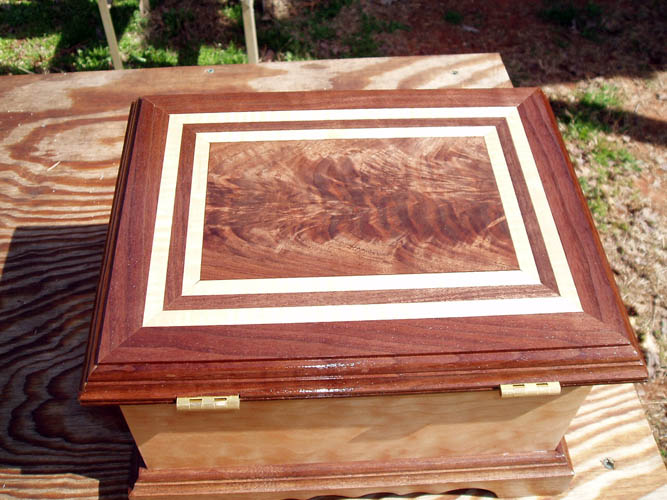
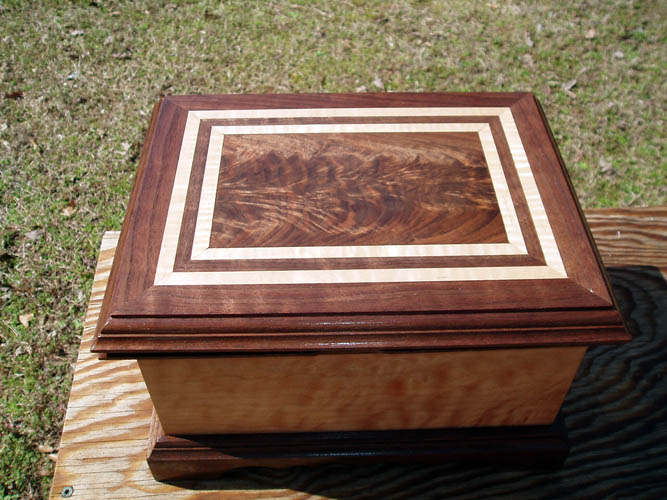
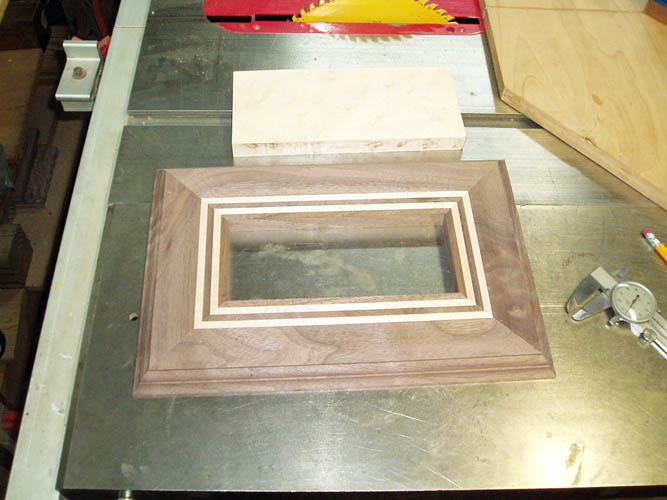
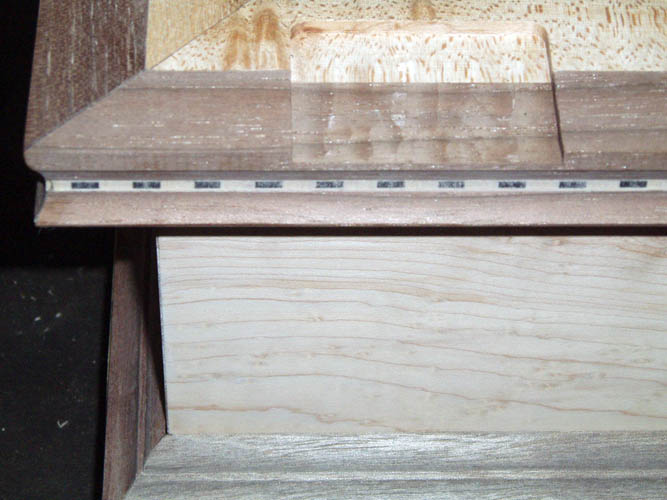
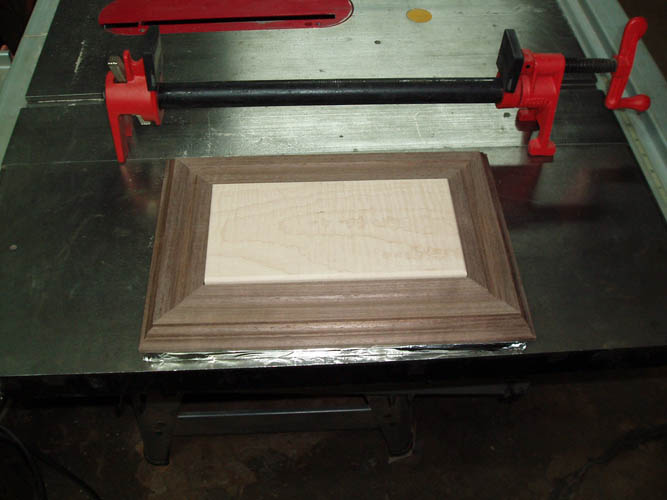
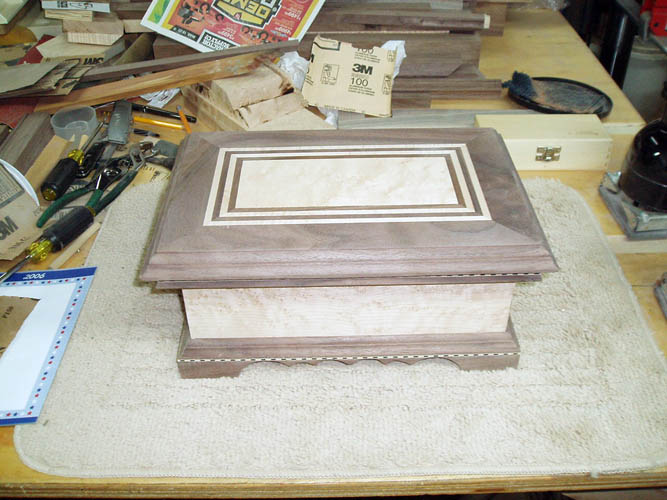
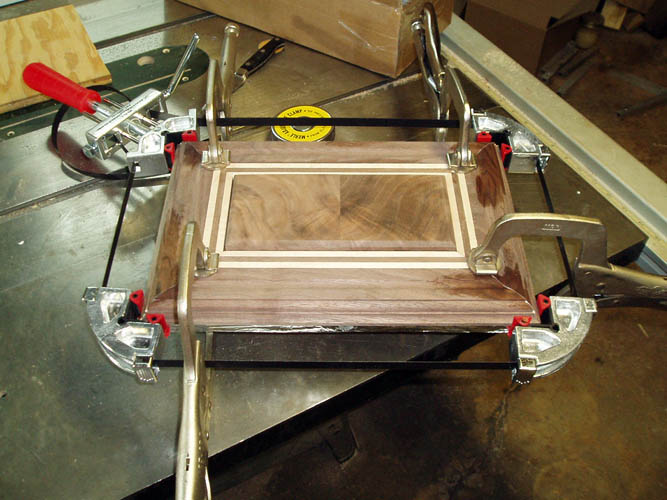
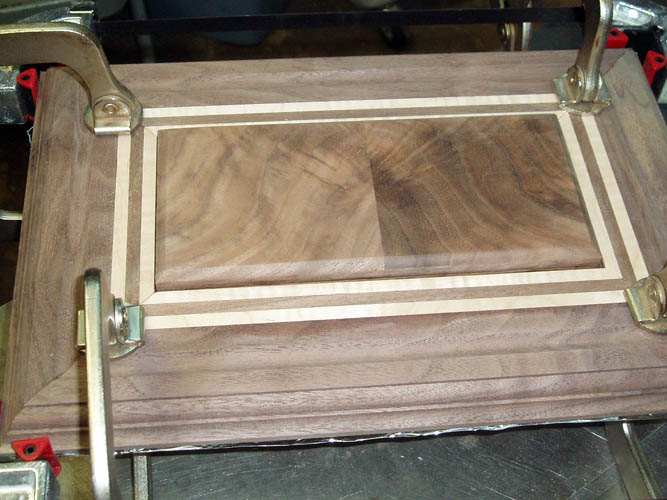
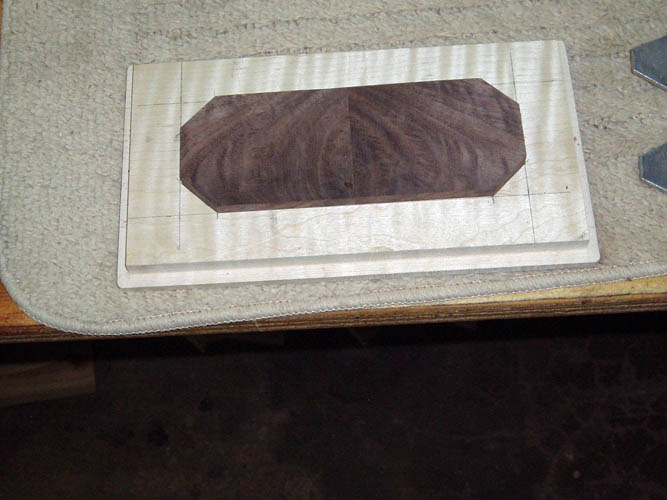
With the above three components finished for the box, whereas the lid being the main focal point for this box and wanted to showcase the figured walnut
crotch wood that I have had on hand for about eight (8) years air drying. I planned
to do a custom turkey box call utilizing this wood but after thinking about how thin the box
call wood would end up, I changed my mind since wood of this type is prone
to become unstable and will splinter and blow out when routed and/or carved
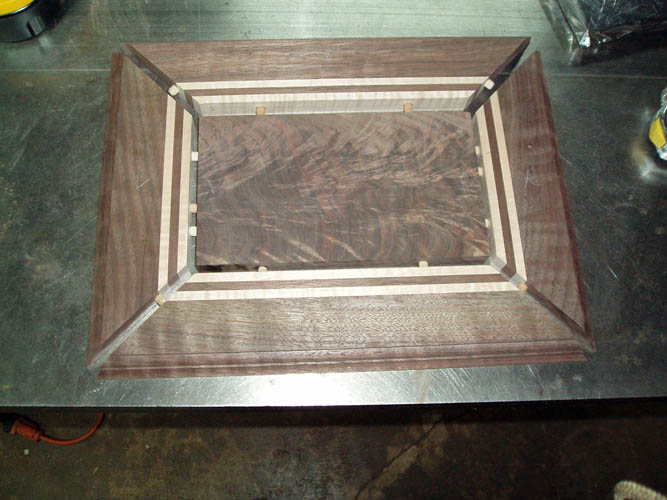
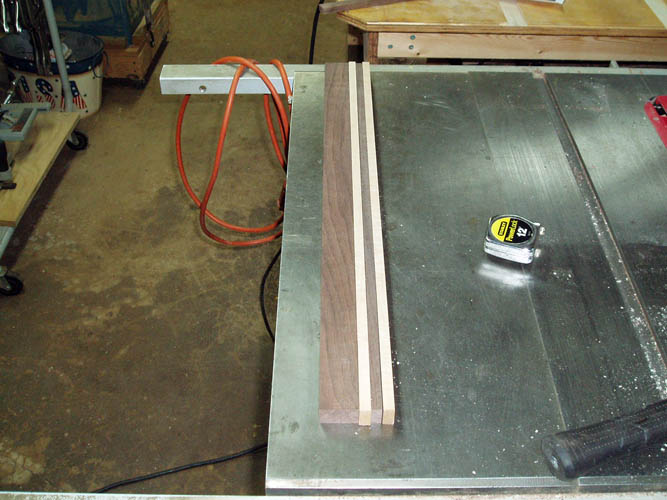
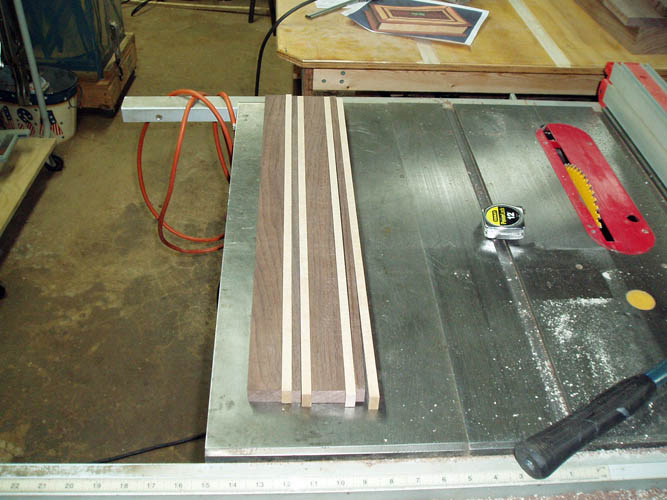
as thin as the soundboards on a turkey box call. I used a piece of walnut
and strips of curly maple wood for the contrasting lamination of the border
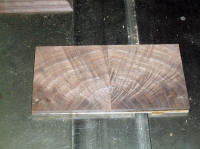
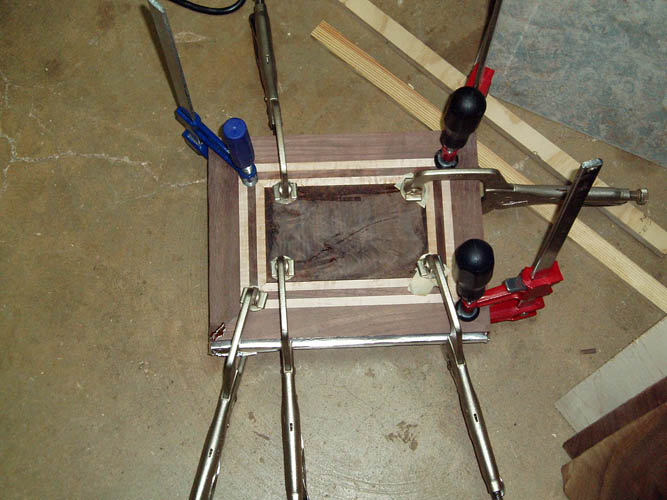
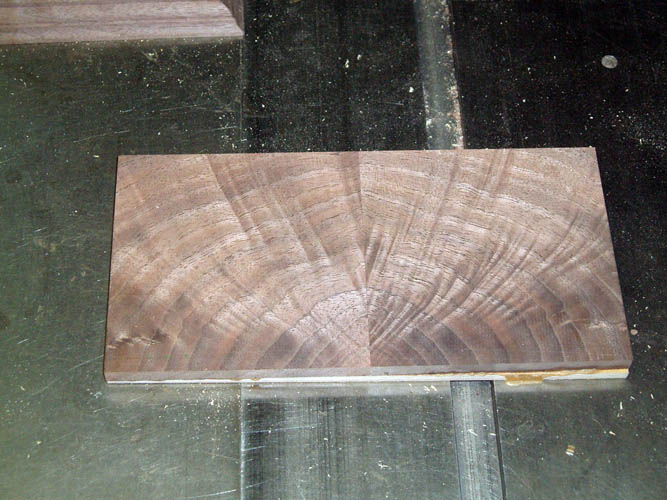
around the walnut figured crotch wood. NOTE: This
wood gets its name because the wood is
harvested from the base of the tree or tree trunk that has formed a crotch, two pieces of
wood from the main trunk of the tree which normally leaves a very
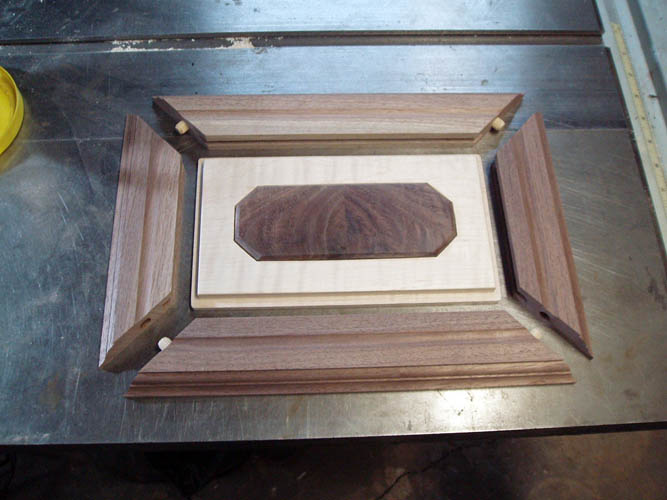
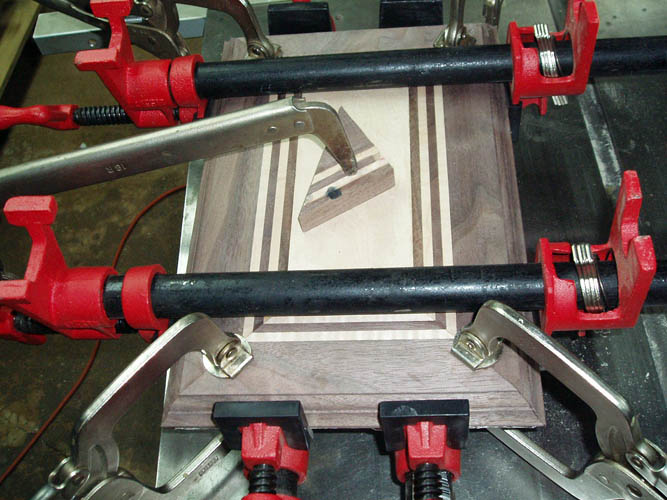
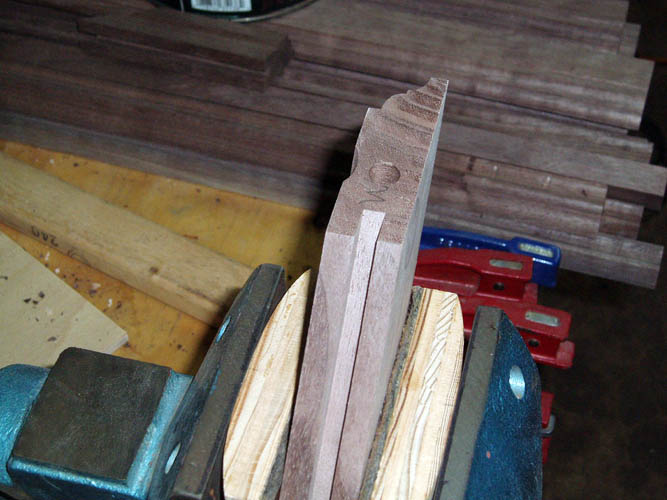
distinctive swirl pattern as evidenced by the pixs below. This was a tricky
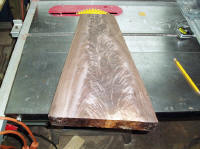
process getting the center figured walnut crotch wood to size since as I
stated earlier, the box was slightly out of square and had to make
adjustments that would render the miter joints and glue joints pleasing to
the eye, even though not perfect! The walnut crotch wood was
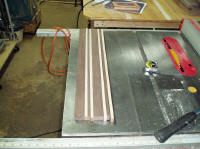
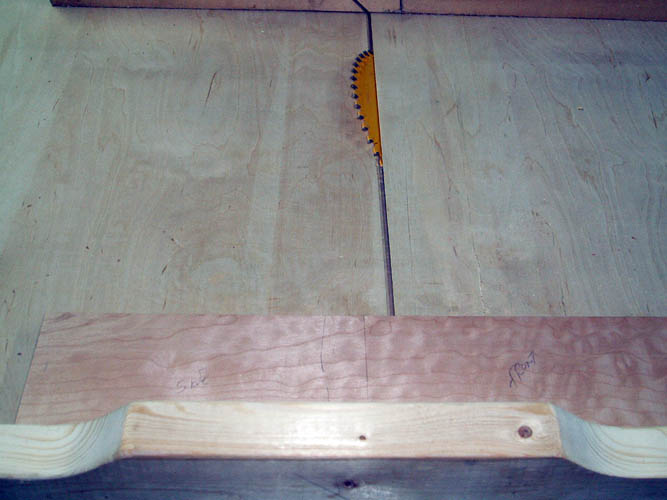
approximately 2 1/4 inches thick and shaped like a large wedge and used one
of my straight cut table saw sleds to get the wood cut to feature the
crotch/swirl pattern. I planed the top and bottom of the wood and then
ripped it in half length wise making two cuts on the table saw with the saw
blade extended to its maximum reach and flipped the piece end over end to
make the final cut rendering two pieces about 7/8 inch thick. Each
piece was then planed down to the same thickness as the walnut border which
was around .730 thousands of an inch. Normally, you would build the
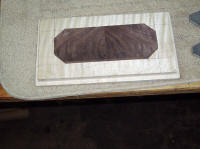
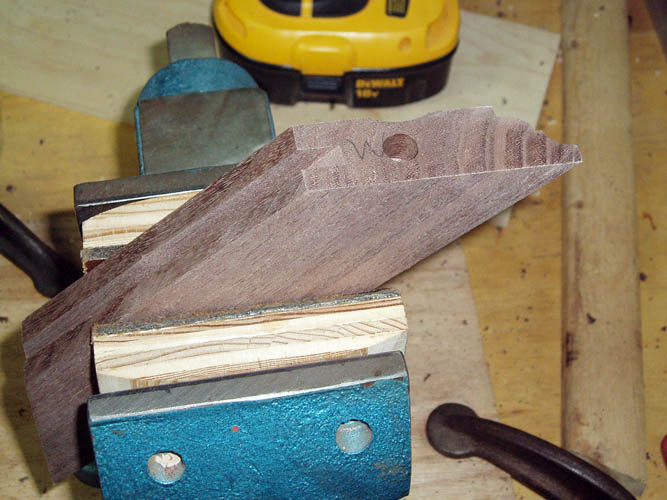
mitered frame around the center piece but I elected to do it the hard way
and cut the crotch to fit as close as I could after the outside frame was
mitered and glued together. I used epoxy to glue the center crotch
wood in place and scored the inner edges deep of both the frame and the center wood
where epoxy would get into each piece and hopefully make a strong bond keep it from moving
around. I later applied some epoxy glue with a walnut colored powder
to fill in a few hairline cracks in the surface of the crotch walnut and
will keep check on it and apply the filler as needed if any cracks reappear.


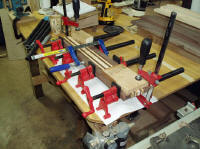
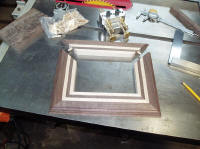
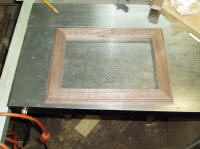
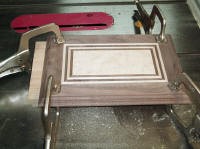
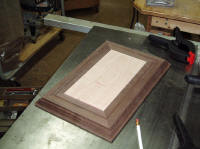
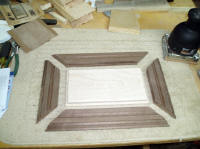
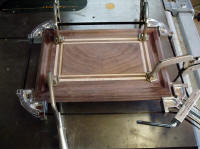
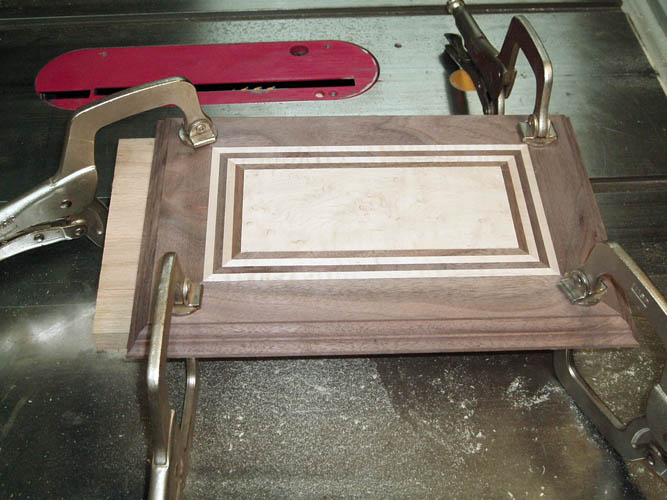
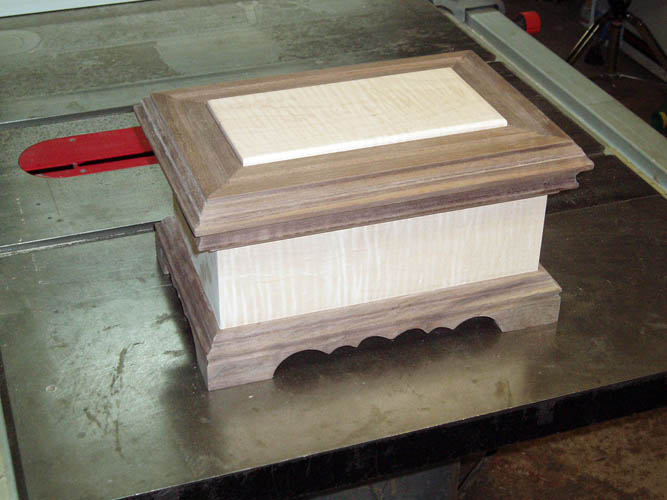
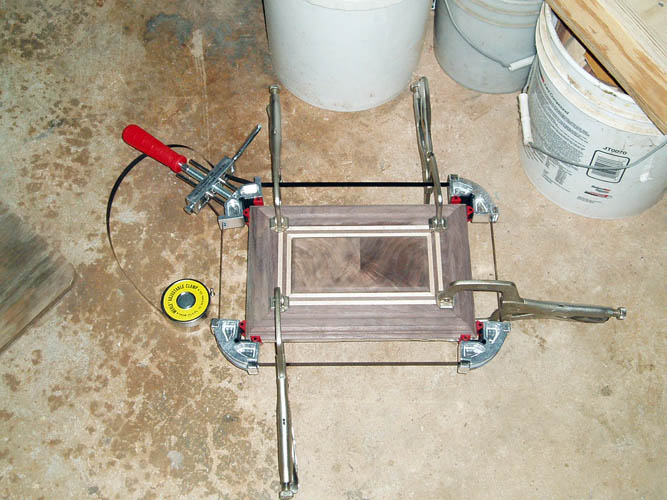
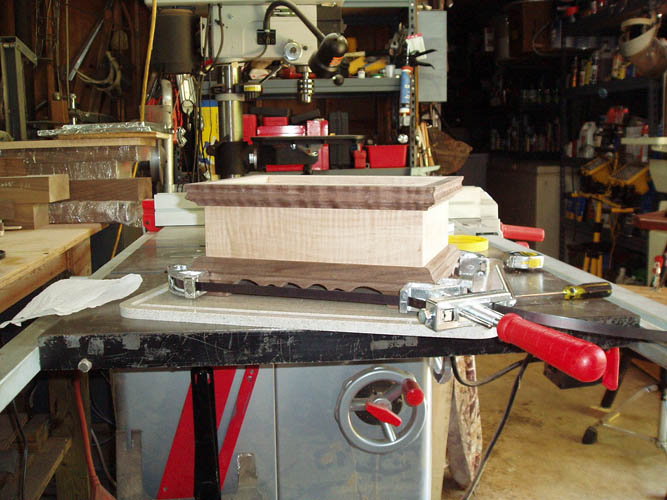
Below is the box with the base and upper molding trim not glued in place:
The base will be stained a darker walnut color since there were some sap wood
in the side and rear piece and the trim below the lid will be stained also.
I want be able to stain the lid due to the contrasting curly maple wood but
it is dark enough to finish natural.
Below is a pix of the lid
with some of the sanding dust blown off, whereas you can see the beautiful
figured swirl/feather pattern of the walnut crotch wood
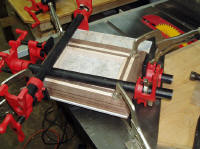
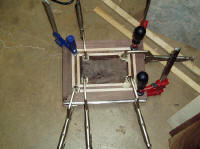
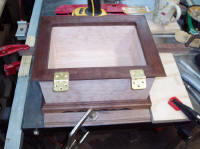
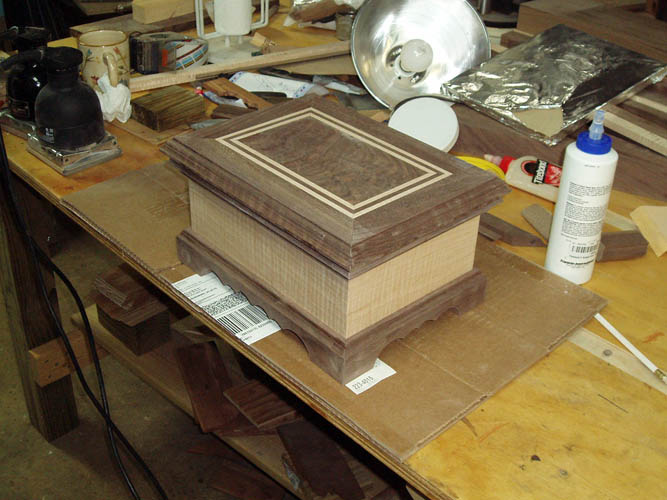
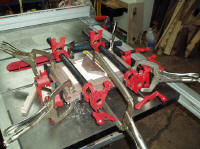
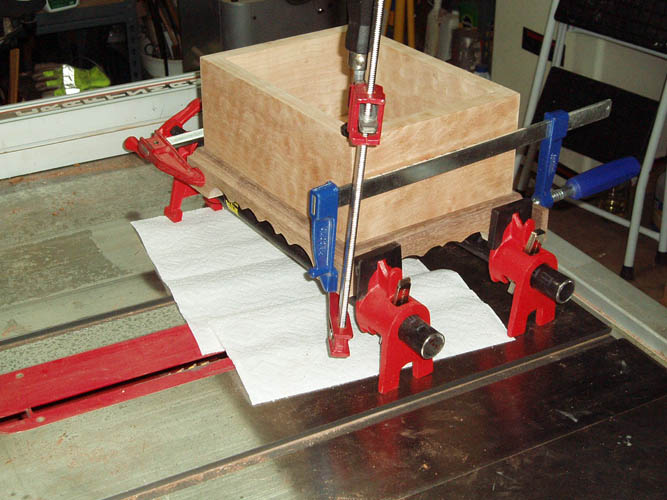
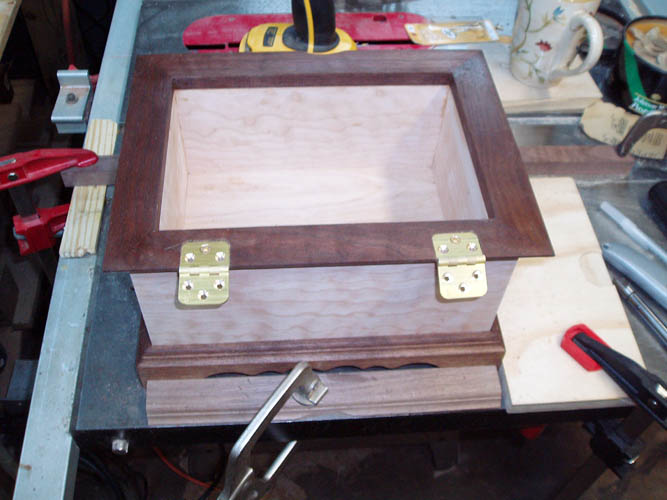
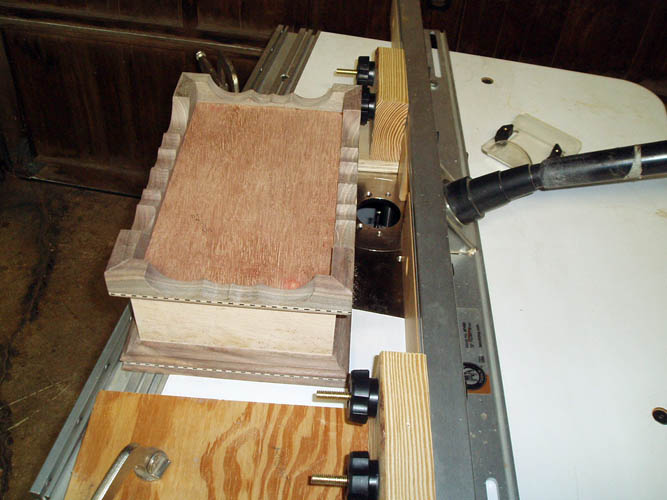
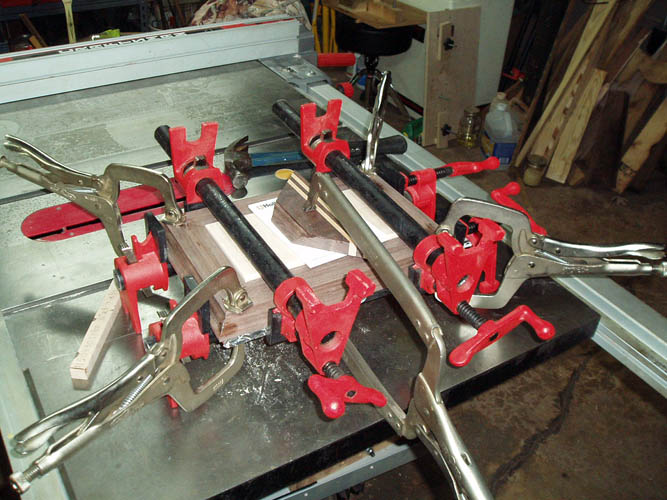
I glued the base and upper trim in place and allowing it to dry as I upload
the pixs. It will then be time to mortise the lid and upper trim of
the box to accept the solid brass hinges. Below pix with the box
upside down while the glue is drying. I am seriously thinking about
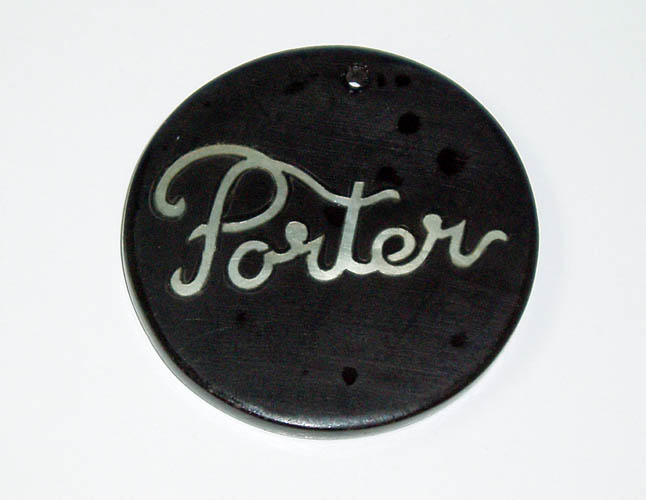
inlaying a medallion
I made for my bride and myself back in the middle 1970s that has my
copyrighted script Porter logo inlaid into a round piece of Gabon
ebony
which would look great on the front of the quilted maple box. I believe with a clear coat of finish applied, there will
be very good contrast between the dark and lighter colored woods.
After the finish is applied, I will add a piece of felt to the bottom of the
box and leave the inside wood as is to highlight the quilted maple
grain pattern. The figured walnut crotch wood reminds me of a feather
with the matching north and south swirls similar to a
book matched pattern.

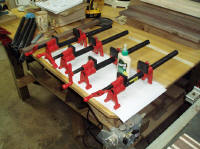
My friend Robert Webster of Hamlet, NC, retired Captain from the NCDOC
stated I needed one more clamp on the above box. You know I had to
grin.
Web published by Bill aka Mickey Porter on 02-27-15.
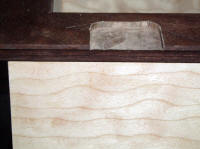
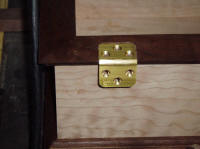
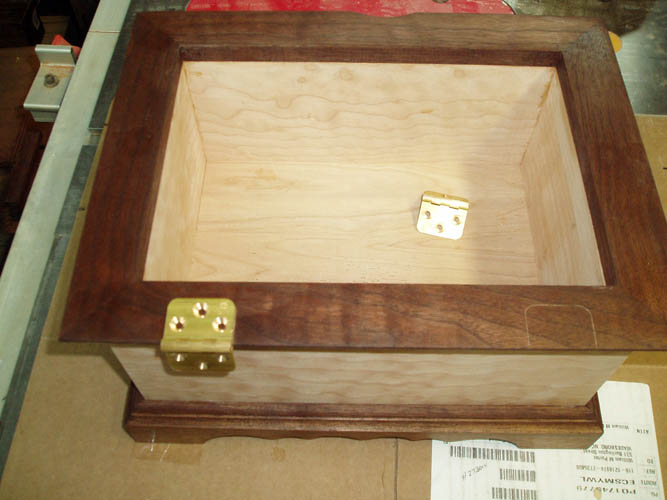
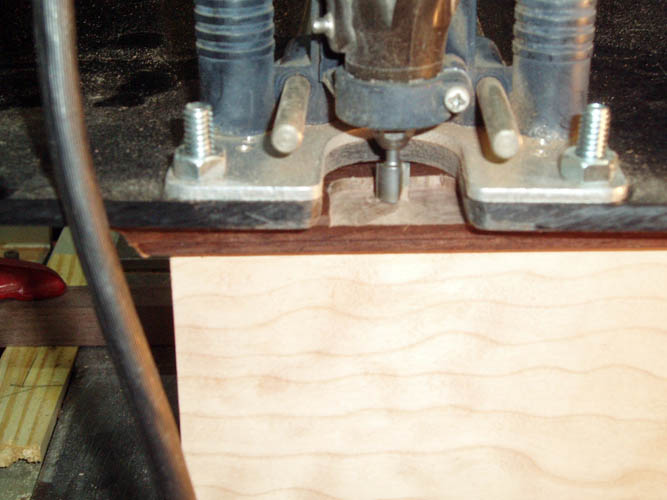
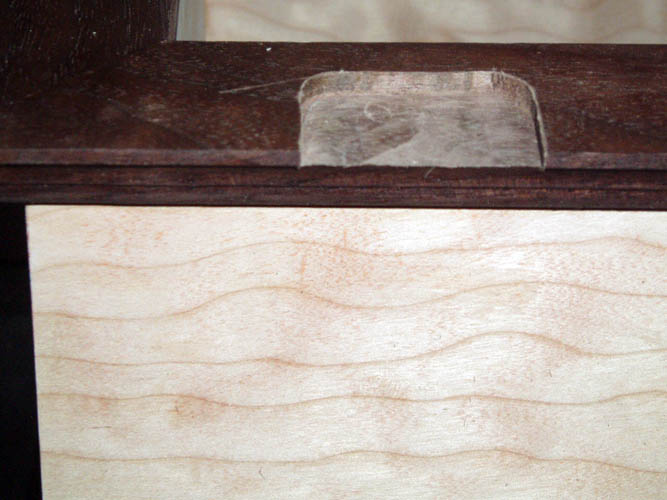
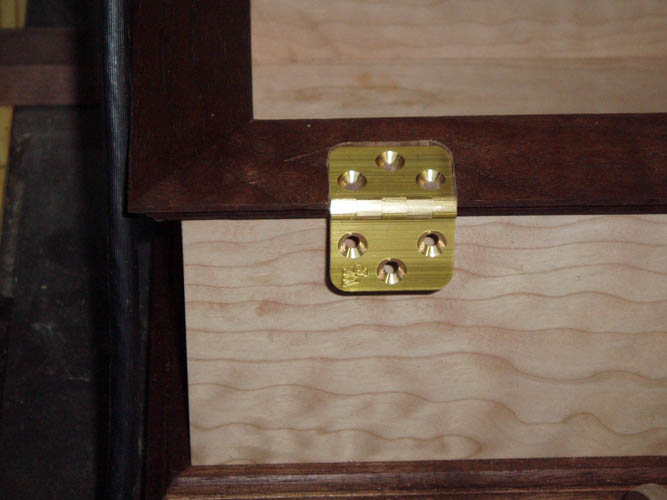
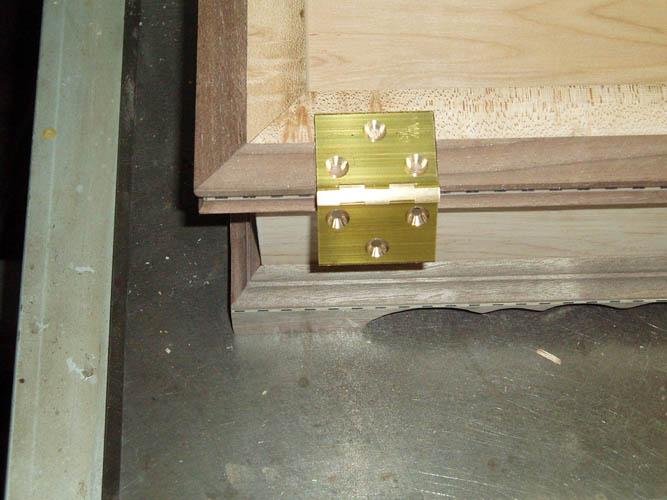
Today is February 28, 2015 and got the hinges attached to the box and it was
a little difficult trying to route a mortise for them freehand.....I hogged
out one of the mortises, in fact the first one, way too much in length
because I couldn't follow the line I had scribed.....my bad for sure but it
is recoverable and on the inside of the box too. I got a better light
source and was able to get a much better fit between the hinges and the box
upper trim. It would have been easier I do believe, to just use a
chisel and cut the mortises in but I had to do it the easy way which turned
out to be the hard way without a routing jig/template. The upper edge
of the box was a little too narrow to use my small Dremel tool and router
base and had to fabricate a much large platform with enough real-estate to
have room to keep the router flat to the surface. I could have clamped
a large width block to the inside of the box and accomplish the same thing
but sometimes "we can't see the forest for the
trees", grin if you must! Click on the below thumbnail pixs for a larger screen
view:

I plan to use a different procedure on routing mortises for the hinges on my
next box and use the table mounted router with a
"flipping story stick" which aids in setting the
stop blocks for the length of the mortise and also the width of the cut.
This technique is used by Doug Stowe who authored,
Basic Box Making available from Amazon.com
of which my lovely sister presented me with a copy years ago when I started
making custom turkey box calls.
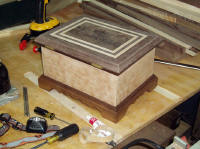
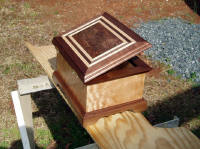
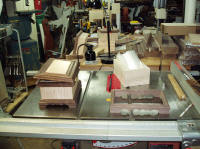
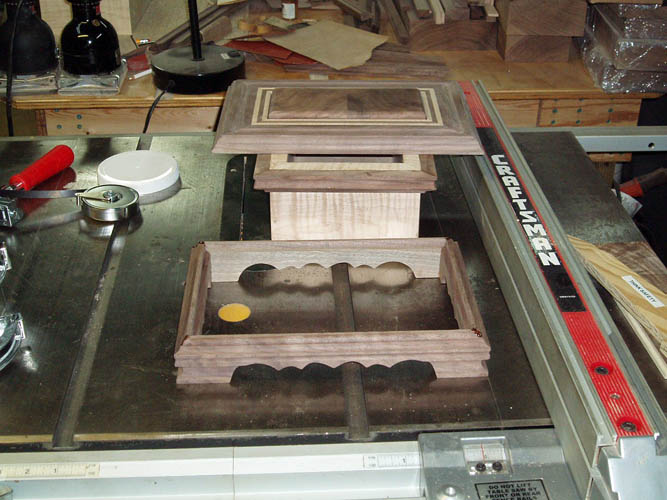
This is what the box looks like ready for a coat of sanding sealer
and a few top coats of lacquer or polyurethane and will apply it when the weather gets warmer
with much less humidity
in the air.
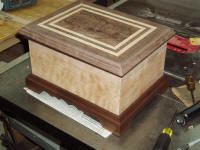
I believe the above Custom Keepsake Box for my bride will really pop when a
clear finish is applied to it and become a cherished heirloom. My
bride is really impressed with this keepsake box and glad I finally got around to
making something special for her with my own two hands. This box was a learning experience and
my next one will be much improved. I already have the sides and bottom
together of a nicely figured curly maple box and plan to use the same base, upper trim and
lid design since I already have enough figured crotch walnut for several
more boxes. I will probably make the upper trim of the box under the
lid a little more bolder in design.
Web published updates by Bill aka Mickey Porter on 02-28-15.
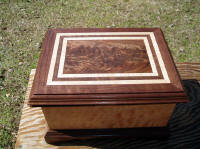
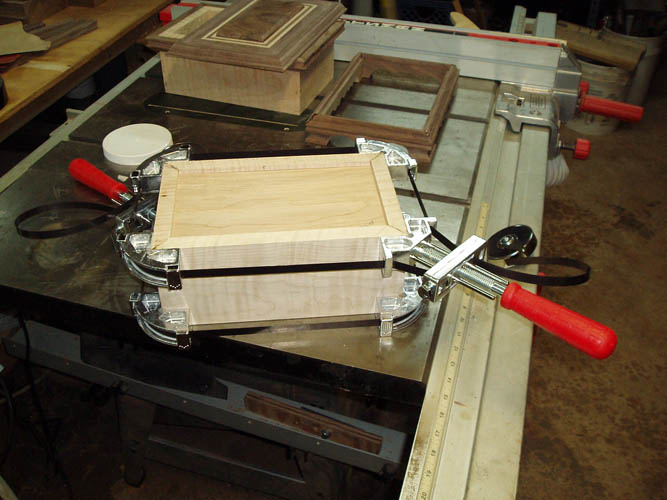
CURLY MAPLE AND WALNUT KEEPSAKE BOX NO. 2
While waiting for the weather to get warmer and dryer, I started another box
using curly maple and walnut trim. Plan to use the same lid design but
with a little thinner width curly maple, walnut, curly maple inside border
and a much bolder upper molding trim. I will add a few pixs along but
will not do an entire photo sequence
since everything is basically the same construction wise. Below is what I have done so
far:
I made the upper molding trim using two different router bits and used one
of the same bits to make the scalloped base molding. Instead of
attaching the molding onto the top of the box, attached it to the sides
which gives the box a lower profile and more pleasing to the eye in the
overall proportion. There are established
formulas for such but didn't
do the research and winging it on this project. Also, 3/4 inch
thickness for the sides is an "overkill"
but I want the box to last a life time and you are not transporting the box
around anyway. The overkill characteristics must be part of my DNA
since that theme has carried over into other areas my entire life....grin if
you must! I might add a drop in removable small tray too. The
lid will overhang the front and sides about 1/4 inch which adds additional
depth to the upper molding trim and also provides a gripping surface to open
the lid without routing a recess in the upper trim molding for that purpose.
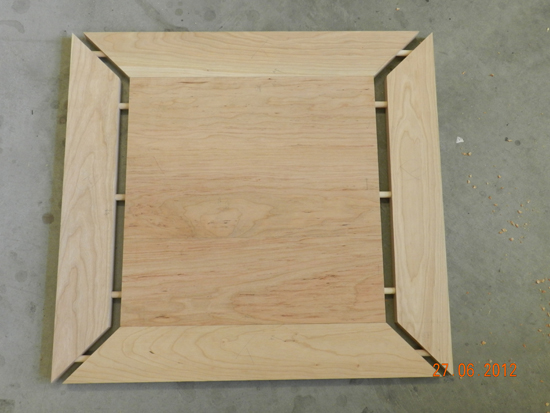
The lid components are cut to their final dimensions, holes drilled for the
dowels and ready to sand before the glue up assembly.
I like the wider outside walnut border with the smaller width
maple/walnut/maple laminations which actually yielded a larger inner figured
crotch walnut panel. Below lid pre-fitted before the sanding and
glue-up.
The Titebond II Extended Time glue just about set up too quickly
before getting all the dowels and edges with glue applied and had trouble
getting the parts to come together with the clamps but managed even though
the fit was not as good beforehand. I have to rethink how I want to
glue the inner panel in place since the individual dowels take some time
aligning and you just don't push the pieces together since the miter joints
have dowels at a right angle. You have to rock the sides into place
because of the placement of the dowels and elongate a few of the holes to
aid the process. I might have had the miter
dowels too close to the inside panel and will try them more centered into
the miters on the next box which should give more latitude in aligning all the dowels.
I contacted
Dowelmax and the inventor Jim Lindsay emailed me and stated in this type of
panel, all the dowels need to be aligned in the same
axis
which means I will leave out the dowels in the sides of the inner panel
since there will be no problem with just glue securing the side of the panel
to the border. This will be a tricky procedure and will give it a test
run on the next box.
I have experienced one bad problem on my part and that is dropping the
mitered corners of the various parts and when they make contact with a solid
surface, they nearly "always" land on
the knife edge of the corner leaving a noticeable ding or dent in the wood.
I use the table saw real-estate for a flat working surface which is cramped
up and need to clean off the work table adjacent to the table saw that I use
as an out feed table to hopefully reduce dinging the parts. The past
few days when I am handling a mitered component, I talk to myself saying
something like, "Ok Butter Fingers, watch what
you are doing."
Murphy's Law
never sleeps!
Web published updates by Bill aka Mickey Porter on 03-04-15 and 03-05-15.
Below box with some initial sanding done to the lid, etc.:
After the sanding is done, it will be time to install the
hinges and plan to
test out my table router set-up on some scrap wood and see how it goes
before committing the box and the lid to the router table. I am using
a pair of back flap solid brass hinges which are heavy duty since the lid
has some substantial weight to it and like I normally do, I go a little bit
"overkill" on many things. I try and purchase what I can from
Woodcraft
in Matthews, NC since they have an excellent selection and inventory for the
woodcrafter plus a knowledgeable friendly staff and about a 45 minute drive from our home.
Web published updates by Bill aka Mickey Porter on 03-07-15.
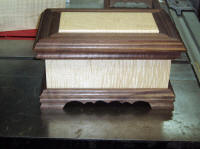
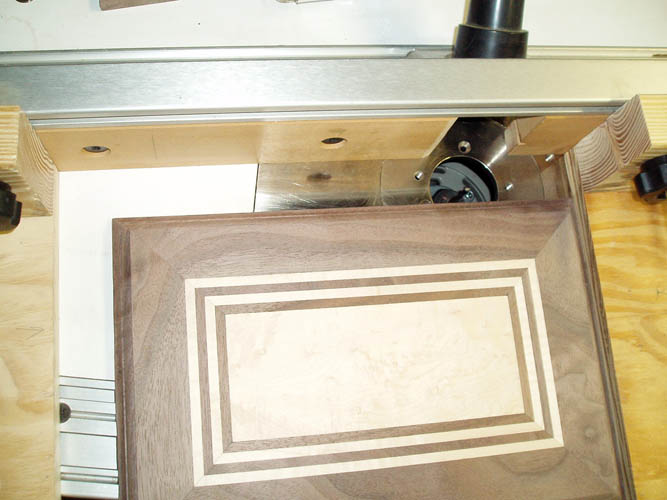
Below is pix of the above box with a special inlay I commissioned David
Nichols, Custom Pearl Inlay of Malone, NY do for me. I planned to use
his inlay as a pattern and cut one myself, but he set the bar far too high
for this one and no way I could come close to the quality of work that he
did. I routed a cavity for the inlay and the box is ready for fitting
the hinges and some final sanding before I glue the composite inlay into the
cavity and start spraying some lacquer.
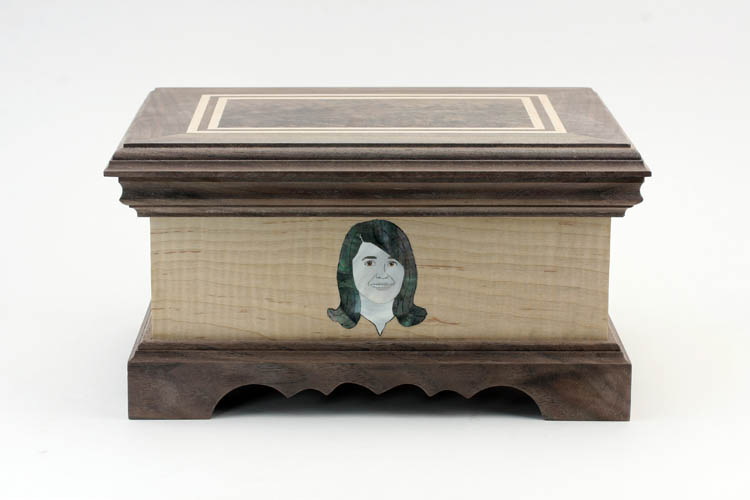
Below is the pix that I emailed David Nichols of my bride to be that was
taken in December 1963 to use as a pattern for the above inlay:

She is still the love of my life after 52 years of marriage and I still call
her my bride!
Web published updates by Bill aka Mickey Porter on 04-17-18 and 01-31-2020.
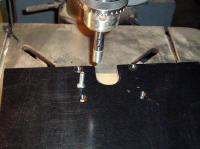
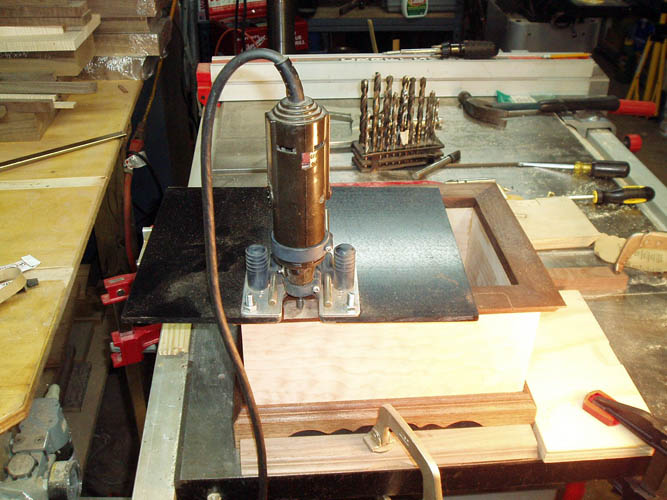
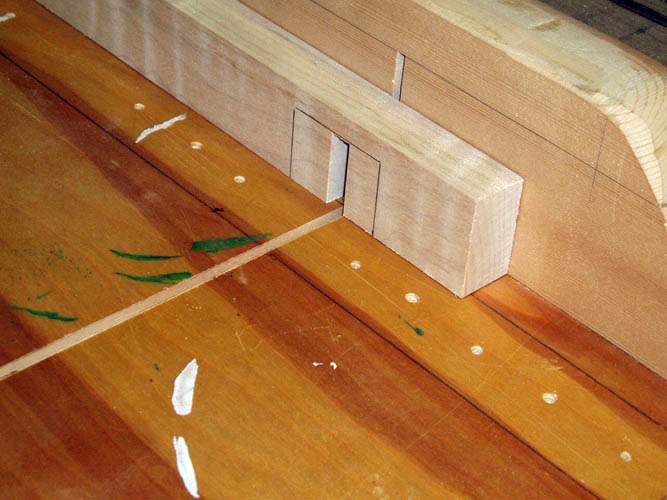
INSTALLING HINGES WITH A "FLIPPING STORY STICK" AND ROUTER TABLE
I mentioned earlier about the procedure that Doug Stowe, author of
Basic Box Making uses to install hinges
using a router table and a gauge called a
"flipping story stick", whereas I wanted to
give it a try and test run the procedure on scrap material before committing
to the special keepsake box I am building for my bride. I will confess
right off, that I was a little more than apprehensive even after a trial test run
because it doesn't take but one mess-up to ruin a project that has come
together pretty good so far.
I will add thumbnail pixs to help manifest how the flipping story stick method works.
The first thing is to cut a length of material the exact length of your box
and/or lid and using the hinge you plan to use, place it on the story stick
the distance you desire from one end of the stick and scribe around it.
Using your table saw, notch away the area where the hinge will rest and have
the slot tight enough to where the hinge will not fall out; a good snug fit.
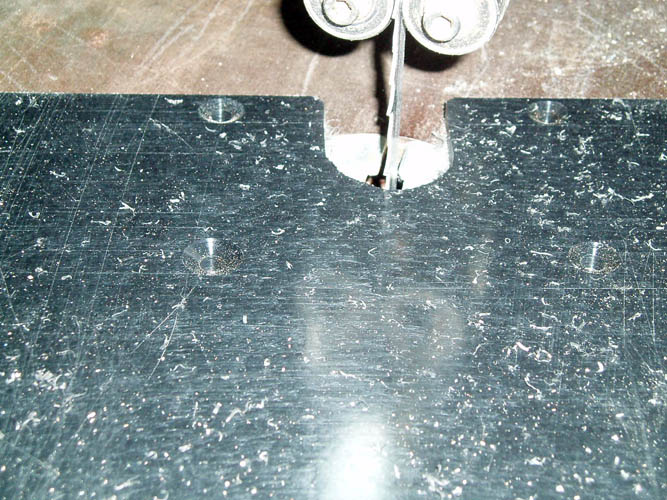
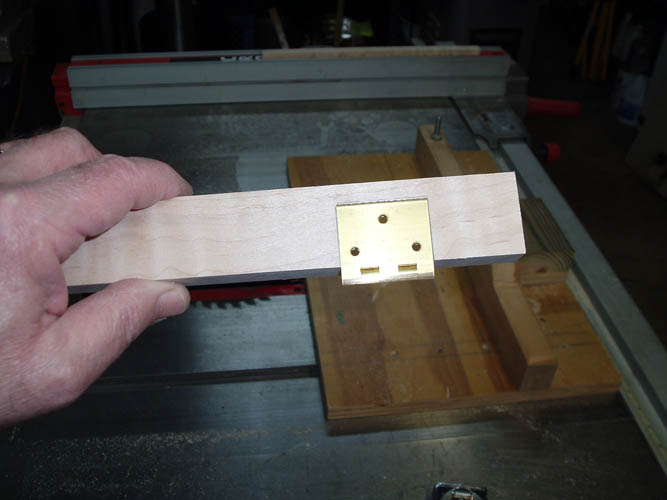
After the "flipping story stick" is fabricated, you adjust your router fence for the
correct width of the hinge and using stop blocks that will control the
movement (length of the mortise route for the hinge). I used a solid
carbide spiral 1/4 inch diameter router bit for this purpose. You use your
hinge to adjust the router depth to match your hinge thickness. For
some reason, most of the smaller box type hinges have the outer portion of
the leaf about ten to twelve thousands of an inch thinner than the rear near
the barrel of the hinge. After you calibrate your router table set up
using the fence and stop blocks, you simply do a blind route by having your
box and/or lid against the left stop and lower the box and/or lid down onto
the router bit which in essence is drilling a hole and this will prevent any
chip out and move the lid or box back and forth until the cavity is routed
out which is controlled by the fence and stop blocks. I will
make a set of right angle stop blocks that will locate off the fence miter
track for the next hinge installation. After you
route one side for the box and the lid (if both are the same length), you flip your story stick over and
adjust the stop blocks for the other side of the box and lid. You
finish off the corners using a square corner chisel or a regular chisel.
Click on below thumbnail pixs for a larger screen view and hopefully show
what I am trying to explain:


I didn't take a pix using the corner chisel and regular chisel but it was a
piece of cake at this point with a big relief in the anxiety level since
everything went as planned with no mishaps.....grin if you must!
On this particular box where I have the length of the lid overhanging the
box to give additional depth perception to the custom molding that I
made, I had to use a small piece of wood the correct width to calibrate the
stop blocks for the lid only. Everything came together and fit like a
glove.
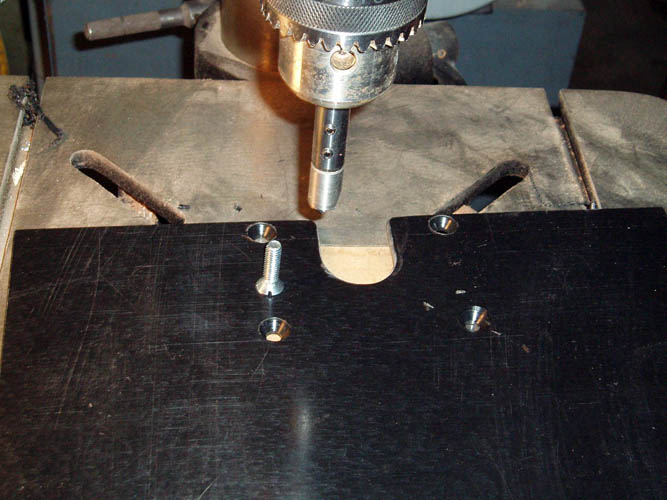
To help with in the hinge installation, I used a self-centering
drill guide made just for # 5 and # 6 flat
head screws and adjusted the length of the 7/64 inch bit to where it would
not drill through the outside of the molding since there isn't a whole lot
of extra real estate present.
I used epoxy and some black powdered filler and glued in the custom inlay and
will do a final sand tomorrow before applying a sealer coat and multiple
coats of lacquer and lightly sand down between coats. It is best to
wait at least 24 hours to give the lacquer time to cure, however I have
applied as many as six (6) light coats of thinned lacquer on
musical instruments
in a single day before wet sanding after curing out a couple days to build
up a good base coat of lacquer. I have applied as many as 20 coats of
thinned lacquer to musical instruments with the majority of the finish wet
sanded down before polishing it out to a
mirror finish. A few pixs while the
weather was in the 80s and the wood grain is really beginning to come alive
after a coat of sanding sealer on the curly maple box and started a couple
coats of lacquer on the quilted maple box. Click on thumbnail pixs
below for a larger screen view:


One of my favorite resources for box building is
Mike's Heirloom Boxes
and he builds some beautiful one of a kind custom
heirloom boxes for sale.
Web published updates by Bill aka Mickey Porter on 03-11-15.
STARTING BOX # 3 AND # 4
While waiting for the weather to clear up again and get out of the mid 40s,
where it will be feasible to start spraying more coats of lacquer on the
first two boxes, I started on a couple more boxes. I am using the same
walnut trim design for the base and the trim underneath the lid and using
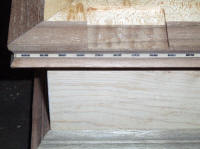
birds eye maple for box # 3 and added a banjo wood purfling that was used on
Gibson pre-war
Granada banjos referred to as a stitch purfling. Click
on the below thumbnail pixs for a larger screen view:


I finished gluing up the lid components for the birds eye maple box and the
box structure for # 4 which is curly maple. NOTE: I
installed dowels using the
Dowelmax
jig system as before and worked a little quicker. After applying
glue to the dowel holes and mating surfaces, I then installed the dowels and
there was enough open glue time left, whereas this change of procedure
worked out very well.
Web published updates by Bill aka Mickey Porter on 03-19-15.
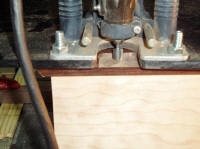
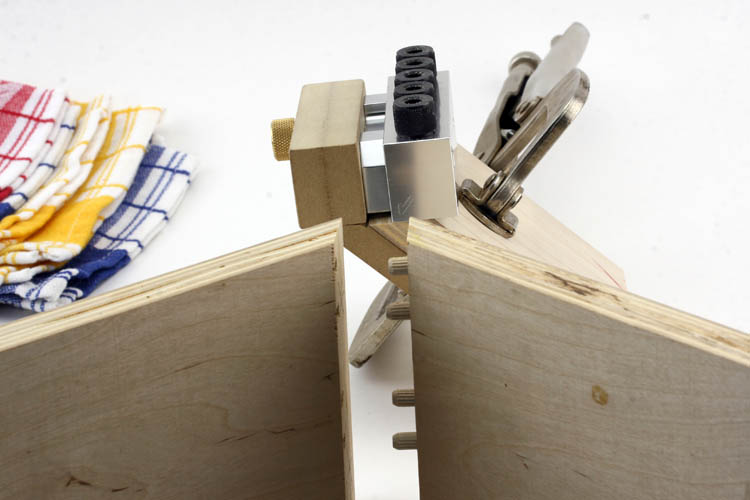
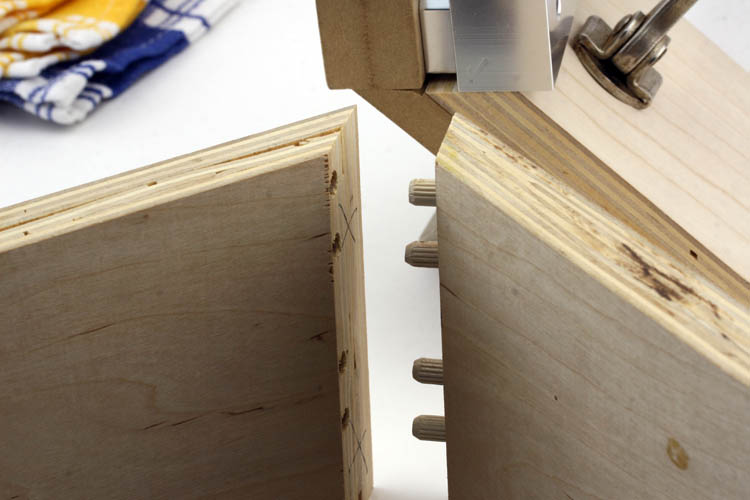
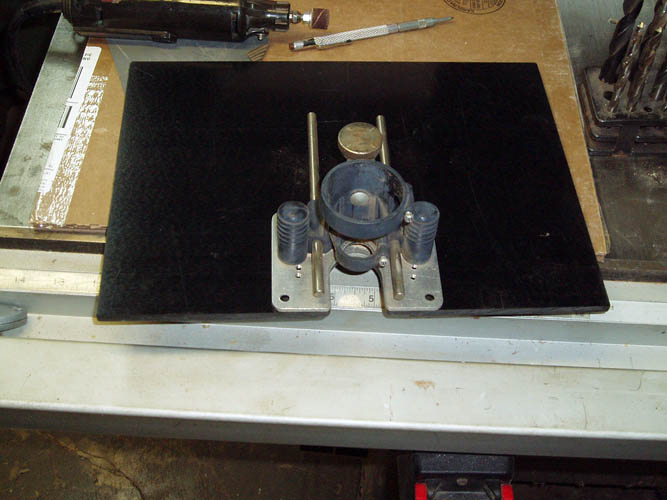
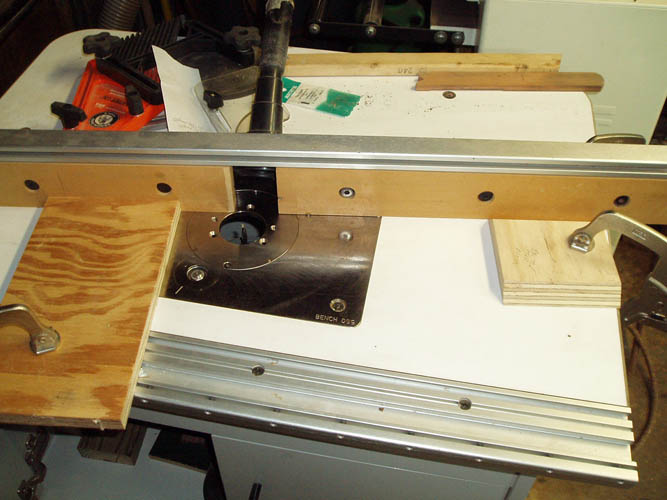
I decided to make a better clamping system while setting up the router using
the "flipping story stick" and below a few pixs taken. I already had
some extra 5/16 T bolts, threaded knobs and plenty of scrap wood and it didn't take long to
get it going for a test run on routing the hinges on box # 3. At this
stage of box building, you don't want a slip on the router table for sure.
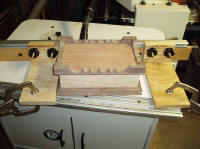


As depicted by the pixs, the box and/or lid is trapped between the right and
left stops and also the fence which controls the width of the route for the
hinge, whereas the right and left stops controls the length of the mortise.
If you are doing more than a single box, this is the way to do it, whereas
you have to make a "flipping story stick" for each different size length box
and/or lid. I had one small mishap installing the hinges. This
lid was about .020 inches thinner that my other boxes since I added the
extra walnut strip which goes next to the birds eye maple center panel and
had to plane the outside lid trim down and didn't adjust the length of the
snappy hinge bit and the 7/64 inch diameter drill bit came through near the
outside of the molding cut which is on the back of the lid but some epoxy
and filler will hide the "boo boo"
enough to "not stick out like a sore thumb".
I had to shorten the four back brass flat head screws about .032 inches.
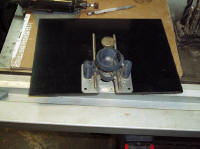
The fabrication of these boxes require extensive usage of the router table
for all the custom molding and trim used and the simple pivoting fence works
much better and faster than trying to adjust each side of the fence parallel
to the router table top and/or edge. The adjustable fence system that
came with the Bulldog router table was the first thing I removed from it and
drilled a hole through the router table top and the left hand side of the
fence and made a simple "pivoting stick" which is far superior and only have
one adjustment to deal with for fence adjustment.
Web published updates by Bill aka Mickey Porter on 03-24-15.
BOX # 3 READY FOR SANDING SEALER
The past couple days I have managed to get a few hours in on box # 3 and # 4
and a few pixs:


Box # 3 being the birds eye maple, got its final sanding and ready for a
coat of sanding sealer. Box # 4 which is another curly maple and
changed the lid design on it. I added an additional radius on the top
of the lid and also routed a groove for a curly maple raised lid. I
cut the maple lid rabbit portion out on the table saw and added a 3/8 inch
radius to the top edge. The raised lid adds a tremendous amount of
visual perception to the height even though it is only raised about 3/16
inch but looks more like some of the ole time wooden coffin box
lids.....grin if you must! I am still not 100 percent satisfied with
my miter joints after gluing them and loose a little accuracy
of the miter fit during the glue-up process and will have to figure out the best and easiest
way to get a better glue-up. The Dowelmax jig is really getting a
workout on these boxes which have a pile of forty-five (45) degree miter
joints.
Below box # 3 and # 4 pixs below:
I added a 1/4 inch radius to the bottom molding/base of box # 4 and it has a
good visual appeal and plan to use it on the rest of the keepsake boxes I
plan to build. The thickness of the base trim was also increased to
7/8 inch thickness and gives the base a more bolder look which matches the
upper lid trim and lid design with increased visual balance.
Web published updates by Bill aka Mickey Porter on 03-26-15.
MAKING SOME PROGRESS AND A NEW LOOK ON THE BASE DESIGN
I decided to add a couple more router cuts to my standard base trim and
pleased with the new look which more resembles a traditional foot design. Below
is pix of the new base/trim using a 1/4 and 3/8 inch radius router bit in
addition to two other router bits used for the inside rabbit and a standard
Roman Ogee molding bit:
Click on below thumbnail pixs for a larger screen view:


I thought I had cured "Butter Fingers"
from dropping things but dropped lid # 4 and naturally it fell on the
concrete floor and landed on one of the back corners making a nice round
shape of the point instead of the square point. I had to do some
sanding and match the other corner of the lid the same. Guess I need
to continue to remind myself to hang on tight when handling the keepsake box
components when not over the carpet on the workbench!
Box # 4 is ready for the installation of the hinges and waiting on the glue
to cure/dry after gluing the base trim to the bottom of the box. I
plan to spray all four boxes with multiple coats of thinned Mohawk lacquer
when the weather conditions are right since I have to spray outside without
the benefit of a dedicated spray booth. Maybe I can get it done before
the insects get to flying and swarming....grin if you must!
Web published updates by Bill aka Mickey Porter on 03-29-15.
Box # 4 got a coat of sanding sealer today, March 30, 2015:
BOX # 5 BIRDSEYE MAPLE
With box # 4 waiting for the top coats of lacquer along with the other three
boxes which have a few coats of lacquer and sanded down ready for additional
coats, I plan to "fire up" my
Lynx L-300H HVLP 1 quart
spray gun manufactured by CATechnologies and use some left over Mohawk
lacquer from my last
banjo project. I glued up box # 5 which is another birds
eye maple of which I already had the sides, back and front mitered, sanded
and ready for the installation of the dowels using the Dowelmax Classic
doweling jig which is a dream to use. Earlier, I got 5 sets of boxes
cut out and mitered the forty-five (45) degree corners and set them aside
and have three sets of the curly maple left to put together. I haven't
decided on what the lid design will be for box # 5 but might use a raised
walnut center panel and go with my standard walnut, curly maple, walnut and
curly maple outside lid trim design since I have enough already glued up.
Below a few pixs:


In the past when I owned a mail order business for musical parts and
accessories from 1969 through 1978, I manufactured both
metal and wood
components and would do the parts in lots varying in quantity up to 150 or
more units for the larger metal items which helped distribute the set-up cost.
However, with these individual keepsake/heirloom boxes, it is a little more
difficult to do in lots since basically each one is a little different and
would have to standardize the width, height and length of the box which I
did on the last five sets of wood. Curly maple and Birdseye maple is
also somewhat pricy and I have to pay retail cost plus shipping and that is
another determining factor for the box construction. The extremely
hard Northern birds eye maple doesn't want to cut that well especially
on the forty-five (45) degree miters using the sled and even with a new blade it
is easy to "burn" the wood. My standard thin kerf 80 teeth crosscut table saw
blade wanted to wander from a perfect cut and switched over to a general
purpose saw blade with 40 teeth with a full .125 inch kerf which was dull
but worked much better than the 80 teeth crosscut blade. I am having the 40
teeth combination blade re-sharpened, however I am going to order another
combination blade, hopefully one that is a better quality blade,
maybe Forrest, Freud, etc.
I am having a "ton of fun" with
these keepsake/heirloom boxes and I can tell an improvement in my
woodworking skills with each box but I do have a few glitches in my system
of which I am trying to work out and "Work Smarter,
Not Harder" which is open for
debate.....grin if you must!
Web published updates by Bill aka Mickey Porter on
03-30-15.
SPRING WEATHER FINALLY ARRIVED AND IT
FEELS GREAT
The ole cliché about the month of March
"Comes in like a roaring Lion and goes out like a Lamb"
is still pretty much true for this year, although the wind the past couple
days have really been doing its thing. We have a large set of Wind
Chimes hanging from roof overhang over our deck and they are tuned to the
key of G and give off some beautiful music.
Below are few pixs taken as I am cruising along with
these keepsake/heirloom boxes and one of my friends related to me that was a
lot of set-up and jigs for them but I already had over half the slides made
for my custom turkey box calls. My real passion if I can call it that,
is making jigs and fixtures in order to get to the point of producing a
product whether it is in wood or metal when I plan to make more than a few
and the mental challenge is what I enjoy the most. Routine production
of a product is not my "cup
of tea" although I don't necessarily
dislike such which may sound somewhat paradoxical.....grin if you must!
Well, as usual I got side tracked a little and below the pixs I mentioned
above:


I increased the depth of the 3/8 inch radius router cut on the box base trim
and satisfied with the look. It is a little risky routing the radius
after the base trim is fabricated but with the scalloped design, I just
can't route the groove ahead of time before trimming to length since it
would cut into the scalloped design. So far I haven't damaged the
couple bases that I have done this way but as I have stated before, "Murphy's
Law Never Sleeps." Box # 5 is ready to glue the top
trim molding and base along with final sanding everything and a coat of
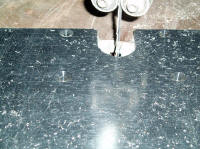
sanding sealer. The pix of the Dowelmax jig shows the 1/8 inch spacer
in place for the 7/8 inch thick stock that I am using on the border of the
lid with the birds eye maple center raised panel. The miter sled for
the picture frame type cuts is getting a good workout on each box too!
I planned to start spraying the four boxes already completed sans the final
top coats of finish outside but the pine tree pollen is falling now and
might not be a good idea unless I can catch a windless morning, etc., and
get the boxes back inside as quickly as possible. I have one curly
maple box frame ready to glue up and gluing the miters so far is one of the
challenges to keep the corners as perfect as possible since they are cut
pretty accurate but I loose some accuracy during the glue-up process.
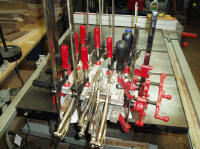
I ordered a couple
Merle band clamps featuring special corner
blocks with self adjusting jaws which should help me with the glue process
and on other projects as well. If not, it want be the first time I
have wasted some hard earned cash!
Web published update by Bill aka Mickey Porter on 04-04-15.
BOX # 5 READY FOR SANDING SEALER
The walnut and birds eye raised panel box is ready for a coat of sanding
sealer.
Below, one coat of sanding sealer applied and not buffed or sanded down yet.
04-10-15
The close up pix of the raised panel lid reveals the tight birds eye grain
pattern which should be "beautimous" when finished with clear lacquer.
Web published updates by Bill aka Mickey Porter on 04-07-15.
BOX # 6 CURLY MAPLE WITH BOOK MATCHED WALNUT RAISED LID
Being retired, I get extra fun time in, whereas my bride and I are getting
out much more since the cold weather and the
"flu crud bug" had her staying inside for around 5 weeks
except to get out on each Friday for her weekly hair appointment and a
couple times she wore a mask as a health concern for others. We are
catching up on eating out at our favorite restaurants of which none are
located in our
"One Horse Town" but we enjoy the ride and being out and
about together! I have also managed to get some time in on Box # 6 and
decided to use up the walnut, curly maple, walnut, curly maple lid frame
material I have on hand and do a book matched raised walnut panel. I
have a couple end pieces of some 3/4 inch thick walnut and ripped the first
piece in half on the table saw but that is a high risk procedure of which
can easily translate into a kick back with possible injury. The second
piece, I exercised more common sense and safety precautions and set up
the Jet 14 inch band saw which has a 1/2 inch width blade with 4 teeth per
inch. I rigged up a taller fence to match the height of the
walnut board which was a little over 4.5 inches x 9.25 inches and it worked
out great. The saw didn't bog down and the finish cut was nearly as
good as if it had been run through the planer or jointer; might be a little
exaggeration but not too much. Pix below of the set up:
I glued the book matched walnut pieces to a 1/2 inch thick birch plywood
panel the same size as the walnut and the glue-up came out great!
Click on below thumbnail pixs for a larger screen view:

The book matched walnut reminds me of the shape of a large bell....grin if
you must! I also got in a couple of the
Merle band clamps
and put
one of them to use immediately. From what
I observed so far, the clamp is doing what it is claimed and designed to
accomplish. I do think the small red plastic self-aligning flexible
jaw inserts
that fit into the right angle jaws are flimsy and puny looking and noticed
they did flex/bend under pressure when I tightened the adjusting screw
mechanism since the edge of the lower lid that makes contact with the
plastic inserts is a little over 1/8 inch in height which isn't a lot of
contact area. I elevated the lid with a piece of 1/2 inch birch
plywood that had a piece of aluminum foil over it so the plastic
flexible jaw inserts would make contact in the center of the self aligning
flexible jaws inserts. I tend to over kill
or over engineer things that I make or design but that is just my own DNA
for sure....another grin is in order. I will take out the removable
self aligning jaw inserts and just use the die cast ninety degree blocks
instead since they really aren't needed for ninety degree clamping. I
will give it a test run after the glue up above has dried.
I have all the components ready to glue up which
includes the upper trim and the lower foot/base trim, whereas the basic box
is already glued up and sanded.
Tomorrow, I will glue the trim and foot/base in
position and final sand the lid and will be ready to attach the hinges.

Box # 7 is another curly maple and have the box frame
and bottom already doweled and glued. Box # 8 has the pieces cut and
dowels drilled but not sanded or glued yet. As soon as the pine tree
pollen gets gone, I should have about all the 8 boxes ready to do some final
spraying lacquer and then to another project or two with plenty of yard work
to get on. I am forgoing turkey hunting season this year and maybe my
friends will harvest a couple birds and I can enjoy some
Wild Turkey Nuggets
or Wild
Turkey Breast Stir Fry or two.
Web published updates by Bill aka Mickey Porter on
04-10-15.
BOXES UPDATE

I got just a little woodworking in today but mostly serviced my Lawn Tractor
changing the oil and filter, sharpened the blades and greased all the
fittings and then got some grass cutting time in. There was plenty of
time in the afternoon for my Bride and I to get some
swinging time
in under the shade of the white oak tree that is beginning to leaf out
nicely.
I got box # 8 curly maple shell in the Merle clamps of which I removed the
plastic self-aligning jaws from the die cast corner brackets and it seems to
work ok. I did a little touch up on the base trim miter joints with a
mixture of Epoxy 330 and some Mohawk powder on box # 6 and will final sand everything
in a day or two. I will also get the upper trim and lower base rail/feet
cut for Box # 7 and think about what lid design I want to do. I have a
couple glue ups left of the walnut, curly maple, walnut and curly maple lid
material; enough for one more lid and will probably do a raised curly maple
lid with it.
I was hoping to have some Wild Turkey today, the two legged kind with wings and
feathers on it and not the bottle version but my hunting buddies went empty
on opening day. I settled for some
cubed venison loin strap and mushroom gravy
and have it simmering as I type......grin if you must! Will serve it
over a bed of sticky rice with
Mary B's Tea Biscuits.
Web published update by Bill aka Mickey Porter on 04-12-15.
MERLE CLAMP USAGE
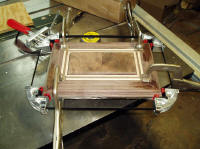
Below a few pixs of using the Merle clamp for gluing the lower and upper
trim on box # 7 and the clamp works pretty good:


I started on the lid design and decided to use a piece of the walnut left
over from Box # 6 and glue up another book matched raised panel; pix below:

I band sawed the board in half and have a pix of it posted on here earlier.
I glued the edges together and will laminate onto a piece of birch plywood
for a backing and run it through the planer to get it the correct thickness
and then cut all the walnut trim miters to length that already has a 1/4 inch slot
routed into them for accepting the raised panel.
Web published updates by Bill aka Mickey Porter on 04-18-15.
BOX # 7 UPDATE
Click on below thumbnail pixs for a larger screen view:
My bride likes the raised panel insert with the wood grain
"rays" coming down instead of the
orientation on the left which reminds me of turkey tail feathers spread
while in a full strut mode. I didn't take a pix of the raised panel
where I cut the rabbit edge using the table saw. With the figured
wood, there is a less chance for chip or tear out using the tables saw
versus using the router
table. The only thing left to do will be some final sanding and glue
the base trim to the box, install the hinges and it will be ready for a coat
of sanding sealer.
My curly maple supply is fast dwindling and have used the best already.
I believe my Bride's Box # 2 has some of the nicest curly maple and walnut
grain pattern and only befitting that she has the best of the best!
Each box has its own unique elements and I personally like all of them.
Above Box # 7 has a coat of sanding sealer buffed down ready for finish
clear coats when the weather is more conducive; e.g., less humidity and
wind. The book matched walnut raised panel should really pop
when clear coats are applied and buffed/polished out.
Web published updates by Bill aka Mickey Porter on 04-22-15 and 04-26-15.
BOX # 8
Box # 8 will be my final keepsake heirloom box in this series unless I
decide to do other ones in the future. I am currently
"time sharing" between some yard
projects and other things needing to get done and have a couple more wood
working projects down the pike aka
bucket list and hope to get to them
before fall of the year arrives when it will be time to get back into the
ole platform tree stand with the bow and arrow, The Lord willing of course!
My woodworking skills have really improved on this project and need to keep
similar projects on the burner, whereby my eye/hand coordination skills will
stay in focus and in tune.
I haven't decided on what lid design to use, however I do have one walnut
lid molding cut like Box # 5 which has the grooves already routed for a
raised panel and might see if I can do a raised panel with a panel inside
the panel or something a little different.


Web published updates by Bill aka Mickey Porter on 04-26-15 and 05-01-15.
BOX # 8 LID DESIGN
I got a chance to work on box # 8's lid and got the lid completed except
drilling dowels for the forty-five (45) degree miters. I had a piece of
slightly figured walnut 3/4 inch stock long enough for the insert book
matched panel and ripped it in half on the band saw and have enough to do a
couple type insert panels. Pix below of the temporary attachment to an
oak board long and thick enough to go through the thickness planer without
bursting the grain pattern:

I ran out of Scotch one inch width double stick tape and used a small drop
of Titebond II glue in each corner and let it set an hour or more and it
held ok. I have some tape on order and couldn't wait until next
week.....grin if you must! I used the bottom panel of which both have
interesting wood grain patterns to them and came from the same board.
Below a few thumbnail pixs taken and the more or less free hand routing for
the insert "raised type panel" was the difficult part. My antiquated
late 1960s Dremel tool had barely enough power to run the small 1/4 inch
width two fluted carbide tipped flat bottom bit and had to switch over to a
small trim router with a solid carbide spiral bit to finish the job. I
cut the 45 degree corners in using a chisel and it worked out pretty good.
I have to drill for the 3/8 inch diameter dowels using the Dowelmax jig for the forty-five (45) degree
miters and do a finish sand on all the parts and it will be ready for glue up.
I could have accomplished the same visual effect by using a thinner panel
and just gluing it in place on top of the curly maple slightly raised panel
but I had to do it the hard way again which seems to be my regular MOA
(method of operation) on this project....another grin is in order for sure.
Below pix of the semi-finished lid:
Even with the make shift small wood fence on the Dremel router base, it was
difficult to keep the router bit from wandering away from the finish edge
when the router bit encountered the tough curly maple element which is
harder than the non-curly portion, it would dig into the maple panel which
required a lot of sanding to true the inner edge.
If I planed to do more than one box or two of the same identical design, it
would be feasible to make a routing template for both the insert and the
wood panel using a guide bushing but that is a pile of work to get it done
very accurately.
Web published updates by Bill aka Mickey Porter on 05-02-15 and 05-03-15.
LID GLUE UP 05-04-15
Got a chance to do a little box work this morning and drilled the holes in
the walnut outer miter corners for 3/8 inch dowels, a few pixs below:
I will glue the inner walnut book matched panel in place after I do a final
sanding on the lid. I normally let the Titebond Glue stay clamped
about a day or at least overnight although it sets up much faster than that;
still old school I guess. Got a little yard work accomplished this
morning and the weather is fantastic outside; should be 80 plus degrees
today. A few mornings ago, it was in the lower 40s and our furnace
kicked on to get the chill out of the home.
This keepsake heirloom box(s) project is coming to a close and box # 8 is about
finished. Only thing left is glue in the inner walnut panel in the
routed cavity on the
lid, final sand the box perimeter and upper trim, glue the lower foot trim
assembly in place and install the hinges. A coat of sanding sealer and it will
be time to get out the spray gun and work on all the boxes as if on
production. Some of the boxes already has several coats of finish lacquer on
them but the spray equipment will work a lot faster than the lacquer in the
can and less expensive if I don't count the current cost of the high dollar
lacquer thinner.
Web published updates by Bill aka Mickey Porter on 05-04-15.
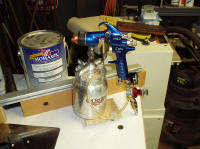
ALL BOXES READY FOR FINAL COATS OF LACQUER
A couple days ago, box # 8 was finished and got a coat of Deft sanding
sealer. Yesterday, I sprayed a coat of lacquer on all 8 boxes and this
morning I lightly sanded them down to start the next coat of lacquer.
The ole spray gun, Lynx 300L HVLP hadn't been used since my last
musical
instrument was completed in November 2010 and have been finishing my
turkey box calls with Deft spray can sealer and lacquer which works out ok
for a single box call or half a dozen or so. The spray gun does
provide a much better finish since it can atomize the lacquer particles to a
very fine mist which reduces the orange peel look. These boxes will
not have a finish like on a musical instrument where a dozen or more coats
of finish is applied and then wet sanded down after a good base build up of
lacquer which renders a deep highly reflective finish. Below a few
thumbnail pix taken:
Web published update by Bill aka Mickey Porter on 05-14-15.
UPDATE: Above boxes except box # 1 quilted maple aka my OJT (on
job training) keepsake box given out as Christmas gifts; see this
page.
Web published update by Bill aka Mickey Porter on 01-09-16.
MODIFIED HEIGHT ON BOX # 1
I kept box # 1 of which was the first box in the series of eight (8) boxes that I
made simply because I wasn't happy with the height proportions in
relationship to the length. It wasn't difficult to cut about one inch
from the top of the box underneath the lid but I forgot that I had two small
nails hidden beneath the upper side banding to hold it into alignment while
the glue dried. My freshly sharpened carbide tipped circular saw blade
made a little racket when contacting the steel nails but too late to do
anything about that; guess another sharpening will take place sooner than
expected....grin if you must! Also, I tried to miss the wood dowels
that are installed between the forty-five (45) degree corners of the box
which took two passes on the table saw which wasn't a big deal since the
upper banding hides the connection but I originally was planning on putting
another piece of molding out of walnut that was left over but was too thick
and decided to keep the original banding which already had the lid hinge
openings routed and drilled. The custom made walnut molding wasn't
safely feasible to attempt to trim and common sense took over; imagine that!
Below a couple pixs taken, however I still had my camera white balance set
for an outdoor setting in the manual mode; my bad on this one which changed
the image color:
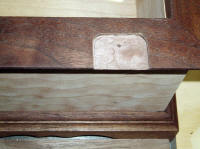
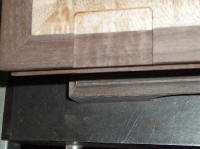
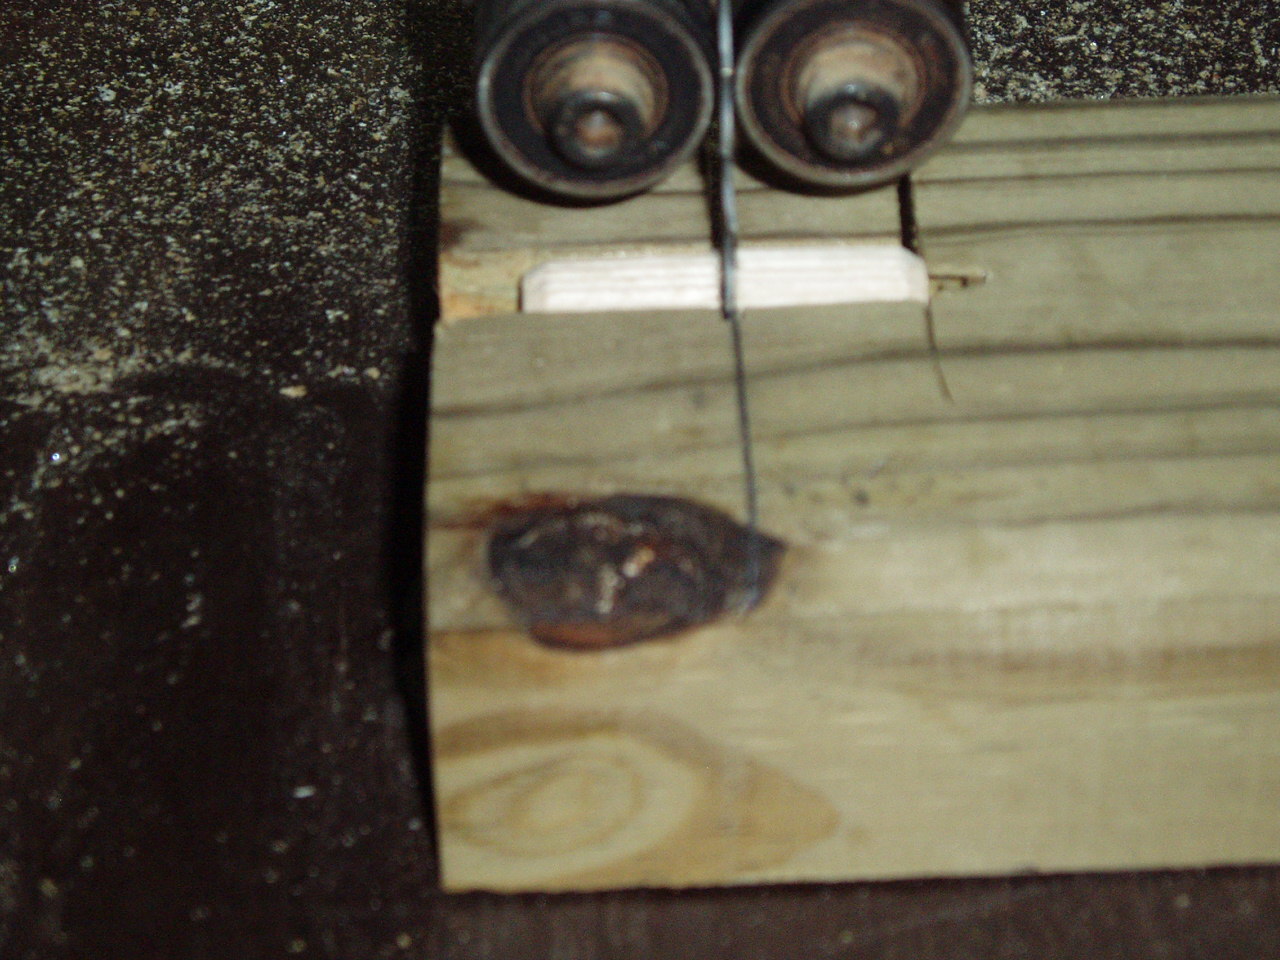
Below pix of the dowel fitted into one of the corners of the box which is
normally hidden from view:
Web published update by Bill aka Mickey Porter on 03-21-16.
BOX # 1 HAS A NEW HOME
My friend Calvin Jones of Wadesboro, NC liked the above box and purchased it
for a special gift on 04-30-16 and now all eight (8) of the custom heirloom
boxes have homes.
Web published update by Bill aka Mickey Porter on 04-30-16.
LEAVING ON A
SPIRITUAL NOTE
If you do not know Jesus Christ as your Lord and Savior, please take
this moment to accept him by Faith into your Life, whereby Salvation
will be attained.
Ephesians 2:8 - 2:9 8 For by grace are ye saved through
faith; and that not of yourselves: [it is] the gift of God: 9 Not of
works, lest any man should boast.
Hebrews 11:1 “Now faith is the substance of things hoped for,
the evidence of things not seen.”
Romans 10:17 “So then faith cometh by hearing, and hearing by
the word of God.”
Open this
link about faith in the King James
Bible.
Romans 10:9 “That if thou shalt confess with thy mouth the
Lord Jesus, and shalt believe in thine heart that God hath raised him
from the dead, thou shalt be saved.”
Open this
link of Bible Verses About Salvation,
King James Version Bible (KJV).
Hebrews 4:12 “For the word of God is quick, and powerful, and
sharper than any two edged sword, piercing even to the dividing asunder
of soul and spirit, and of the joints and marrow, and is a discerner of
the thoughts and intents of the heart.”
Romans 6:23 “For the wages of sin is death; but the gift of
God is eternal life through Jesus Christ our Lord.”
Romans 3:23 “For all have sinned, and come short of the glory
of God;”
Micah 6:8 “He hath shewed thee, O man, what is good; and what
doth the LORD require of thee, but to do justly, and to love mercy, and
to walk humbly with thy God?”
Philippians 4:13 "I can do all things through Christ which
strengtheneth me."


