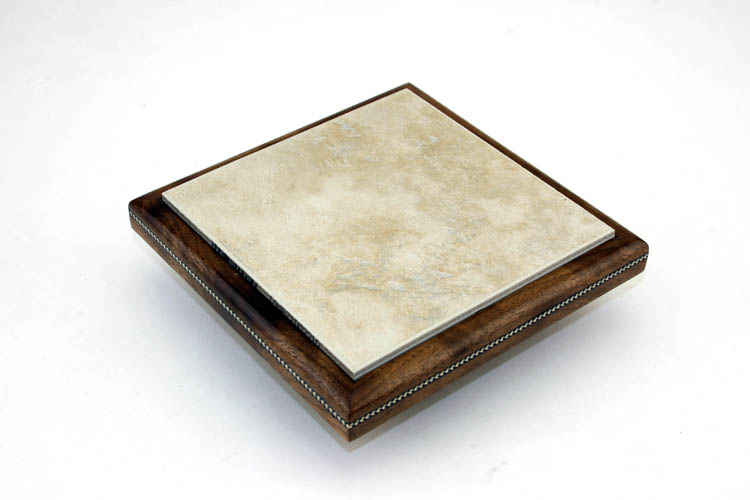
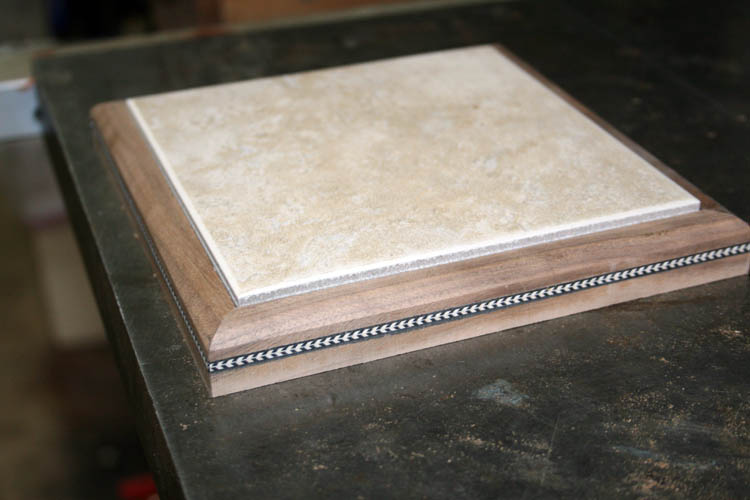
CERAMIC AND WOOD POT HOLDER
GRINNING BEFORE GETTING UNDERWAY
I did a
little grinning myself when I created the title for this page because I
guarantee there will be some who will think of the smoking pot aka
marijuana, weed, reefer, grass, herb, hemp and all the other generic names for cannabis!
However, I am talking about the cooking utensil pot and wanted to make a
few pot holders for gifts and also for my own personal usage in the kitchen. I
am constantly placing pots n pans on regular insulated cloth type pot holders to
protect the counter and island/work station from hot pots n pans.
We don't' have the granite counter and island tops, but old school Formica
butcher-block maple 1950s stuff, therefore protection from hot pots n pans
is necessary!
I originally wanted to make a pot holder using 8 inch square ceramic
tile, however Lowe's in Rockingham, NC had only 6 inch square ceramic tiles
and the standard 12 inch tile, therefore decided to go with the 6 inch
square ceramic tile which will still work for a much larger diameter pot,
pan, skillet, etc.
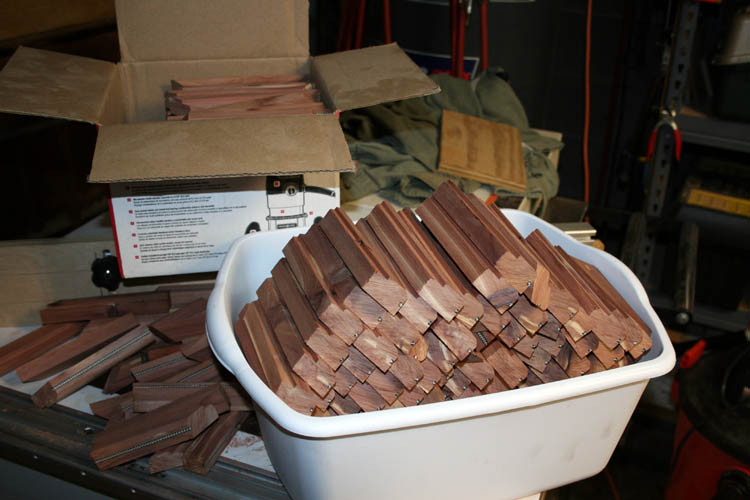
I had already checked my inventory of scrap aka unallocated wood and
found a couple 8/4 pieces of black walnut that was approximately 27 and 20
inches in length and would be ideal for making the picture type frame for
the ceramic pot holders.
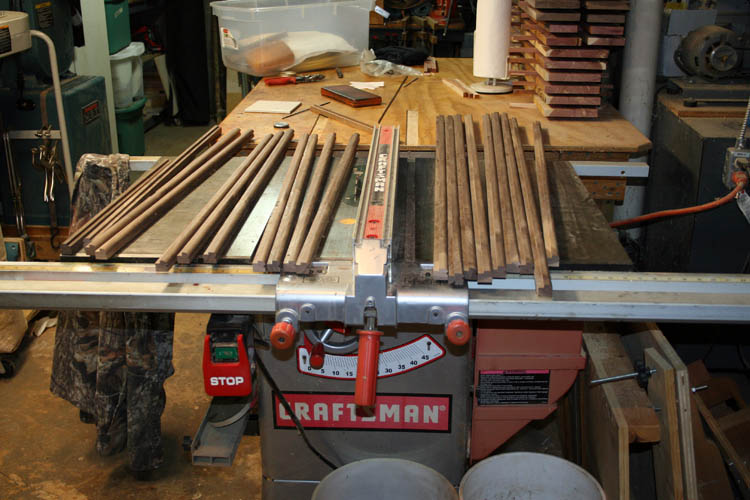
GETTING STARTED
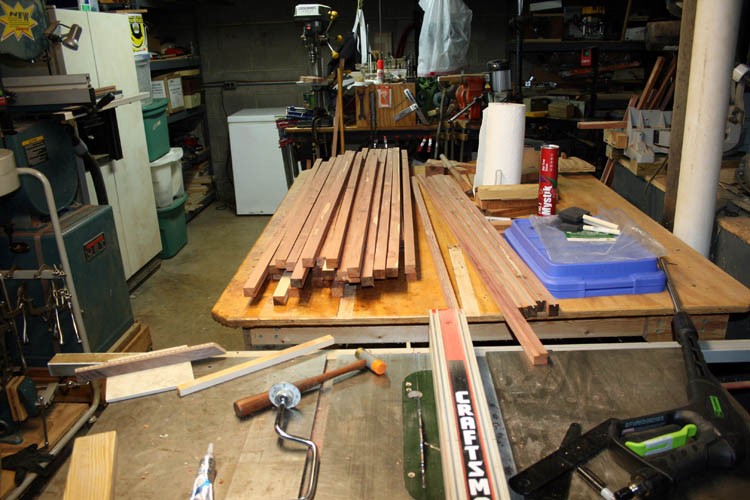
I ripped the 8/4 (2 inches thickness) wood to a width of 3/4 inches and
then ripped to 3/4 inches square without having to move the fence on the
table saw. I used a thin kerf rip saw blade which needs sharpening,
but it made it through the 8/4 inch walnut ok.
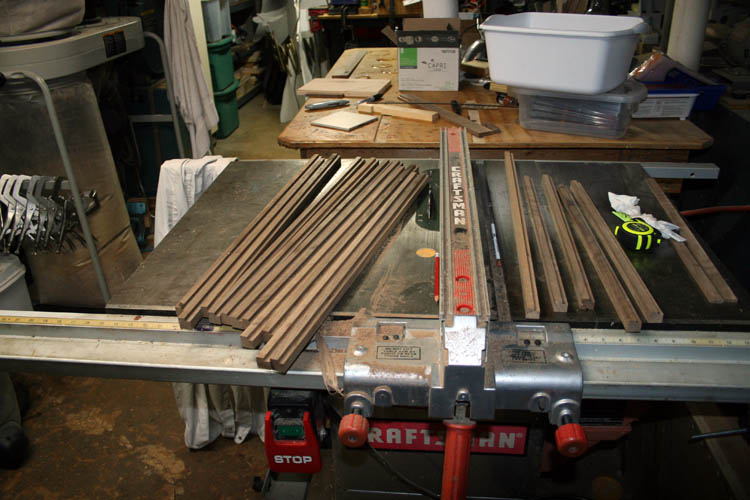
There was enough material for fourteen (14) frames, however on the last
frame, I got a little dyslexia and cut a miter reversed aka backwards and
not able to get a completed frame from that piece. Also, when I initially did
the slot for the wood marquetry, I had it orientated wrong, however it was on the
back of the frame, therefore still useable. I will reserve that one
for yours truly!
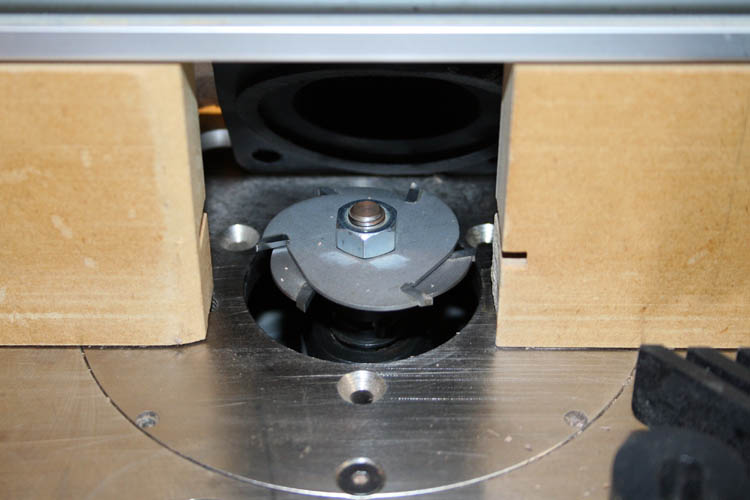
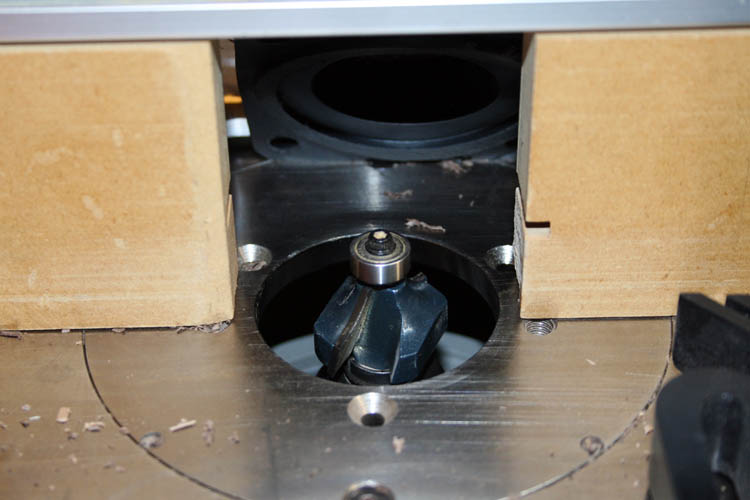
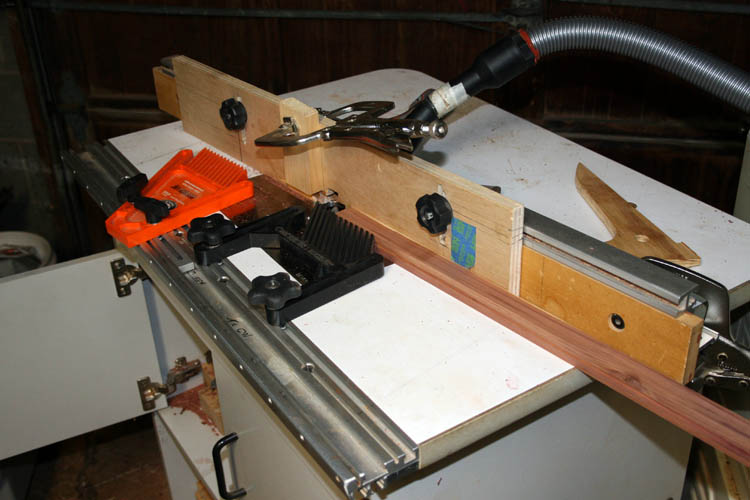
ROUTER TABLE SET UP
I used three (3) different router bits to make a rabbet groove for the ceramic
tile to rest in; a stacked slotting cutter bit for the black/white
herringbone wood purfling aka marquetry and a 3/8 inch round over router bit
for the top outside edge of the frame. All router bits are carbide
tipped.
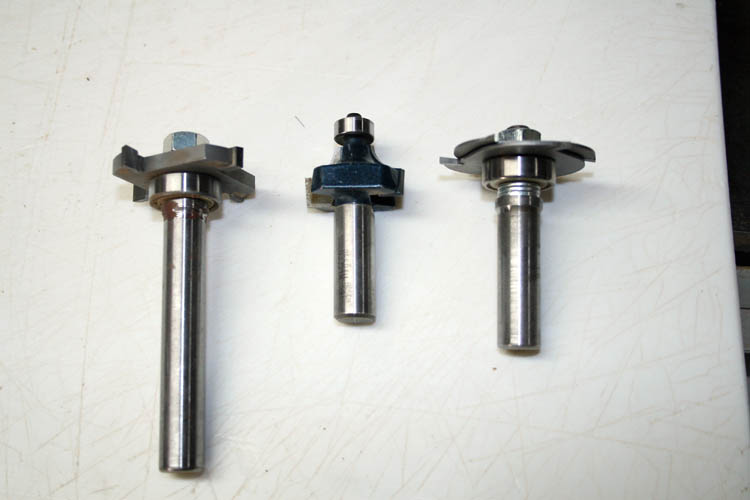
I set the router table for the rabbet groove for the ceramic tile being
.321 inches in width and a depth of .175 inches which would have the ceramic
tile proud of the frame, whereas the tile thickness is .325 inches in
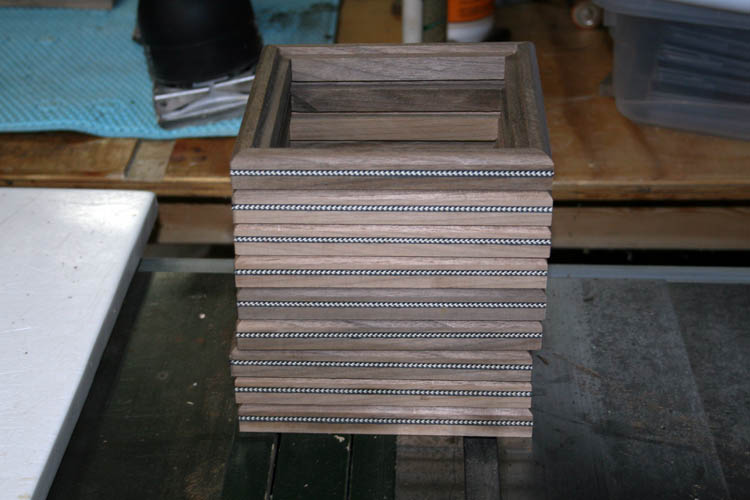
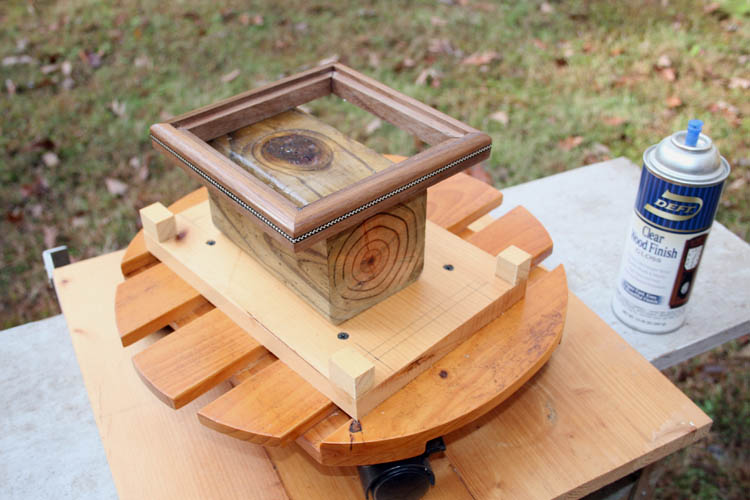
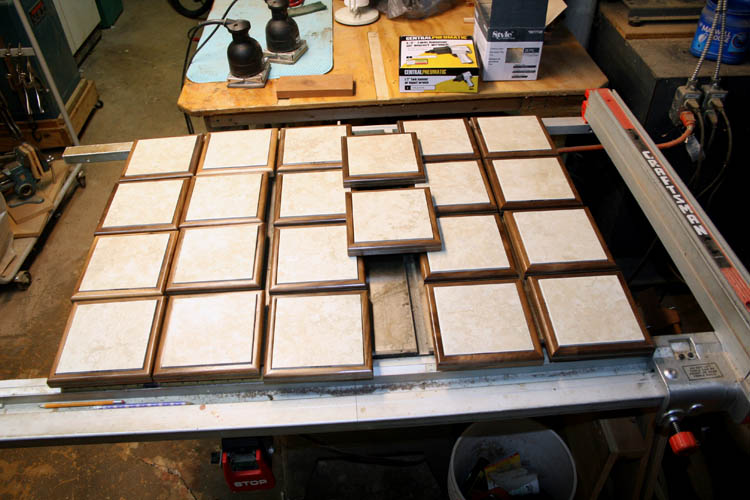
thickness. The ceramic and wood pot holder is 6 11/16 inches square.
RABBET FOR THE CERAMIC TILE
I didn't do entire sequence pixs of the three router bit usage, but there
are enough pixs to make it clear what I am doing.

I orientated the wood grain vertical and above pixs of the pieces with
the rabbet aka groove where the ceramic tile will rest into.
I could have used the table saw with stacked dado blades to make the
rabbet, but using the slotting cutter in the router table was the easiest
set-up for me.
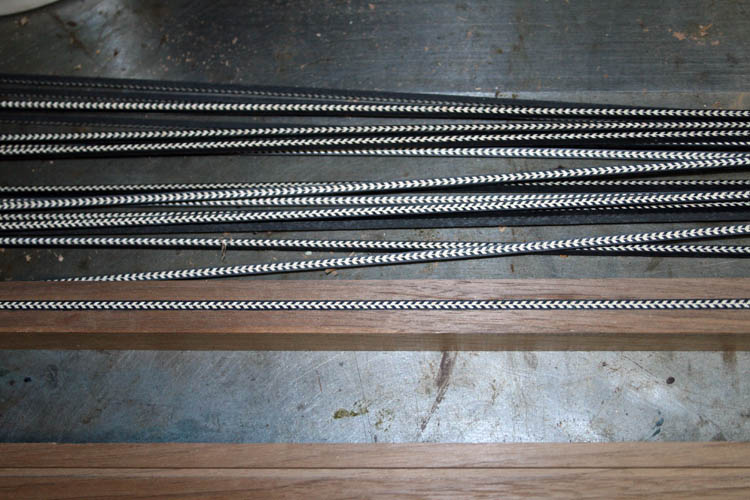
SLOT FOR THE WOOD PURFLING
I changed the router bit and used the stacked slotting cutter dedicated
for the black/white herringbone wood purfling which
matches the width of the black/white herringbone wood purfling which is .148
inches and set the router table fence for .108 inches where the wood
purfling was slightly proud of the wood, which will be sanded flush later on
the 6 inch wide belt sander. I used scrap material to test out the
router table settings.
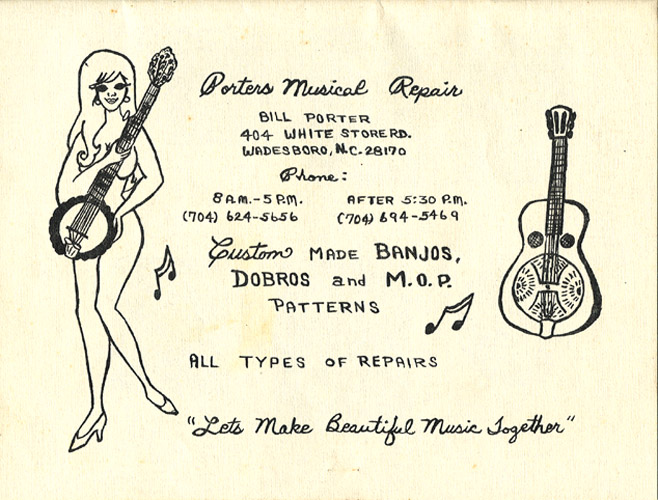
I have used the black/white herringbone in musical instruments and for
sale going back
to 1969 when I had my musical instrument repair service and musical parts
and custom inlay mail order
business.
I have also used the black/white herringbone on my turkey box calls too,
therefore already had the stacked slotting cutters for three different types
of wood purflings aka wood marquetry. For those familiar with prewar
Gibson Mastertone banjos;
they are for the Granada and
RB4 Mastertone banjos. I also have a
dedicated slotting cutter for .205 width, but can't remember what I used it
for.
NOTE: I racked my brain trying to remember what that .205
stacked cutter was used for and finally figured out it was for some walnut
veneer 2' x 4' that Home Depot advertised as .250 inches thick and when I
received the shipment, the stock was .198 inches thick and the outside
veneers was super thin. I used it for a bottom on
secretary boxes.
The stuff was totally junk....the first piece I took out of the shipping box
was partially
delaminated and the lightest shade of walnut to be had in my
humble opinion. They sent a link for me to do a review of the purchased
product and I told them it was junk. They replied that my review did
not meet their standards, or something to that fact and for me to revise my
review. I told them, if you don't want the truth, don't ask for it!
So much for venting.....grin if you must!
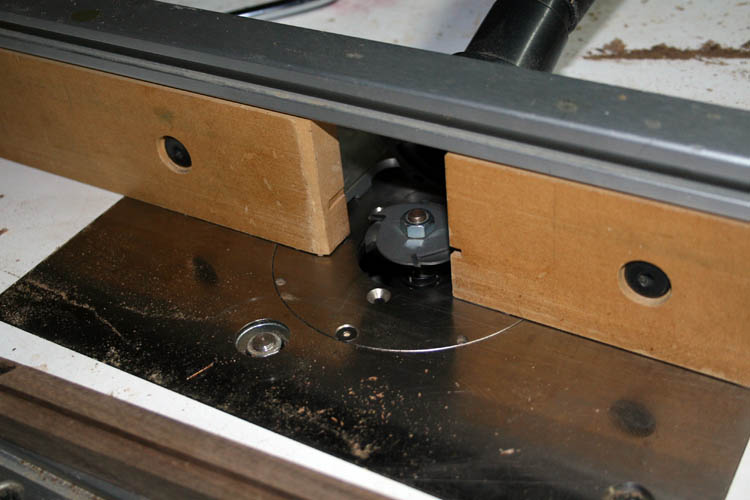
Slotting cutter installed in the router with fence properly adjusted for
the height and depth of cut.
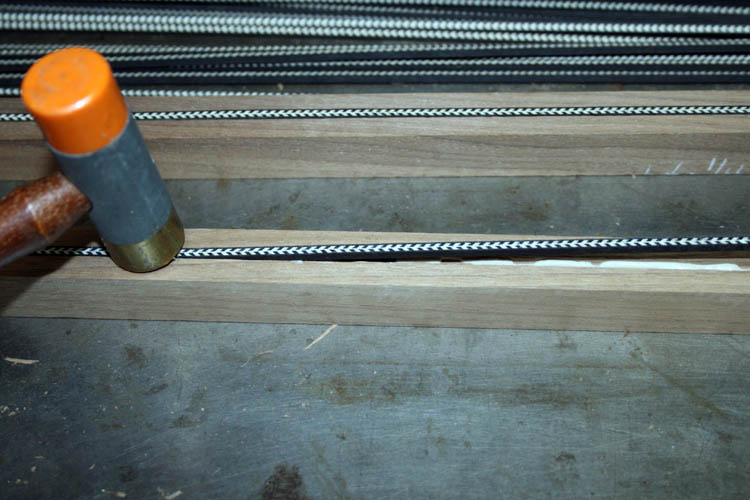
The wood purfling is tighter than two coats of paint into the groove and
tapped in place after a light application of wood glue.
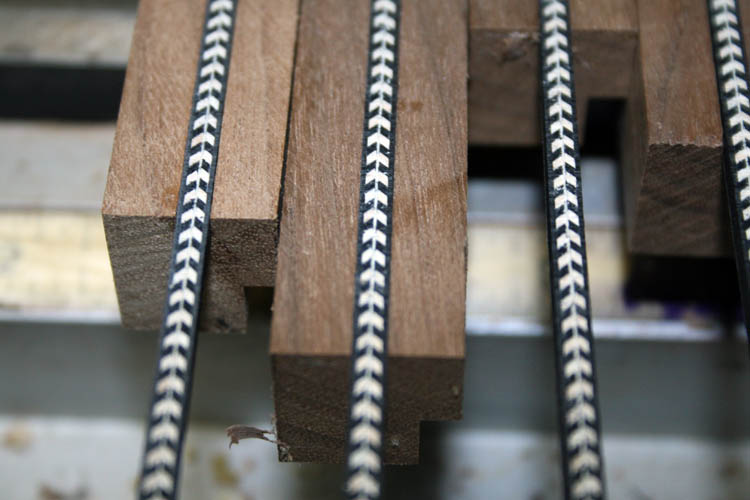
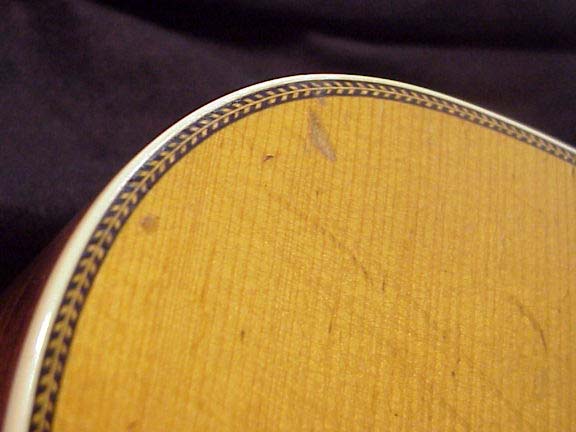
Close up of the black/white herringbone wood purfling. The above
wood purfling was used on pre-war C. F. Martin
D-28 rosewood guitars.
The wood purfling is manufactured in Germany for export and other various
countries manufacturers various styles and types of wood purflings and
marquetry for the musical instrument trade and other uses as well.
Back in the late 1960s and early 1970s, I was the first to have exact reproductions of
the pre-war (WWII) wood purflings used by Gibson and C. F. Martin Guitars
manufactured and available for sale via my mail order
catalogue!
Those wood purflings were available direct from Franz Dotzauer in
Erlangen, Germany, however they have a minimum order of which I cannot
remember the quantity. Several vendors here in the USA have the wood
purflings for sale also.
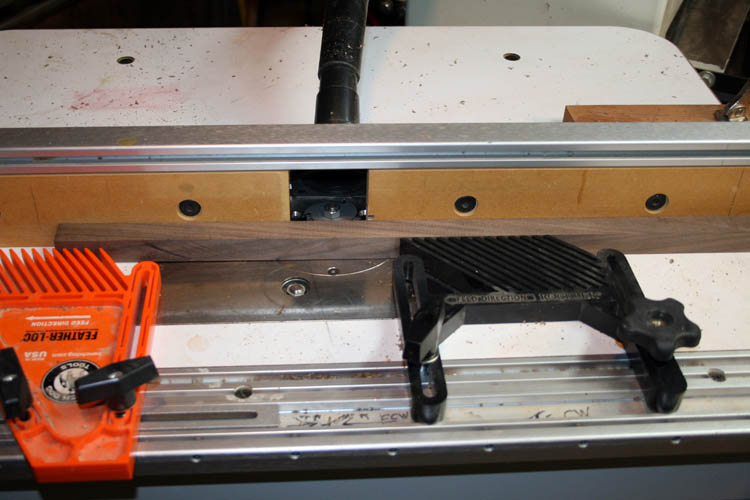
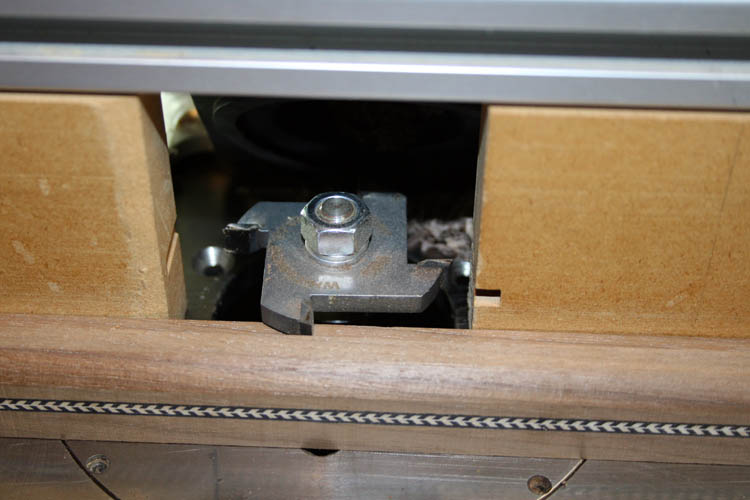
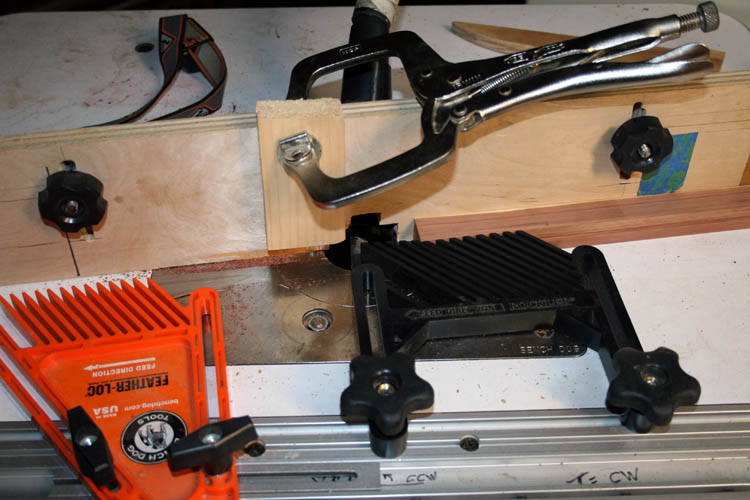
ROUND OVER BIT
The router bit was changed to a 3/8 inch radius round over bit and
installed two feather boards to keep the wood tight against the fence
because the bottom of the wood facing the router table has the rabbit
already cut into it.
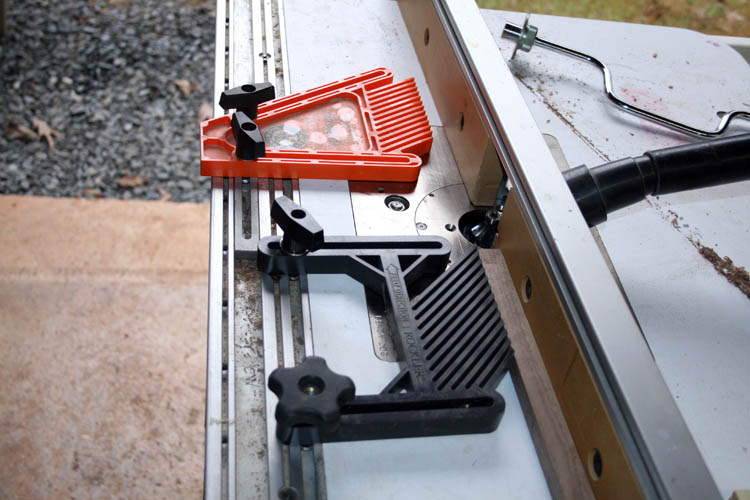
I use a pivoting fence on my router table which works best for me.

The Milwaukee cast/forged wrenches above, work much better than the
standard stamped wrenches that came with the Porter Cable 3 1/4 HP router.
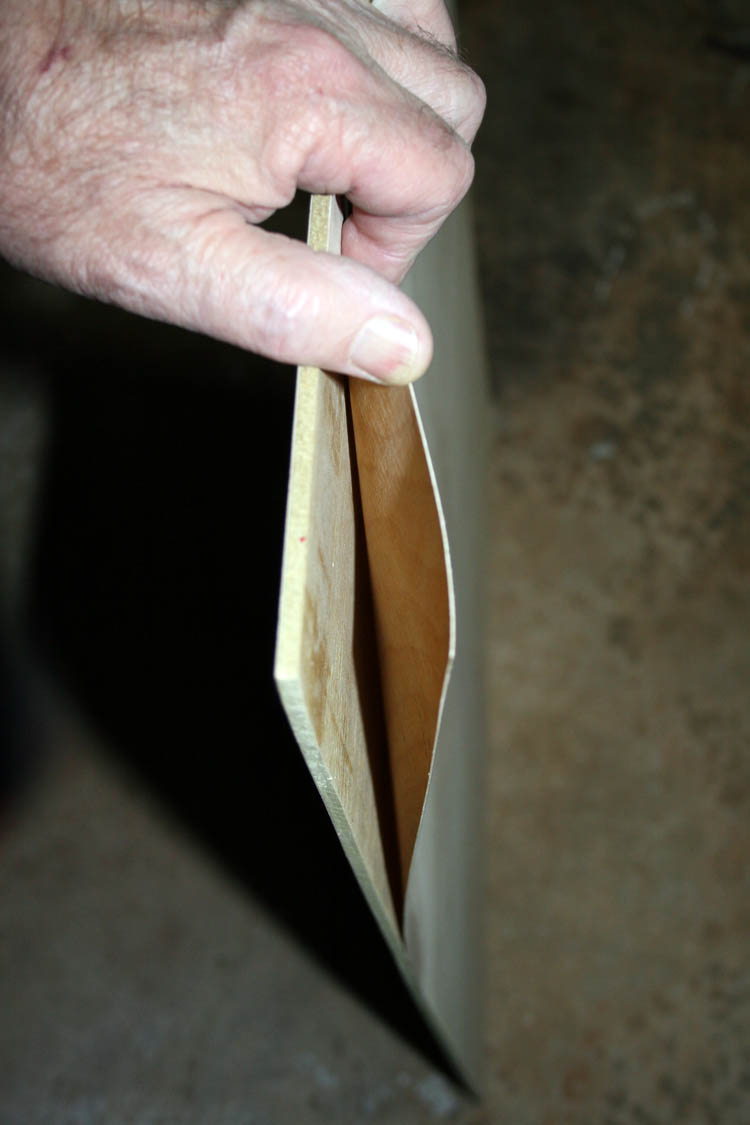
Below is an end view pix of the wood frame for the ceramic tile.
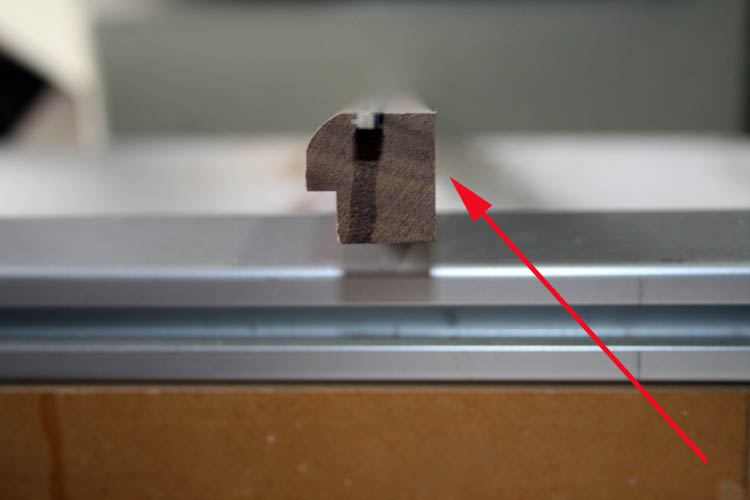
Notice the vertical grain
orientation.
FRAME MAKING
I used the table saw with a crosscut blade and my custom made forty-five
(45) degree miter sled to
make the frame for the ceramic tile.

I made the first miter cut using the right side of the miter sled and then
set the stop on the left side for the length of the frame which was 6 11/16 inches.
I tested the frame and everything was
right on the money so to speak and cut all the thirteen (13) pieces and
messed up on the last piece (14th) as stated earlier, of which I ended up
with 13 complete frames.
USING THE DOWELMAX JIG
As most woodworkers know,
end grain wood such as the forty-five (45) degree miters do not make for a
strong glue joint, even with the high tech glues we have today. Many
items made on production such as picture frames will have some type of nail
and/or brad to hold the joint together. I have not seen the corrugated
fasteners used in many years and they were used in the furniture making
industry way back when and also on picture frames which tended to fracture
the pieces put together using them over time.
I have used biscuits in various types of end grain joints and inserted
splines into the miter joints to add strength, however neither of the two
just mentioned will work for the ceramic and wood pot holder frame since I
have the wood purfling installed where the spline would normally be located
and the smallest biscuit is too large.
I do not own a Kreg pocket screw
jig and have no need for one at the present time. Many cabinet makers
are using that system, but it is not for me!
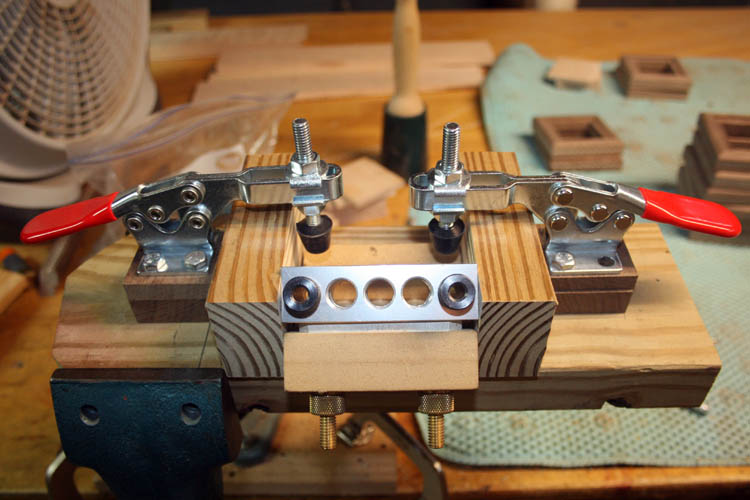
My
option was to use 1/4 inch diameter wood dowels into the miter joints from
the inside where they would not be seen. You definitely have to use
some type of dowel jig and
Dowelmax is the Cadillac of the doweling jigs in
my humble opinion.
NOTE: Beware of Chinese imported
knock-off copy cats of Dowelmax jigs; they are junk!
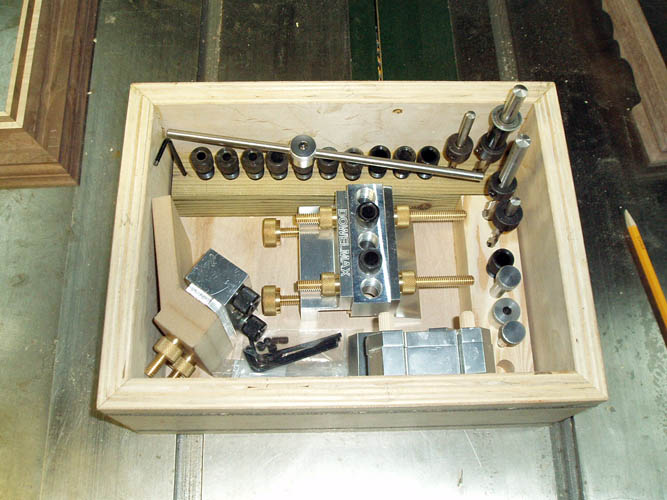
Above
is a pix of my Classic
Dowelmax
jig which includes the forty-five (45) degree jig for miter joints.
There are several aluminum spacers for different thickness woods and the
learning curve for the Dowelmax jig is not difficult at all!
Dowelmax has
an aluminum forty-five (45) degree angle jig available, but their wood jig is
working fine!
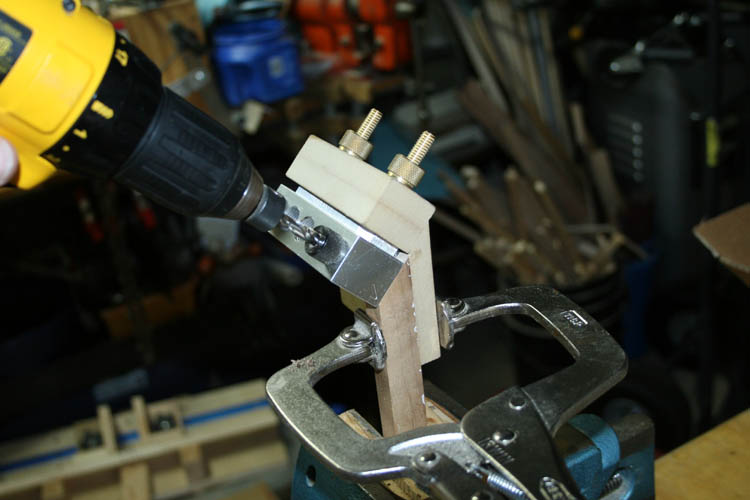
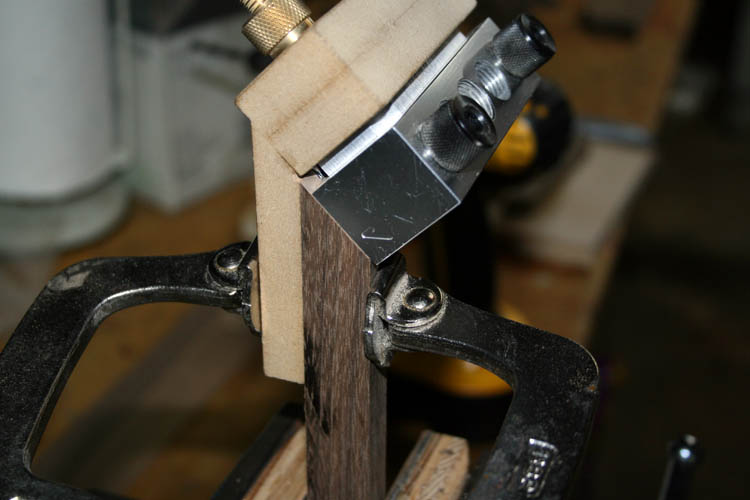
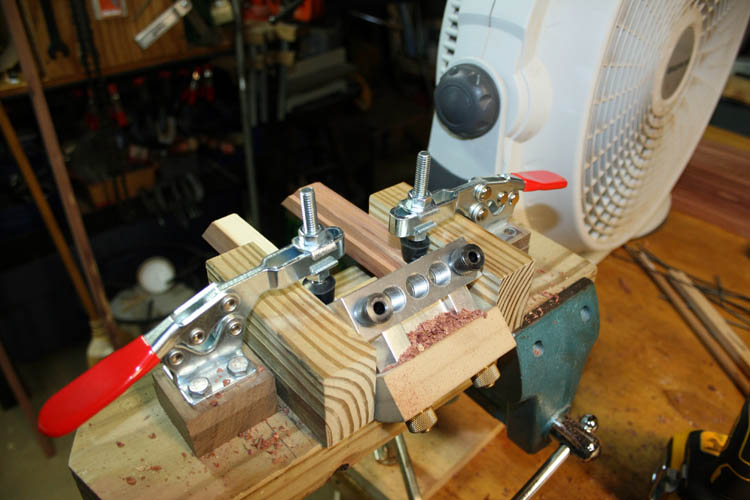
Once all the ends were
drilled for the 1/4 inch diameter wood dowels, it was time to start cutting
1 inch length dowels in half.
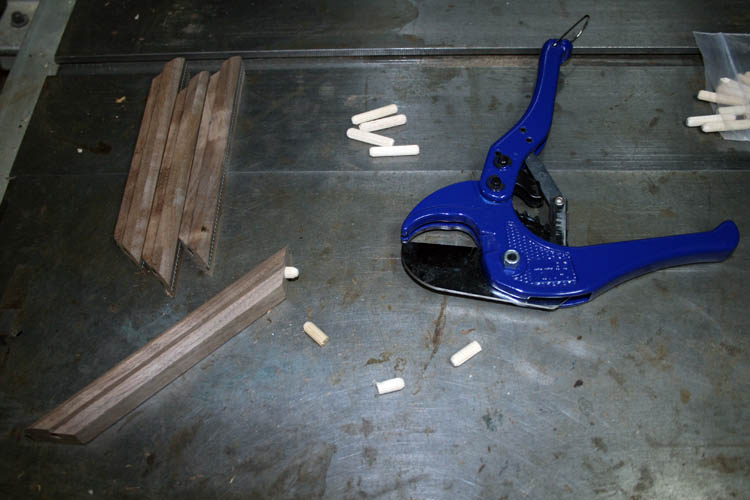
I use to cut the dowels to length using my band saw with a jig, but the light
bulb finally came on and used the above PVC cutter which works great!
Never to old to learn and "work smarter, not
harder."

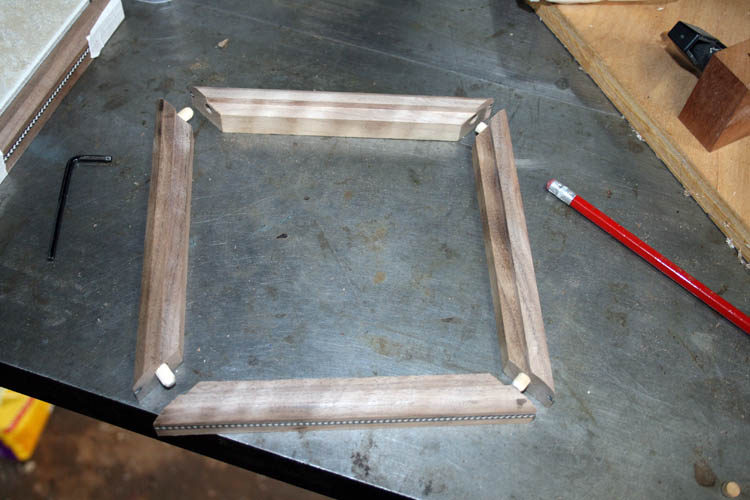
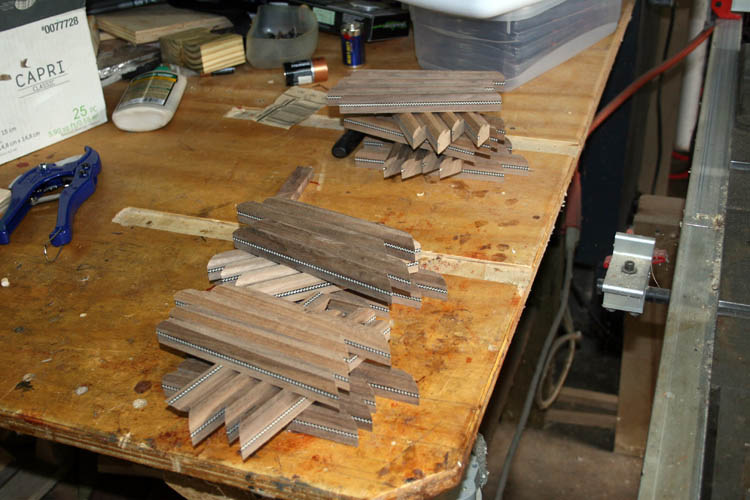
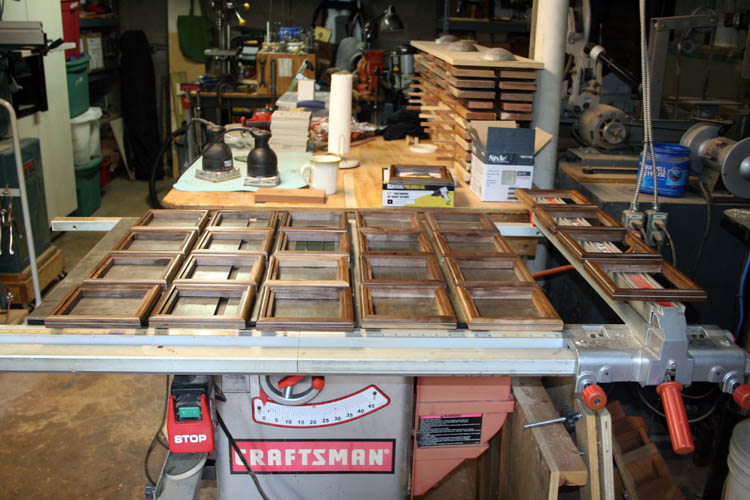
All thirteen (13) of the frames were dry fitted together using the 1/4 inch
diameter wood dowels.
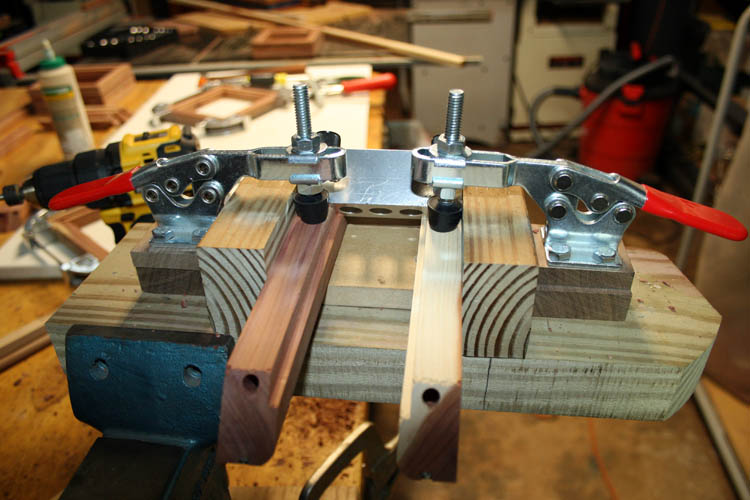
GLUE UP
I used what Titebond Ultimate III glue I
had on hand and finished up using Gorilla wood glue that was gifted to me.
I normally use only Titebond glue for my woodworking projects.
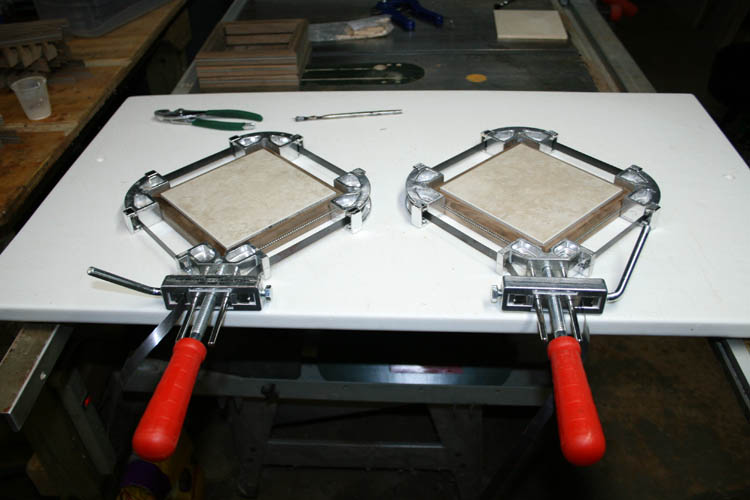
The forty-five (45) degree picture
frame
Merle band clamps are perfect for gluing forty-five (45) degree miter
joints together and have used them on various
woodworking
projects with great success!
I normally let my woodworking projects glue overnight, but the Titebond
III and Gorilla wood glue are fast setting and glued two units up in the
early morning and two units in the late evening to hurry the project along,
however there is no real hurry to have them done, but I get
antsy sometimes....grin if you
must! Using the above two glues mentioned, you can release the clamps
much sooner.
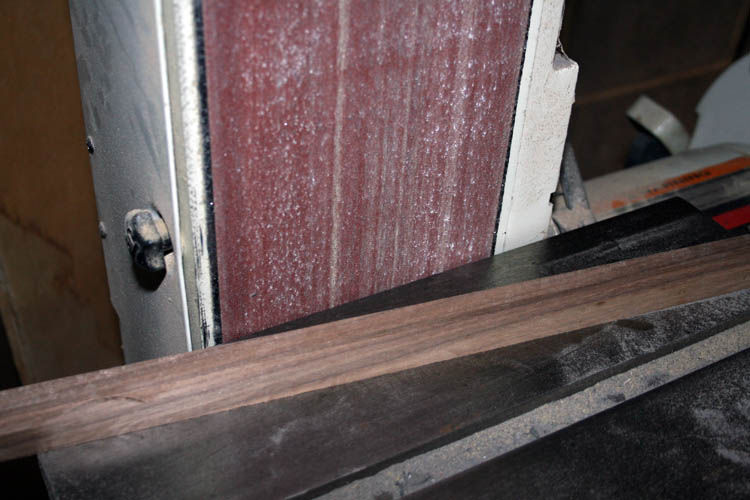
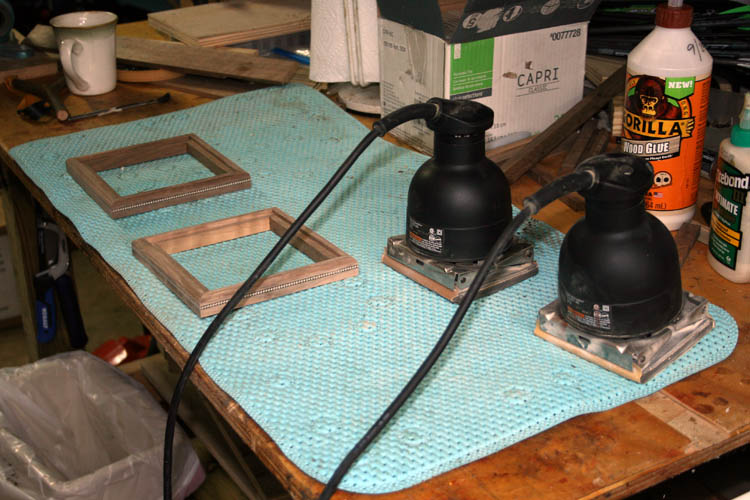
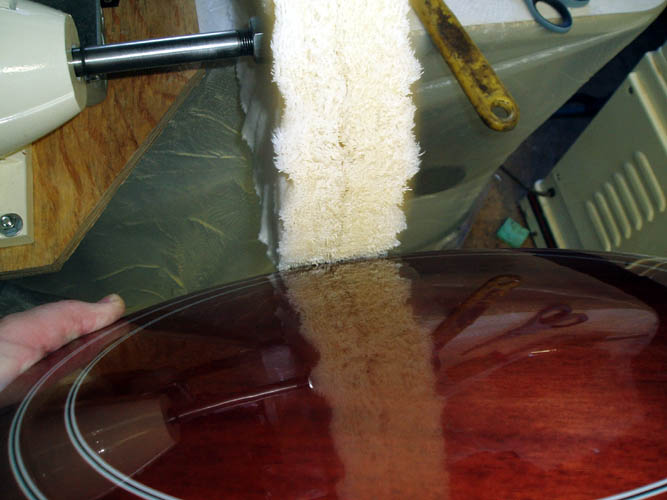
SANDING
Since this project will not
require a musical instrument grade type
finish, I plan to use a couple of my Porter
Cable Speed bloc hand sanders with 150 and 320 grit and finish off with a green Scotchbrite pad.
FINISHING
I have several cans of Deft clear lacquer and sanding sealer on hand and
will apply a coat of sanding sealer, wait 24 hours and buff the surface with
a Scotchbrite pad. I will then spray a couple coats of the Deft clear
lacquer.
I will have to catch the humidity level below 65 percent,
otherwise the lacquer will get a blush aka bluish haze or tint to it.
There is a spray on product that will remove the blush and also lacquer
retarder you can add to lacquer if using a spray gun, however that will not
be the case with the spray on lacquer.
These ceramic and wood pot holders will be SN 86 thru 98.
Web page created by Bill aka Mickey Porter on 10-31-2020.
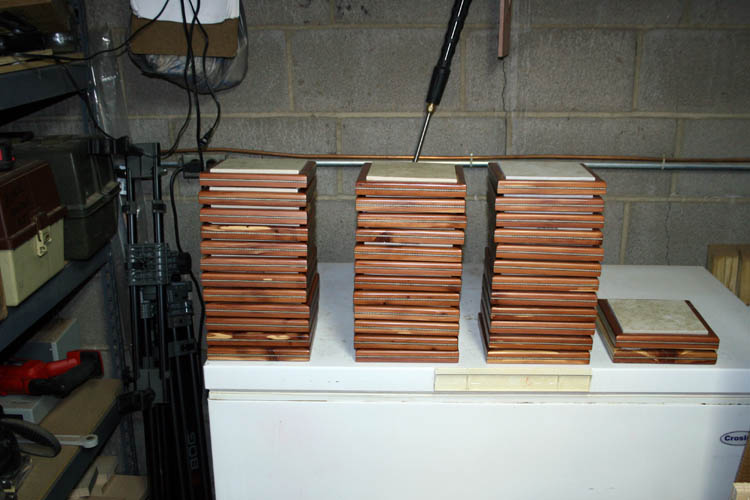
SPRAYING LACQUER
The weather was excellent on
11-06-2020 and sprayed a couple coats of Deft lacquer on the wood frames.
I decided not to spray any sanding sealer since the pores of the walnut was
not too open and sanded fairly smooth.
I used my rotary fixture that I use
for about all my small projects come finishing time. I bent a piece of
wire and suspended the frame from it and sprayed the first coat on all the
surfaces.
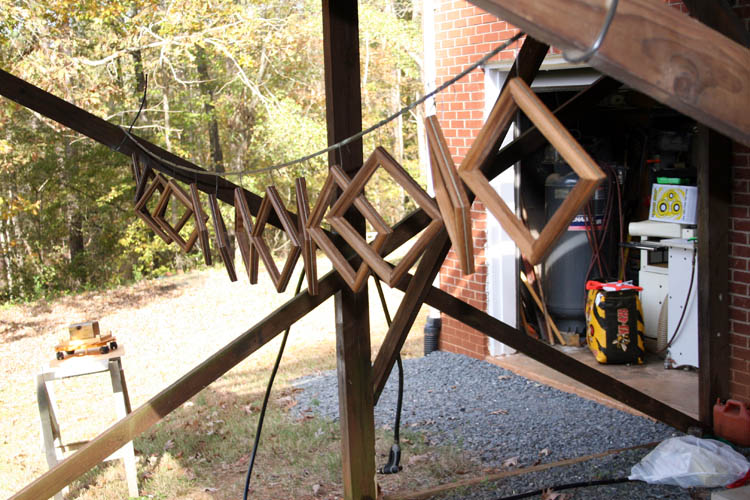
I hung the frames
under the deck to dry; pix below:
I
then used the rotary fixture for the second and final coat; spraying finish
only the top and side surfaces.
Web page updated by Bill aka Mickey Porter
on 11-06-2020.
MORE CERAMIC AND WOOD POT HOLDERS AKA
TRIVETS
With the year 2021 behind me and recovering from the
broken arm of
April 19, 2021, I have been very antsy wanting to do a few woodworking
projects and got 15 board feet each of black walnut and red cedar and have it
acclimating to my basement woodworking shop humidity, etc. The 4/4
rough boards were planed down at the mill where I purchased them from to
13/16".
After allowing the wood to rest for a while before processing.
TRIM FIXTURE
I trued up one edge on the table saw using a
straight sled aka trim fixture I made that will handle boards a little over
four (4) feet in length. The sled aka trim fixture saves a bunch of
time rather than using the jointer, of which many times you have to band saw
the board for a straight cut before going to the jointer.
Above is the trim fixture aka sled trimming curly maple boards for my
curly maple
coffee table. The carbide tipped rip saw blade leaves a
good finish to the edge of the board which doesn't require using the
jointer.
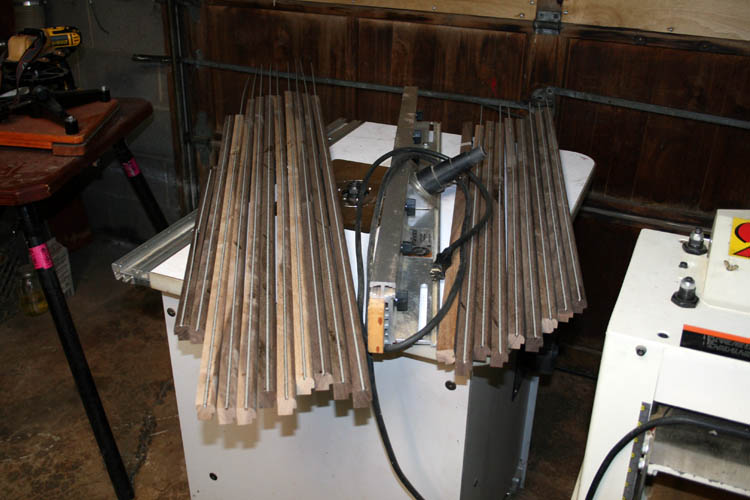
TABLE SAW CUTS
After each board
had one good edge, I set the table saw up for a 13/16 inch wide cut and
ripped what I wanted. I didn't do the entire 15 board feet, since I
will have to inventory the herringbone wood purfling I have on hand.
The above pix shows the black walnut cut to the proper width and also three
(3) router operations beginning with the slot for the .148 inch width
herringbone wood purfling that is about .100 inches in depth.
ROUTER TABLE OPERATIONS
The carbide tipped stacked slotting cutter works great leaving a smooth cut!
The adjustable feather boards on the router table top keeps the wood snug
against the "pivoting aka stick fence."
I
changed the slotting cutter bit to a 3/8 inch radius round over bit and
rounded over one edge of all pieces.
After
each piece had the slot for the herringbone wood purfling and round over, I changed router
bits to a 1/4 inch width slotting cutter.
I
used a piece of left over wood from the project from last year and got the
table height and width of cut adjustments set. This time I had the
wood piece orientated with the flat side down for better stability and used
the feather boards to keep the wood tight against the fence. This
orientation is a little more dangerous and you definitely have to use a push
stick and know where your fingers are! I would not recommend this type
routing unless you have years of experience using a router/table.
The other method cutting the slot orientated
with the cut on the bottom of the wood is the safest method!
This is about all I can do on this project until the Titebond Ultimate III
glue arrives. I had some gifted Gorilla glue, but it was two (2) years old
and my Titebond III glue was used up.
Web page updated by Bill aka Mickey
Porter on 01-19-2022.
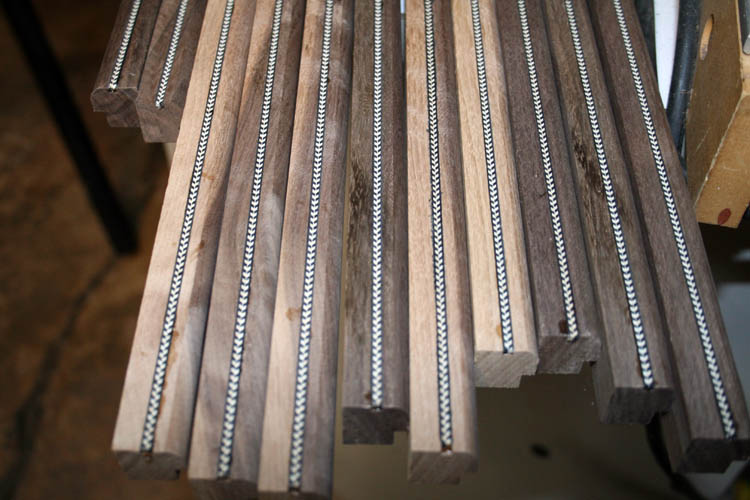
GLUED HERRINGBONE WOOD PURFLING
Today, I got antsy and wanted to glue the herringbone wood purfling in the
place and rounded up some Fletchtite glue that I use for gluing vanes and
feathers to arrow/bolt shafts which will work fine on wood/
I had only 35
full length pieces of the herringbone wood purfling and some left over short
pieces from this same project in 2020 and was enough to finish this run of
ceramic and wood pot holders aka trivets.
I
will give the glue twenty-four (24) hours to cure, although it sets up
within 30 minutes. After the glue cures, it will be time to change the
table saw blade to a crosscut and get my homemade forty-five degree miter
sled ready to go.
I don't think I will post any sequence pixs of the procedures
from here on out on this project since it would be redundant, however I
might post a few pixs when this project is nearing completion.
Just for curiosity, I looked up the current retail price
of the herringbone wood purfling and it is $ 9.00 per 31.5 inch length
strip, whereas when I purchased it from Erlangen, West Germany in the 1970s.
is was probably less than .50 cents per strip.
Web page updated by Bill
aka Mickey Porter on 01-20-2022.
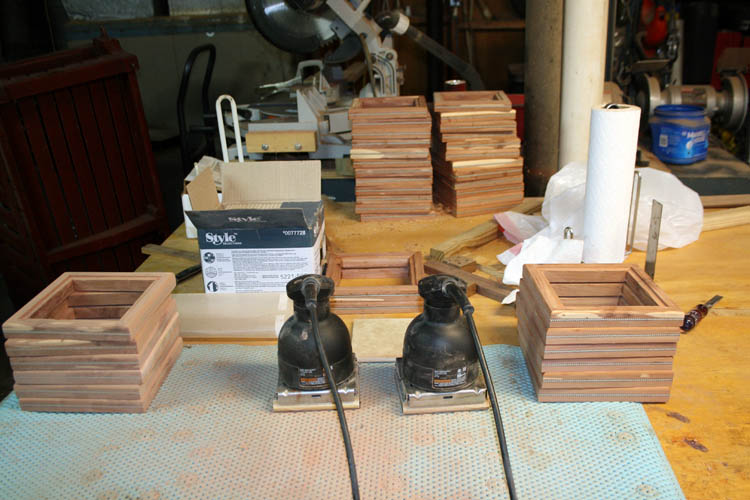
GLUED UP POT HOLDERS
AKA TRIVETS
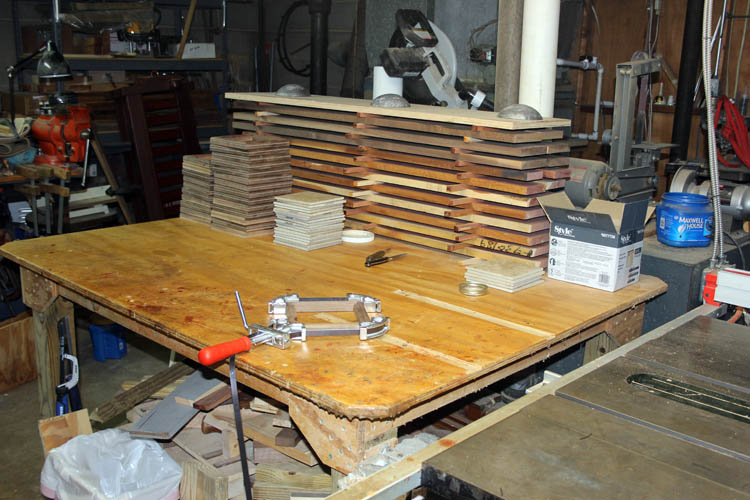
I
finished the glue up on twenty-five of the ceramic and wood pot holders aka
trivets this morning. I will start sanding the frames, but due to the
weather conditions, it will probably be early Spring before I start spraying
sanding sealer and then lacquer.
In the mean time, I plan to rip the cedar
boards to about 4 inches in width and then rip them vertically on the
bandsaw and see what they will clean up on the planer. I am
hoping for 5/16 inch in thickness or more, depending on how accurate and clean
the ripping on the band saw goes.
I haven't used the
Porter-Cable 12 inch 4216 Deluxe Dovetail
Jig since 2016 +- and will have to get the instruction manual out and take
some serious mental notes before tackling the
napkin holders I want to make after the
ceramic and wood pot holders.
I plan to get some white pine wood and do my
practice cuts using the Porter Cable dovetail jig before committing to the
red cedar wood.
Web page updated by Bill aka Mickey Porter on
01-28-2022.
BACK TO THE POT HOLDERS AKA TRIVETS
Today
is May 10, 2022 and finished spraying a coat of Deft sanding sealer and one
coat of Deft high gloss lacquer on all 25 of the pot holders. The
weather was in the mid 70s and humidity was around 36% today +- and a good
day for spraying the sanding sealer and the lacquer.
Next on the agenda is glue the ceramic tiles in place, sign and date and
this project will be completed. My bride wanted eight (8) of the
ceramic and wood pot holders aka trivets to give to her siblings for
Christmas gifts. The balance I will probably sell to help defray some
of the materials cost. I might keep a couple more for our kitchen!
Web
page updated by Bill aka Mickey Porter on 05-10-2022
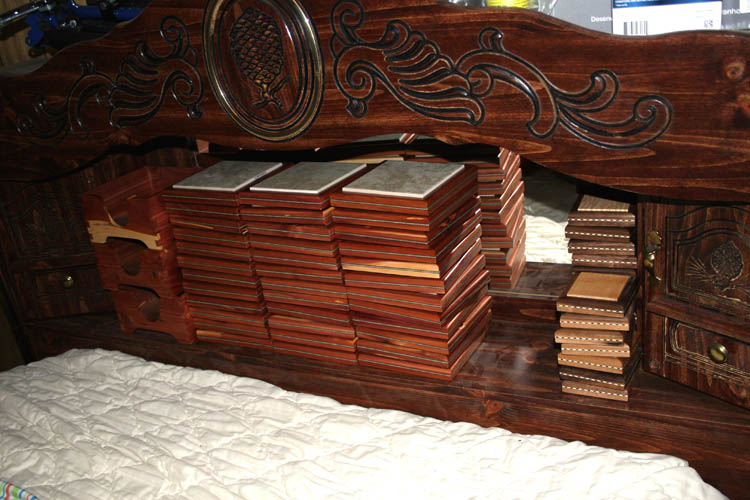
COMPLETED CERAMIC AND WOOD POT HOLDERS
I signed and dated the
completed ceramic and wood pot holders and also put small felt circular pads
in each corner on 05-13-2022.. These pot holders are SN 103
through SN 127.
My
friend Calvin Jones from West End, NC is coming by to pick up four (4) of
them and I have eight (8) reserved for my bride.
I plan to start another
batch of the napkin
holders in the near future, our Lord willing of course.
Web
page updated by Bill aka Mickey Porter on 05-13-2022.
MORE CERAMIC AND WOOD POT HOLDERS
It has
been over a year since I did any woodworking projects and decided to use up
what Eastern Red Cedar that I had on hand which was left over from the last
batch of turkey box calls that I made. The cedar wasn't wide enough to
use for other projects unless I glued a couple or more of the boards
together and I wasn't in the mood to do that, therefore ripping the boards
for the frame of pot holders aka trivets would be more to my liking, grin if
you must.
I surface planed the boards down to 7/8 inch thickness and then trued up on side using
a table saw sled instead of using the jointer which would require several
passes and only one pass using the sled.
I started ripping the boards to
width to 1 inch on 08-22-2023 and the next day set up the slotting cutter for
the herringbone wood purfling that I had purchased a year or more ago from
China, of which I couldn't get any from Germany due to my supplier no longer
handling it. I contacted the major manufacturer in Germany, but never heard back
from him. The Chinese stuff has some plastic fiber in it and I don't
like it as the original stuff I received from Germany. I purchased
that wood purfling from a supplier (Franz Dotzauer) in the early to middle 1970s back then it
was Erlangen, West Germany before the Berlin wall was torn down.
The wood
purfling herringbone pattern from China was about fourteen thousands
(.014) of an inch narrower than the original stuff I used before which was
around .156 inches in width and also the Chinese stuff was only .060 inches
in thickness, whereas the German wood purfling was much thicker. I had some difficulty getting the slotting cutter set to the
proper width and took several attempts adding and/or reducing thin spacers
until I got it right, practicing on scrap aka unallocated wood.
I
will count and see how many strips I cut from the cedar wood. I ruined
one strip setting up a router bit for the slot for the ceramic tile.
I believe I counted forty-six (46) strips.

Test glued a few strips of the Chinese made herringbone wood purfling after
slotting the entire lot of frame strips.
I
set the router table up for cutting the slot for the ceramic tile.
Some of the strips of cedar wood cut had a bow in it (vertical and
horizontal) and had to secure the wood
tightly to the table and fence of the router table while routing the slot
aka rabbit groove.
Once I finish cutting the rabbit aka slot for the tile
on the entire lot, I will set the router table up and use a 3/8 inch round
over bit for the top portion of the frame members.
Web page updated by
Bill aka Mickey Porter on 08-24-2023.
WOOD FRAME MEMBERS CUT TO LENGTH
I ran out of the Fletch-tite glue that I was using to glue in the
herringbone wood purfling and ordered more, however the Postal System sent
my package to Marshville, NC 28103 instead of Wadesboro, NC and they had to
re-route it back through Charlotte, NC and hopefully will get it delivered
on Monday 08-28-2023.
I have about fifteen (15) lengths of the frame material to glue in the
wood purfling and then cut to length. Each piece of material is a
little over 4 feet in length, +- and is 7/8 inch thickness and 1 inch in
width with the cut frame member length being 7.062 inches in length.
I
reset my
Dowelmax
dowel jig where the wood dowel is closer to the inside of the frame member
allowing me to use a longer dowel without having to cut the dowel to length. I
could have set the drill bit depth for using a 1 inch length wood dowels,
but have plenty of the 1.5 inch length dowels on hand and need to use them
up.
Below is pix of the jig I used on the last batch of
coasters before I changed the thickness
spacer.
JIGGING THE JIG
I found a much better way to use the Dowelmax right angle jig for drilling
the holes for the wood dowels and using two DeStaCo 225U type clamps to hold
the wood against the Dowelmax jig. This jig is dedicated just for making the
ceramic and wood pot holder frames and also the coaster frames. This
jig is using the original right angle jig made from composite wood material
from Dowelmax and I have the Dowelmax aluminum right angle jig as needed for
other applications.
With this jigging the jig, it is
a much faster operation in my humble opinion not having to use an auxiliary
clamping device. Here I am using the much thicker aluminum spacer to
position the drill bushings closer to the inside of the wood frame member.
I normally will drill the entire lot of frame members for the 1.5 inch
length x 1/4 inch diameter wood dowels, but elected to drill each frame
member as needed and will glue up six (6) frame member frames per day using
two of the Merle band clamps. The Titebond III glue sets up fairly
fast, but like to give it plenty of set/drying time before removing the
Merle band clamp.
Web page updated by Bill aka Mickey Porter on
08-27-2023.
FINISHED GLUING THE FRAME MEMBERS 09-08-2023
Today is September 8, 2023 and finished gluing up the frame members for the
ceramic and wood pot holders aka trivets.
I counted a total of seventy-four (74) frames and I believe I scrapped at
least 3 or 4 of the frame members because of improper fitting of the
corners. Either the frame member was drilled wrong for the 1/4 inch x
1 inch length dowels or the miter was not perfect enough. Even with
accurate jigs and fixtures, if you don't pay close attention to what you are
doing, you can easily ruin a part and that was my bad for sure.
With the
frame members glue up, I will start sanding a few of them along and apply a
couple coast of lacquer to them and add the ceramic tile. I also put
small felt pads on the base of them. I will start
out with Serial Number 341 on
this project.
Web page updated by Bill aka Mickey Porter on 09-08-2023.
FINISHED 36 OF THE TRIVETS AKA POT HOLDERS
I
finished 36 of the 74 frame members and will save the balance to finish
after our annual big game hunting season is over. SN 341 thru
SN 376.
THIRTY EIGHT (38) TRIVETS TO COMPLETE
I recently finished my
serving trays with brass handle
reinforcements on 03-07-2024 and decided to start on finishing the
thirty-eight (38) trivet frames which requires mostly sanding and finishing,
however there were a few frames that the ceramic tile would not fit, being
too tight and had to get the chisel out to get them to fit properly. I
first sanded the trivet frames using my 6 x 48 sanding belt station which
might be 100 grit and finished up with the two palm sanders using 150 and
220 grit sanding paper.
I finish sanded 12 of the 38 trivet frames and will spray lacquer on them
when the weather permits. There is too much humidity in the air today
and rain possible.
FINISHED THE TRIVETS
I finished the trivets 03-14-2024 and have plenty in stock for Christmas
gifts and might sell a few. These trivets are SN 396 thru SN
433.
Web page updated by Bill aka Mickey Porter on 09-15-2023, 03-08-2024 and
03-15-2024.
LEAVING ON A
SPIRITUAL NOTE
If you do not know Jesus Christ as your Lord and Savior, please take
this moment to accept him by Faith into your Life, whereby Salvation
will be attained.
Ephesians 2:8 - 2:9 8 For by grace are ye saved through
faith; and that not of yourselves: [it is] the gift of God: 9 Not of
works, lest any man should boast.
Hebrews 11:1 “Now faith is the substance of things hoped for,
the evidence of things not seen.”
Romans 10:17 “So then faith cometh by hearing, and hearing by
the word of God.”
Open this
link about faith in the King James
Bible.
Romans 10:9 “That if thou shalt confess with thy mouth the
Lord Jesus, and shalt believe in thine heart that God hath raised him
from the dead, thou shalt be saved.”
Open this
link of Bible Verses About Salvation,
King James Version Bible (KJV).
Hebrews 4:12 “For the word of God is quick, and powerful, and
sharper than any two edged sword, piercing even to the dividing asunder
of soul and spirit, and of the joints and marrow, and is a discerner of
the thoughts and intents of the heart.”
Romans 6:23 “For the wages of sin is death; but the gift of
God is eternal life through Jesus Christ our Lord.”
Romans 3:23 “For all have sinned, and come short of the glory
of God;”
Micah 6:8 “He hath shewed thee, O man, what is good; and what
doth the LORD require of thee, but to do justly, and to love mercy, and
to walk humbly with thy God?”
Philippians 4:13 "I can do all things through Christ which
strengtheneth me."


