INTRODUCTIONIt has been over
32 years since I built a banjo neck and/or completed
banjo based on the Gibson pre-war Mastertone design. I plan to use an
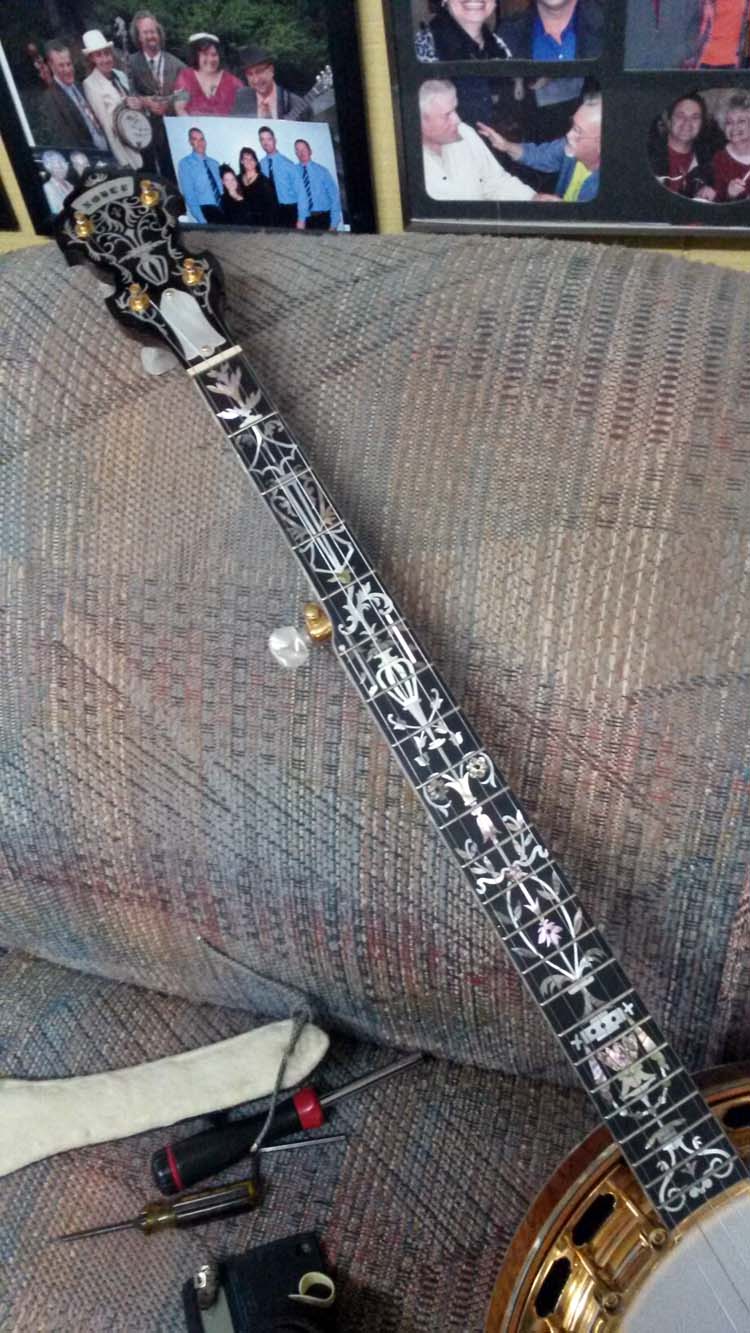
inlay pattern of mine titled
"Flaming Claw" that I used in the
mid 1970's. I have cut and inlaid only 14 of the Porter Flaming Claw
inlay patterns of which most were traded off and/or sold and several ones
had other
banjo makers Logos and/or Gibson re-inlaid into the peghead
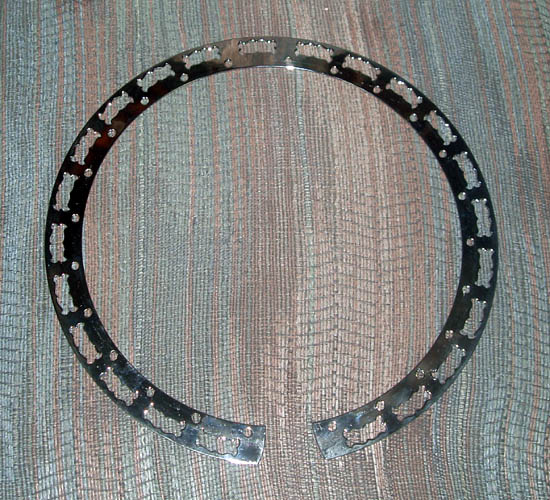
overlay; not done by yours truly! The only other original design part I will be using is a
plate
that I made as a pattern in the mid 1970s which has a unique tone hole
pattern of my own copyrighted design of which was destined to go on my own banjo with a logo
I used and the trademark PREWARTONE. The word PREWARTONE
is certainly not too original, but I though it had some merit and potential
when I had it copyrighted/trademarked, however it has taken on an ambiguous set of
values open to interpretation. This banjo with the special tone
holes in the flange will be one of a kind, serial number 001FC.
Most of what I will be doing will no doubt be done the hard way and
figuring out a few simple fixtures and jigs as I progress along and will be
by no means the only way to accomplish that particular element of the banjo
construction process and probably not the best way to do it either, but I
plan to use what materials I have at hand as much as possible without trying
to re-invent the wheel.
PERSONAL SAFETY AND LIABILITY ISSUES
My goal will be to keep
Safety paramount because hand and power tools can
do serious bodily harm and death if not used properly, therefore these pages
are solely for entertainment purposes only from a personal
liability standpoint. Please read the
Legal Stuff
page for additional information concerning liability issues before going
any further. Safety glasses and hearing protection is a must, although
I do forgo the hearing protection many times; my bad!
BACKGROUND INFORMATION
I did custom inlays for individuals after I
sold my mail order music business in 1979 up until around 1995 and built a
resophonic
guitar, square neck in 2000 using my Flaming Claw inlay pattern. Other
than a few custom patterns for my turkey calls, that has been the extent of
my musical instrument making and inlaying since 2000.
I will start this project without the benefit of my earlier specialized
tooling, fixtures and jigs and will have to rely on some prefabricated
parts; e.g., resonator, wood rim and of course the metal parts sans
the plate for the tube and plate flange mentioned earlier. I do
have a few templates left over and hopefully will be enough. I have
"pooled" the resources from several
BHO members and they have
graciously given sound advice. Decades ago, it was myself in the
"drivers seat", but I certainly don't mind asking for help and information
when needed.
The Porter method of cutting and inlaying pegheads and
fingerboards while in the "raw state" worked extremely well for me in a
semi-production environment before the advent of CNC routers driven
by the personal computer.
I have accumulated most of the major parts to build a
Masterclone type banjo based on the Gibson Mastertone design of
construction and believe it is still the best set-up for Bluegrass picking.
"To copy someone is one of the greatest forms of flattery" and I respect the
talented Gibson craftsmen of years gone by of which I equate the period 1925 to
1930 as their Renaissance Period.
I am going with the tube and plate flange against the main stream and do not
mind being a renegade at all, so let's begin.
Without an accurate motorized custom made
fret saw and fixture of which I have owned
two, I obtained a pre-slotted and profiled
ebony fingerboard and
ebony peghead to inlay.
The technique I use for cutting and inlaying mother of pearl is based
on the pre-war Gibson style of cutting and inlaying which in a nut shell has
the mother of pearl glued to a substrate material which in my case will be
1/4 inch thick x 3 x 8 inch lengths of balsa wood which has enough
strength to support the mother of pearl material while it is being cut.
Gibson and/or their pearl cutter vendors in pre-war days used a 1/10 inch thick rotary cut poplar veneer
as a substrate material and a few examples of Honduras mahogany has been
observed on a few fingerboard inlays which is rare. Gibson used mother of
pearl blanks that were around .040 +- inches thick and were much thinner after the
fingerboard and pegheads were sanded down and on some you could actually see
the backing substrate. Also, much of the mother of pearl Gibson's
contract vendors used was not the highest quality; e.g., without a
tremendous amount of iridescent color and some with fisheye patterns in the
mop which I personally classify as seconds. I will be using .050 thick
mother of pearl material which is a little harder to cut and also mother of
pearl that is very rich in rainbow colors without any "fisheye" material
of which I classify "fisheye" as seconds for my usage. Gibson
and/or their contract vendors used large
motorized marquetry saws that were made in Germany based on a jigsaw type
design with the blade running vertical and featured a much longer stroke
length because the blade was secured into a movable arm that looked like a
long giant tuning fork similar to the cheap hobby type scroll saws of late.
It is to my understanding some of their vendors used the foot pedal powered
scroll saw machines as well.
According to
Joe Spann,
Research Library Director and author of
SPANN'S GUIDE TO GIBSON 1902-1941, Gibson subcontracted most of their
pre-war inlays out to two different sources which are listed in his
excellent informative book. I have owned three (3) Rockwell/Delta motorized
scroll saws that have about a 24 inch throat depth and made a few modifications to
them by using self-centering upper and lower chucks that hold the blade and
increased the standard speed of the machine. However, my current
machine doesn't have the self-centering upper chuck, only the lower chuck is
self-centering. It allows for smoother
cuts, easier turns and cut backs but it does reduce jewelers saw blade life,
especially with the current manufactured jewelers saw blades. In the
late 60's and 70's, I used Vigor brand jewelers saw blades
only until they were no longer available; they were simply the best for high
speed operation. I will take a digital image at each stage along the
way and explain in detail what I am doing.
I started to break this project up into several different pages but the
antiquated program I am using to create this website of which my web hosting
service doesn't allow the extensions anymore from this program to upload changes and having to
use an auxiliary ftp program and manually selecting the required files and upload
each file which is time consuming. I expect when this thing crashes, I
will upgrade to a more modern web creating program! I have
Dreamweaver website creating program, but it has a steep learning curve and I certainly don't
entertain the thoughts of writing code either. Heck, the motherboard in
this pc is only 10 years old.....grin if you must!
After thinking about the download time for this page even with the
thumbnail pixs, I elected to break this project up into a separate page at
each stage of the process and so far it is working ok; a good many more
mouse clicks on my part as the
webmaster, but it should be worth it. I will start with a materials
and equipment list and add to the list at each stage of the construction
process.
MATERIALS AND EQUIPMENT LIST:
1 to 2 oz. .050 large
colored mother of pearl shell blanks
2 pcs. 1/4 x 3 x 8" Balsa
wood
Titebond Original glue
Scotch brand clear 1"
wide double stick tape
2 Vice-Grip SP11 "C"
clamps and 12 would be much better
3 Aluminum plates 3 x 8 x
3/16" or equivalent material
1 Aluminum plate 3/16"
thick same size as fingerboard profile plus 1" length each end
Inlay pattern
Masking tape, 2" and 1"
width
Scissors
X-Acto knife
3" utility knife or
paring knife
Jewelers saw blades size
6 and size 4; several dozen of each size
Scroll saw with 24" depth
Rockwell/Delta or equivalent
Dust Mask, dual canister
type
Opti-Visors if needed
Drill Press and/or hand
drill
1/16" dia. drill bit
Needle files (assorted
shapes)
Dremel Tool with 1/8"
collet
1" Abrasive disc with
1/8" arbor
Belt sander 1" width x
42" length with 80 grit aluminum oxide sanding belt
Palm sander 4" Porter
Cable or Rockwell type
Aluminum oxide and
automotive sheets sanding paper for above palm sander to 400 grit
Ebony peghead overlay
.060 to .090 thick x 3 x 7"
Ebony slotted fingerboard
Epoxy 330 or equivalent
Mohawk Blendal coloring
powder (ebony or rosewood)
Router table and router
Belt sander 4 inch or
larger width
1/4 inch diameter square
end solid carbide router bit or equivalent to match your truss rod
Band saw with 1/4 inch
wood cutting blade
Table Saw 10" or larger
Drill Press and assorted
drill bits
Jointer
Planer
Assorted wood files, rasp
Templates and plans
SUPPLIERS:
Stewart
MacDonald
First Quality
Musical Supply
Custom Pearl Inlay
Luthiers Mercantile
International
Cox Banjos
Rio Grande
Woodcraft Supply
Harbor Freight
Lowe's or Local
Hardware Store
LEAVING ON A
SPIRITUAL NOTE
If you do not know Jesus Christ as your Lord and Savior, please take this
moment to accept him by Faith into your Life, whereby Salvation will be
attained.
Ephesians 2:8 - 2:9 8 For by grace are ye saved through faith;
and that not of yourselves: [it is] the gift of God: 9 Not of works, lest
any man should boast.
Hebrews 11:1 “Now faith is the substance of things hoped for, the
evidence of things not seen.”
Romans 10:17 “So then faith cometh by hearing, and hearing by the
word of God.”
Open this
link about faith in the King James Bible.
Romans 10:9 “That if thou shalt confess with thy mouth the Lord
Jesus, and shalt believe in thine heart that God hath raised him from the
dead, thou shalt be saved.”
Open this
link of Bible Verses About Salvation, King
James Version Bible (KJV).
Hebrews 4:12 “For the word of God is quick, and powerful, and
sharper than any two edged sword, piercing even to the dividing asunder of
soul and spirit, and of the joints and marrow, and is a discerner of the
thoughts and intents of the heart.”
Romans 6:23 “For the wages of sin is death; but the gift of God is
eternal life through Jesus Christ our Lord.”
Romans 3:23 “For all have sinned, and come short of the glory of
God;”
Micah 6:8 “He hath shewed thee, O man, what is good; and what doth
the LORD require of thee, but to do justly, and to love mercy, and to walk
humbly with thy God?”
Philippians 4:13 "I can do all things through Christ which
strengtheneth me."
HOME PAGE


